If you’ve followed me for a while, you’ll know I spent years working as a cake decorator. Celebration cakes, wedding cakes, last-minute orders, early starts, buttercream everywhere. And through all of that, there was one vanilla cake recipe I came back to again and again.
I’ve shared bits and pieces of my baking over the years, but this is the first time I’m putting this one on the blog. All my customers commented on how amazing it tastes and the best thing is that it bakes up even layers so you don’t even need to trim the top.
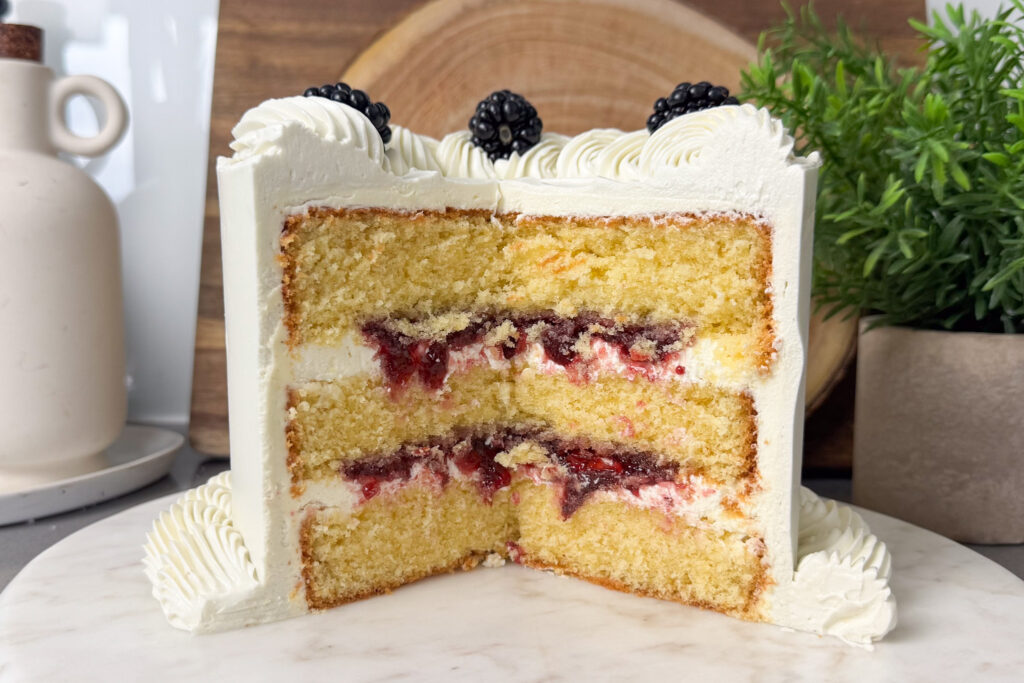
My go-to for these measurements is 3 6” layers as they bake up amazingly and give you layers that have the perfect thickness.
What Makes This Vanilla Cake Different
A lot of vanilla cake recipes go one of two ways: all butter (flavourful but can dry out quickly) or all oil (stays moist but lacks depth). This one sits right in the middle, and that balance is exactly what makes it so good.
- Butter gives you flavour and structure – you can’t replicate that richness with anything else
- Oil keeps the crumb soft and moist for days, not just the afternoon it was baked
- Sour cream adds a gentle richness and just enough tang to stop the whole thing tasting one-dimensional
The result is a bakery-style vanilla cake with a velvety, even crumb that’s sturdy enough to layer – even in tall, statement cakes – without ever feeling dry, dense, or heavy.
Ingredients
Makes three 6″ layers
- 300g caster sugar
- 80ml neutral oil (vegetable or sunflower)
- 200g unsalted butter, softened
- 5 eggs, at room temperature
- 1 tsp vanilla extract
- 60g sour cream
- 300g self-raising flour
Pro tip: Room temperature eggs and sour cream are super important here – they emulsify into the batter much more smoothly and are part of why you get that even, velvety crumb. Take them out of the fridge at least 30 minutes before you start.
Method
1. Prep your tins and oven
Preheat your oven to 190°C (170°C fan). Grease and line three 6″ cake tins. If you’re doing a layer cake, dividing the batter evenly between the tins is key – I always use a kitchen scale.
2. Cream the fats and sugar
Add the caster sugar, oil, and softened butter to a stand mixer fitted with the paddle attachment – or a large mixing bowl if you’re using a hand mixer. Beat on medium-high speed for a few minutes until the mixture looks noticeably lighter and fluffier.
This step is incredibly important. You’re building air into the batter here, and that air is what gives the finished cake its soft, open structure.
3. Add the vanilla and eggs
Add the Vanilla and then the eggs one at a time, mixing well after each addition. The mixture may look slightly split or curdled at this point but that’s completely normal. Keep going. It’ll come together once the flour goes in, and it won’t affect the finished cake at all.
4. Fold in the flour
Sift the self-raising flour directly over the bowl. Mix on the lowest speed, or fold in gently by hand, until most of the flour is just incorporated. The key word there is just – you want to keep as much air in the batter as possible, so don’t overwork it.
5. Finish with sour cream
Add the sour cream and fold or mix gently until the batter is smooth and evenly combined. It should look glossy and uniform at this stage.
6. Bake
Divide the batter evenly between your prepared tins and level the tops. Bake for 22–25 minutes, or until a skewer inserted into the centre comes out clean. If you’re baking all three tins at once, check them individually – ovens can be uneven and one layer might need an extra couple of minutes.
7. Let the cake cool completely
Leave the cakes in their tins for around 10 minutes, then carefully turn them out onto a wire rack to cool completely before filling or decorating. Don’t rush this part. A warm cake will melt buttercream and make decorating much harder than it needs to be.
8. Fill and Decorate
I always use my signature Vanilla buttercream as base filling and for covering the cake. It’s incredibly versatile and I have another blog post to give you 9 different flavour options that go with my base recipe.
Storing Your Vanilla Cake
This is one of those cakes that really improves after a short rest – which is a big part of why I relied on it so much when I was decorating professionally. I’d almost always bake the day before, let the sponges sit overnight in the fridge, and decorate the next morning.
Once baked and cooled, the sponges can be:
- Wrapped tightly and stored at room temperature for up to a day
- Refrigerated for up to two days
- Frozen (wrapped well in cling film, then foil) for up to a month
If your cake is already filled and frosted, keep it in an airtight container. It’ll hold well at room temperature for 2–3 days, or in the fridge for up to 5 days – just let it come back to room temperature before serving for the best texture.
What to Fill It With
This sponge is endlessly versatile. It holds fillings beautifully and pairs well with almost anything. A few combinations worth trying:
- Classic vanilla buttercream + raspberry jam – crowd-pleasing every single time
- Lemon curd + whipped cream – sharp, light, and perfect for spring and summer
- Chocolate ganache – for when you want a proper celebration cake moment
- Fresh strawberries + whipped cream – simple, seasonal, always a hit
Frequently Asked Questions
Can I use plain flour instead of self-raising?
Yes – add 2 teaspoons of baking powder per 150g of plain flour to get the same lift.
Can I make this as an 8″ cake?
Absolutely. This quantity works well as two 8″ layers. Add 5–8 extra minutes to the bake time and test with a skewer before pulling them out.
Why sour cream and not yoghurt?
Sour cream has a higher fat content, which adds more richness and a subtler tang. That said, full-fat Greek yoghurt is a good substitute if that’s what you have.
Can I make this ahead?
Yes, and I’d actively encourage it. The flavour deepens slightly overnight and the layers are easier to work with once fully rested. Bake the day before, wrap well, refrigerate, and decorate the next day.
My mixture looked curdled when I added the eggs – did I do something wrong?
Nope. It’s completely normal and sorts itself out once the flour is incorporated. Don’t panic, keep going.