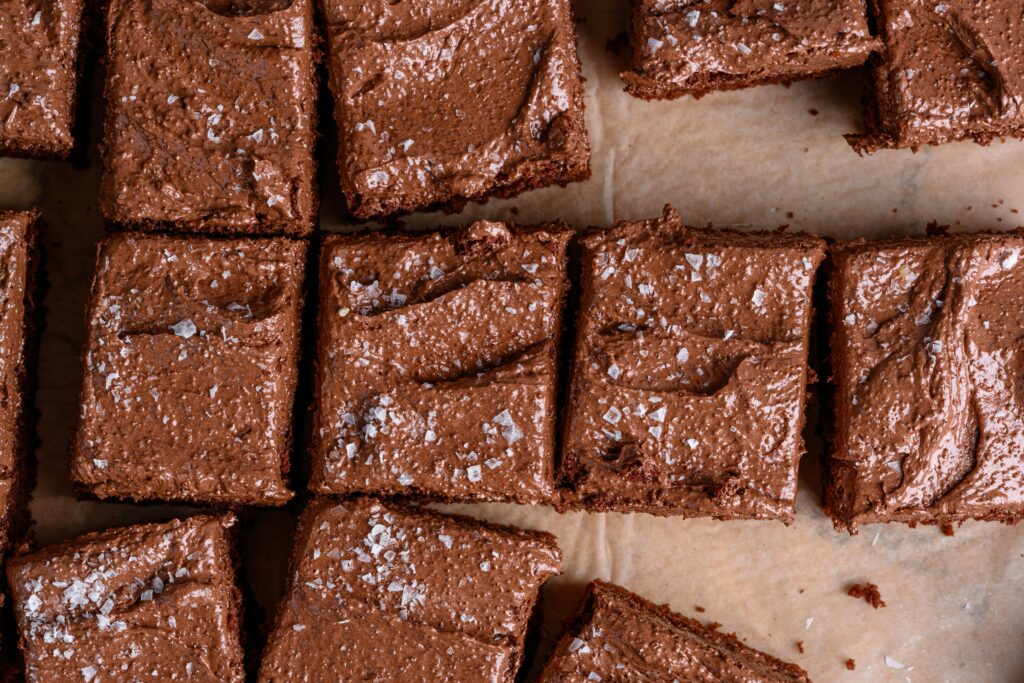
There is a specific kind of magic in a perfect brownie. I’m talking about that paper-thin, crackly top that shatters when you bite into it, giving way to a center so fudgy it’s almost like ganache.
As someone with a background in cake decorating here in London, I have tried sooo many brownies. Many viral London “gems” look beautiful on Instagram but fall flat on texture and taste. This recipe is the “Little Black Dress” of my kitchen – classic, reliable, and perfectly styled.
The Secret to the “Glossy” Top
The secret isn’t just the chocolate – it’s the eggs and sugar. By whisking them until they reach a “ribbon stage” (thick, pale, and voluminous), you’re creating a meringue-like structure that rises to the top in the oven. Don’t skip the whisking time!
Ingredients
180g Dark Chocolate: Use the good stuff (at least 70% cocoa). It balances the sugar.
180g Unsalted Butter: High-quality European butter for richness.
3 Large Eggs: Room temperature is best for volume.
250g Caster Sugar: For that perfect structure.
100g Plain Flour: Just enough to hold it together.
45g Cocoa Powder: Sifted, to avoid lumps.
- Optional (but divine): add a few dollops of your favourite jam or spread. I love using homemade berry compote.
The Signature Finish: Choose Your Aesthetic
A plain brownie is a snack; a topped brownie is an event. Depending on my mood, I finish these one of two ways. This is where the magic happens.
Option 1: The “Cloud” (White Chocolate)
For a high-contrast, minimalist look, I top the cooled brownies with white chocolate ganache.
- The Mix: 150g of white chocolate + 50ml double cream.
The Tip: Use a high-quality white chocolate with cocoa butter (not vegetable fat) so it snaps when you bite into it.
Option 2: The “Silk” (50% Cocoa Ganache)
If I want something indulgent and glossy, I opt for a 1:1 dark chocolate ganache instead
The Mix: 100g of 50% cocoa chocolate + 100ml double cream.
The Method: Heat the cream until just simmering, pour over the chopped chocolate, let it sit for 2 minutes, then stir until it’s a mirror-like silk.
The Look: Moody, rich, and incredibly satisfying.
Method
The Prep: Preheat your oven to 180°C (160°C Fan). Line a 9″ square baking tray with parchment paper.
Melt & Cool: Melt the butter and dark chocolate together (bain-marie or microwave). Set aside to cool to room temperature.
The “Mousse” Stage: Whisk the eggs and caster sugar together for 3–5 minutes until the mix doubles in volume and leaves a visible “trail” (the ribbon) for 2–3 seconds.
The Gentle Fold: Pour your cooled chocolate mixture over the egg mousse. Use a spatula to fold gently—don’t knock out that air!
Sift & Incorporate: Sift the cocoa powder and flour over the mix. Fold again until smooth.
The Bake: Pour into the tin and bake for 25–30 minutes. It should have a slight wobble in the center. Leave to cool completely in the tin.
The Final Touch: Once the brownie is stone cold, pour over your chosen white chocolate or 50% ganache. Let it set before slicing with a hot knife for those perfectly clean “Instagram” edges.
Baking Ahead & Storage
If you’re planning ahead, these actually taste better the next day once the flavours have had time to settle. You can keep them in an airtight container at room temperature for up to 4 days, or in the fridge if you prefer them extra chewy (especially with the ganache). They also freeze really well – just wrap the individual squares tightly in parchment and foil. Let me know if you make these.