Spanish Melon, Serrano Ham and Feta Salad
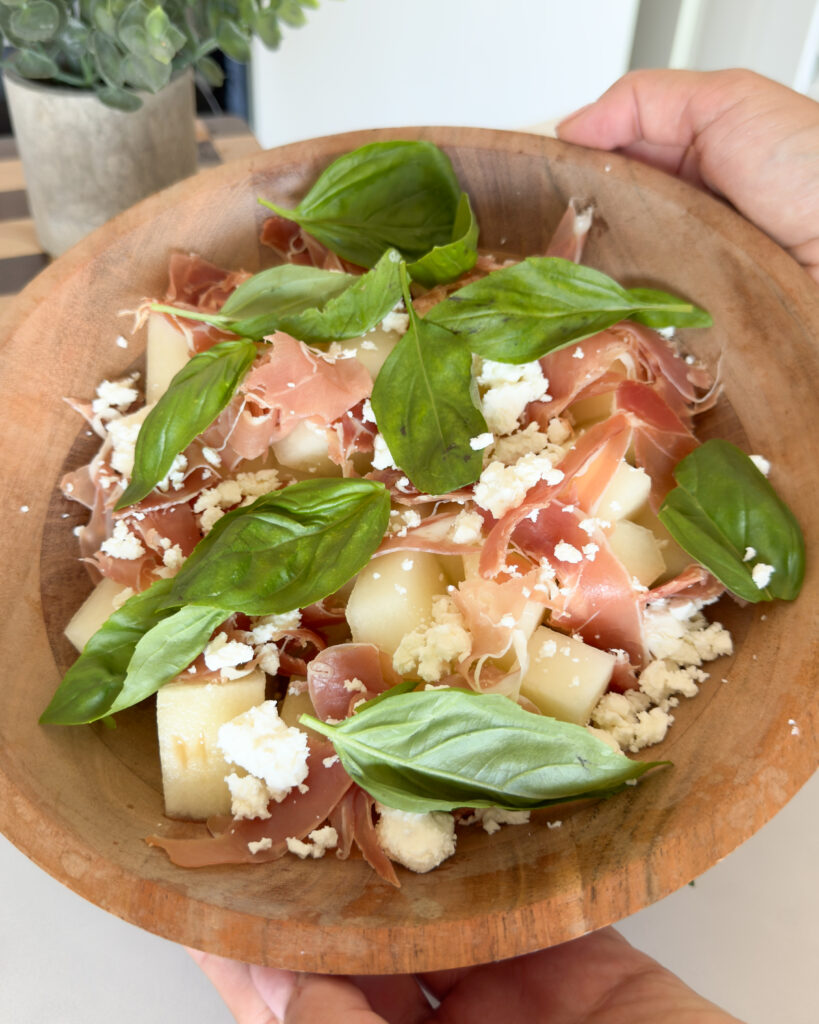
This is the salad I make when it’s too warm to stand near a stove and I want dinner to taste like the last night of a Spanish trip. Sweet melon, salty serrano ham, tangy feta and a scatter of basil – it comes together in the time it takes to set the table, and it tastes like far more thought went into it than actually did. Piel de Sapo melon is the one to look for if you can find it – it’s sweeter and less watery than a lot of other varieties, and it holds its shape well against the salt of the ham. If you can’t get hold of it, any ripe, sweet melon will do the job. Why This Recipe Works Sweet and salty is one of those pairings that always works, and this salad leans right into it. The melon brings the sweetness, the serrano ham brings the salt and a bit of chew, and the feta sits somewhere in between with its own tang. A honey and lemon dressing pulls the whole plate together, and fresh basil keeps it tasting bright rather than heavy. Ingredients ½ a Spanish Piel de Sapo melon, cut into small wedges (or around 4 cups cubed) 84-100g Jamón Serrano, thinly sliced 150g feta, crumbled A large handful (about 15g) fresh basil leaves 2 tbsp olive oil 1 tbsp cider or sherry vinegar 1 tsp honey A squeeze of fresh lemon juice Black pepper, to finish Method Arrange the melon. Lay the melon wedges or cubes across a large serving plate or wide bowl. Add the ham and feta. Drape the serrano ham slices over and around the melon, then scatter the crumbled feta on top. If you like a bit more texture, crisp the ham in a dry pan for a minute or two first and let it cool before adding. Make the dressing. Whisk together the olive oil, vinegar, honey and lemon juice until combined. Dress and finish. Drizzle the dressing over the salad, then scatter over the fresh basil leaves and a good grind of black pepper. Tips for the Best Results Chill the melon first. Cold melon against room-temperature ham and feta gives the best contrast – pop it in the fridge for an hour before serving if you have time. Tear the ham. Tearing rather than laying the slices flat gives a bit more texture and lets the dressing reach every layer. Season the melon lightly. A small pinch of salt on the melon before you add anything else brings out its sweetness. Use good olive oil. With so few ingredients, a decent extra virgin olive oil makes a real difference to the dressing. What to Serve With This Salad This works well as a starter before something grilled, or as part of a spread with crusty bread, olives and a chilled glass of something crisp. It’s an easy one to scale up for a table of friends on a warm evening. Storage This salad is best made and eaten straight away, as the melon releases juice once dressed. If you want to prep ahead, keep the melon, ham, feta and dressing separate and assemble just before serving.
Peach Burrata Salad with Hot Honey
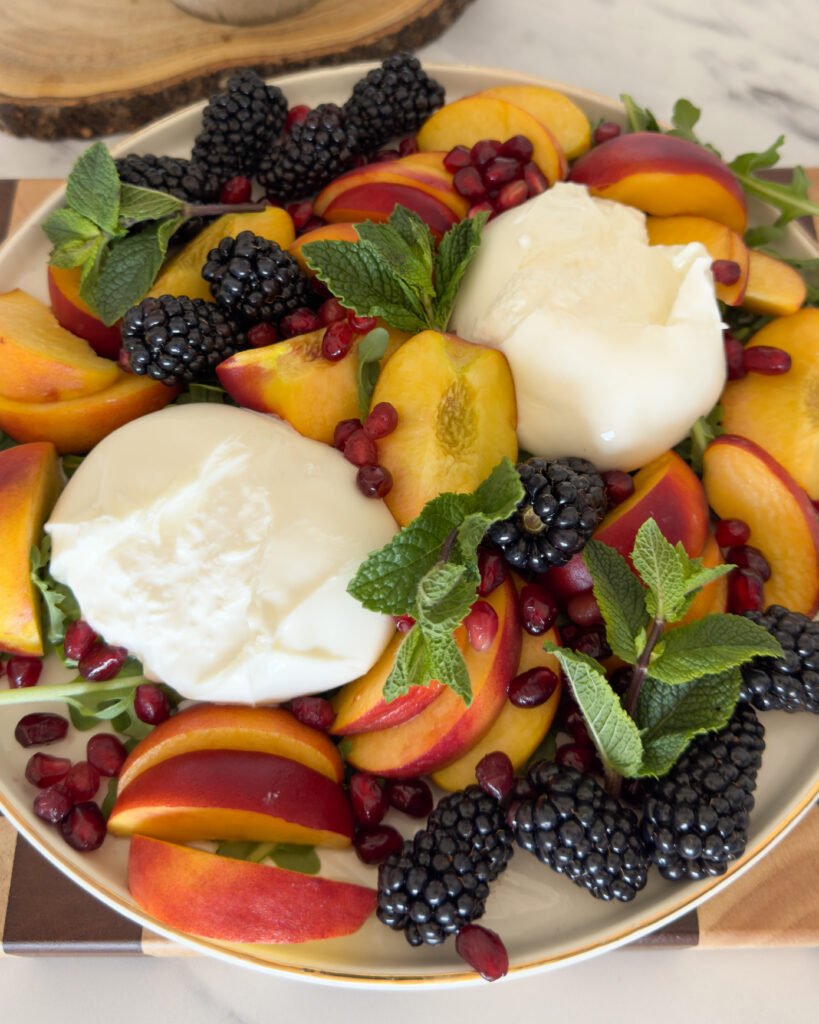
This is the dish I make when I want dinner to feel like a warm evening somewhere else, without turning the oven on. No cooking, five minutes of assembly, and a plate that looks like it belongs on holiday. Ripe peaches, torn burrata, a scatter of blackberries and pomegranate, and a drizzle of hot honey over the top – it’s become my go-to starter the moment peaches come into season, and just as good served as a light dinner with bread on the side. Why This Recipe Works Burrata does most of the work here – it’s rich and milky in a way that needs almost nothing added to it, just something sweet, something sharp and something with a bit of texture around it. Peaches and blackberries bring the sweetness, pomegranate adds a pop of acidity, and hot honey ties it all together with a little warmth at the end. Rocket underneath keeps it from feeling too rich. Ingredients 2 burrata 3 peaches, sliced A bed of rocket A handful of blackberries Pomegranate seeds, for topping Fresh mint leaves, for topping Hot honey, for drizzling Method Build the base. Arrange a bed of rocket across a large serving plate or shallow bowl. Layer the fruit. Scatter the sliced peaches and blackberries over the rocket. Add the burrata. Tear the burrata into pieces and nestle it among the fruit and leaves – torn burrata spreads its creamy centre further than a whole ball would, so you get a bit in every bite. Finish. Scatter over the pomegranate seeds and mint leaves, then drizzle generously with hot honey just before serving. Tips for the Best Results Use ripe peaches. This salad lives or dies on the fruit, so go for peaches that give slightly when pressed and smell sweet at the stem. Room temperature burrata. Take it out of the fridge 15-20 minutes before serving – cold burrata is far less creamy than one that’s had a chance to soften slightly. Tear, don’t slice. Tearing the burrata by hand gives you more surface area for the honey and juices to soak into. No hot honey? Warm regular honey with a small pinch of chilli flakes for a minute, and use that instead. What to Serve With Peach Burrata Salad This works well as a starter before something grilled – chicken, fish or a simple steak – or as a light dinner on its own with good bread to mop up the juices. It also holds up well on a summer table alongside other salads and cold cuts. Storage Best eaten straight away, while the burrata is soft and the peaches are at their juiciest. If you need to prep ahead, slice the fruit and store it covered in the fridge, but leave the burrata and honey until just before serving.
Crispy Air Fryer Parmesan Butter Potatoes
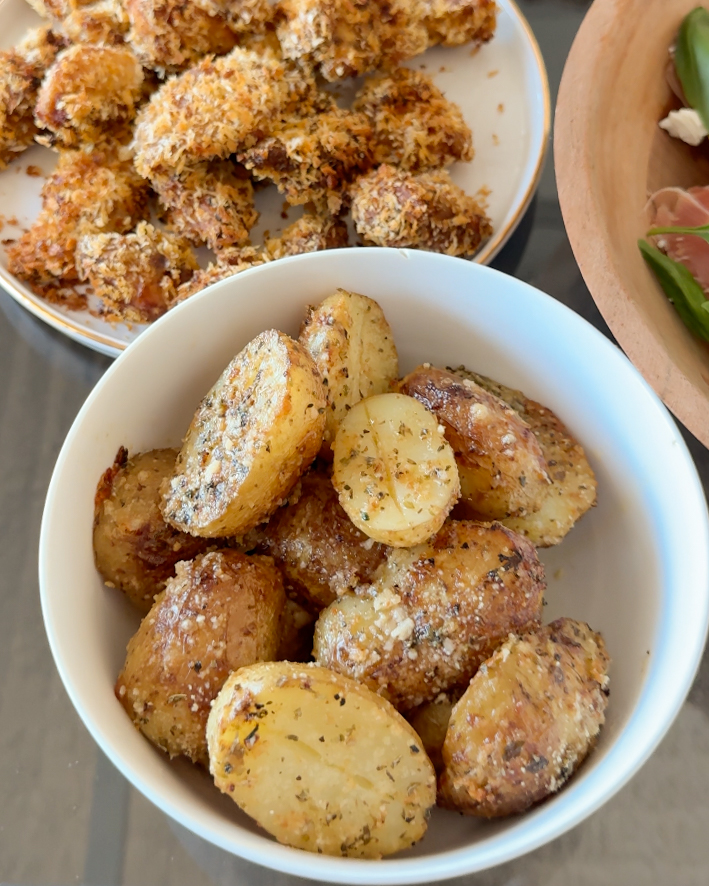
Some recipes are dinner. This one is a side dish that quietly steals the show. I’ve made a version of these more times than I can count now, and they’ve become the thing I reach for whenever a Sunday roast is on the cards – crisp at the edges, soft in the middle, and coated in enough butter and parmesan that nobody at the table is going to call them healthy. They’re not meant to be. That’s the whole point. The method could not be simpler – just baby potatoes cut in half, tossed in melted butter, a good amount of parmesan, and a scattering of rosemary, with the air fryer doing the rest. Why This Recipe Works Cutting the potatoes in half gives you a flat, cut side that goes deep golden and crisp against the base of the air fryer, while the rounded skin side stays soft underneath. Adding parmesan at two points during cooking means you end up with a layer that goes deep golden rather than just melting away. Ingredients 6-10 baby potatoes, halved 70g butter 75g parmesan, in total 1 tsp paprika 1 tsp garlic (fresh or granules) Salt and pepper Fresh rosemary Method Prepare the potatoes. Cut each baby potato in half. Melt the butter. Melt the 70g of butter in the microwave or a small saucepan. Season the air fryer base. Pour a little of the melted butter into the base of the air fryer, then scatter in some of the parmesan along with the paprika, garlic, salt and pepper – this builds a layer of flavour underneath the potatoes as they cook. Glaze and season. Toss the potatoes in the remaining melted butter (or a light oil spray), then place them cut-side down in the air fryer. First cook. Top with more parmesan and air fry at 200C for 20 minutes. Second cook. Turn the potatoes, add another layer of parmesan and the fresh rosemary, then air fry for a further 10 minutes at 200C, until deep golden and crisp at the edges. Tips for the Best Results Cut-side down. Placing the flat side against the base of the air fryer is what gives you that deep golden crust. Layer the parmesan. Adding it twice – once before cooking and again halfway through – gives a better crust than adding it all at once. Toss well in butter. Make sure every potato half is fully coated before it goes in, so the parmesan has something to cling to. Add rosemary early if you can. It crisps up nicely alongside the potatoes; if it goes in late, it will still taste good, just slightly less crisp. Tips for the Best Results Thighs, not breast. Chicken thighs stay juicy under high heat, which matters more in an air fryer than an oven. Breast will dry out faster. Don’t skip the rest. Even 30 minutes of marinating time makes a real difference to how much flavour the chicken picks up. Compact skewering. Push the pieces close together on the skewer so they hold their moisture and cook evenly, rather than drying out at the edges. No Ninja Crispi? This works in any air fryer – just keep an eye on timing, as models vary slightly.
Air Fryer Lemon Garlic Chicken Skewers
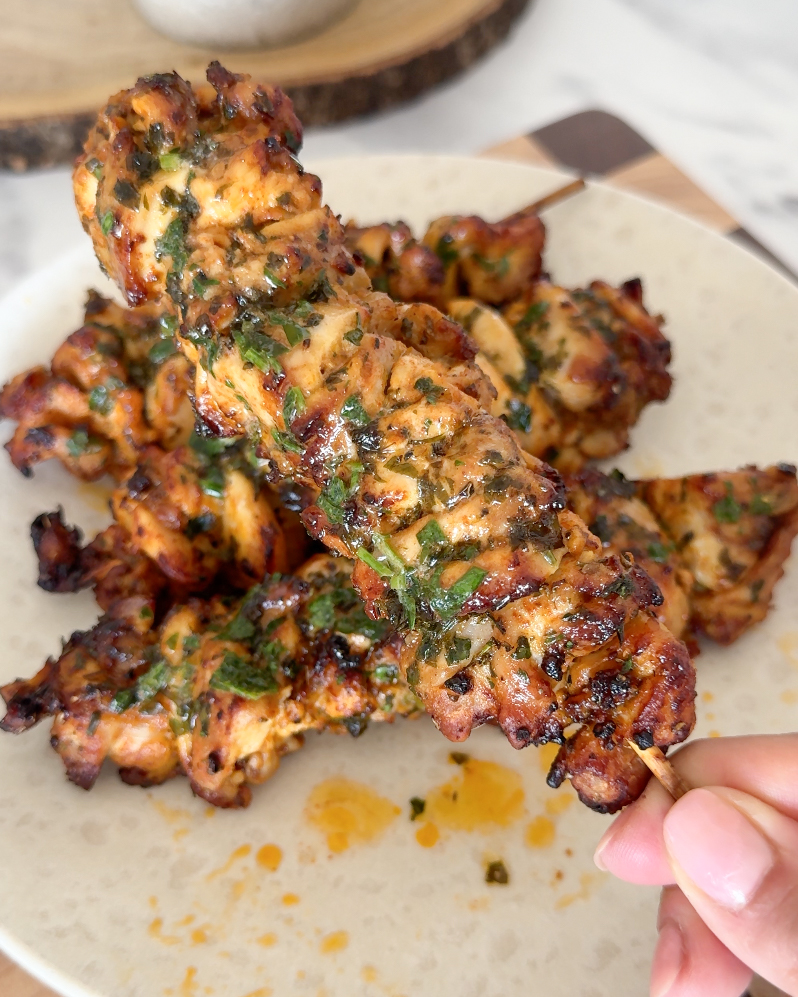
These lemon garlic chicken skewers have earned a permanent spot in my weekly dinner rotation, and once you’ve made them, you’ll understand why. The marinade is bright with lemon and garlic, the chicken comes out of the Ninja Crispi charred at the edges and cooked through in the centre, and the whole thing gets finished with a lemon parsley butter brushed on while it’s still hot. It’s the sort of dinner that tastes like far more effort went in than actually did. Why This Recipe Works This is a simple recipe, and that’s exactly the point. A short ingredients list, one bowl for the marinade, and an air fryer doing most of the work. The lemon and oregano give it a bit of a Mediterranean lean, while the butter finish takes it somewhere richer. It’s quick enough for a weeknight and good enough that I’ve served it to friends without a second thought. Ingredients For the chicken: Zest of 1 lemon (just the bright yellow skin, none of the white pith) 2 tbsp lemon juice 1 tbsp mayonnaise 1 tbsp olive oil 2 large garlic cloves, finely grated 1½ tsp dried oregano ¾ tsp paprika ¾ tsp salt ½ tsp black pepper 640g boneless, skinless chicken thighs, sliced into bite-sized pieces For the lemon parsley butter: 75g butter, softened 1 tbsp fresh parsley, finely chopped 2 tsp lemon juice ¼ tsp paprika ¼ tsp black pepper ⅛ tsp salt, or to taste Method Make the marinade. In a medium bowl, whisk together the lemon zest, lemon juice, mayonnaise, olive oil, garlic, oregano, paprika, salt and pepper. Stir in the chicken until every piece is coated. Cover and leave to marinate for 30 minutes at room temperature. Skewer and cook. Thread the chicken onto four skewers, leaving a small gap at each end so the pieces cook evenly. Place them in the Ninja Crispi and brush over any leftover marinade from the bowl. Cook for 13 minutes at 200C/400F. While that’s going, mix together all the butter ingredients in a small bowl. Baste and finish. After 13 minutes, flip the skewers and brush over roughly a quarter of the lemon butter. Cook for a further minute, flip again, brush with another quarter of the butter, then cook for one final minute, or until lightly charred and cooked through (internal temperature should reach at least 74C/165F). Serve. Remove the skewers and brush over the remaining lemon butter while they’re still hot – this is where most of the flavour lands, so don’t hold back. A squeeze of extra lemon juice at the end works well if you like things sharper. Tips for the Best Results Thighs, not breast. Chicken thighs stay juicy under high heat, which matters more in an air fryer than an oven. Breast will dry out faster. Don’t skip the rest. Even 30 minutes of marinating time makes a real difference to how much flavour the chicken picks up. Compact skewering. Push the pieces close together on the skewer so they hold their moisture and cook evenly, rather than drying out at the edges. No Ninja Crispi? This works in any air fryer – just keep an eye on timing, as models vary slightly. What to Serve With Chicken Skewers I usually go simple: a herby rice or a flatbread, a crisp green salad, and a spoonful of yoghurt or tzatziki on the side. Leftovers are good cold the next day too, sliced into a wrap with salad and a squeeze of lemon. Storage Keep leftovers in an airtight container in the fridge for up to 3 days. Reheat gently in the air fryer for a few minutes to bring back some of the char, rather than the microwave, which tends to leave the chicken a bit rubbery.
No Churn Vanilla Ice Cream Bars – the Viral Recipe You Need This Summer
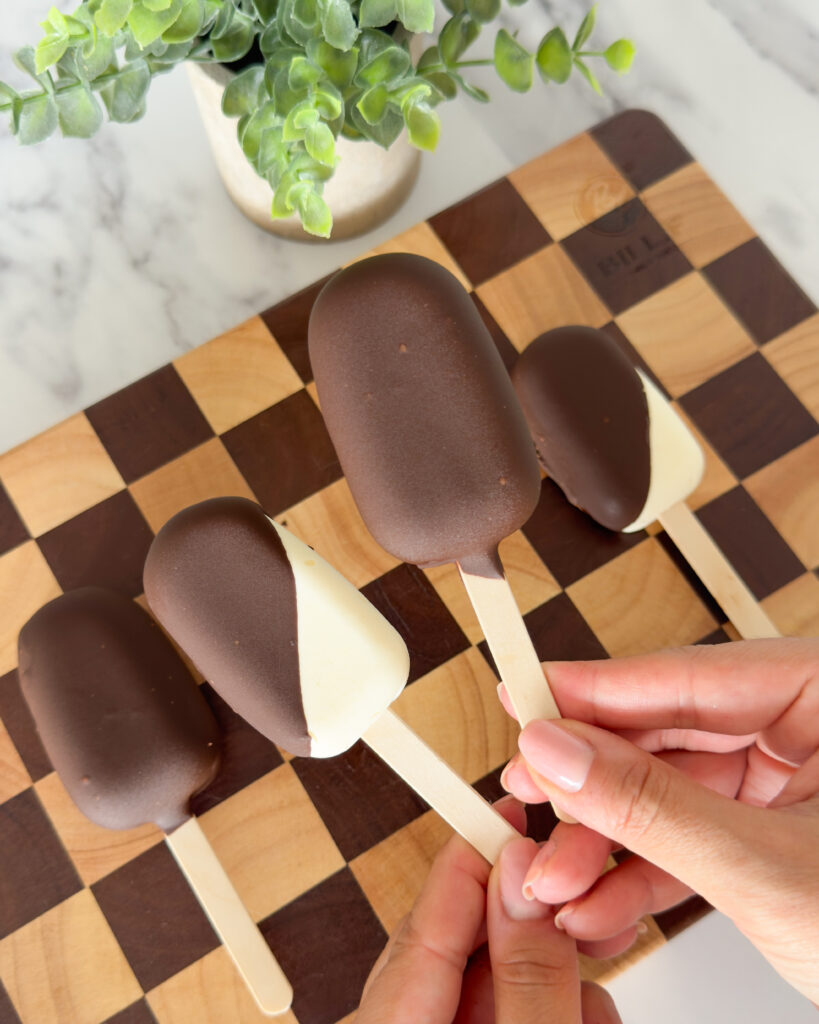
Can we talk about no churn ice cream for a second? Because I genuinely cannot believe it took me this long to get on board. Three ingredients, no ice cream machine, no churning – just the creamiest, most scoopable vanilla ice cream you’ve ever made, set in cakesicle moulds and dipped in dark chocolate for a result that looks like something from a very good ice cream shop and costs a fraction of the price. This is the recipe that has been all over my feed this year, and for very good reason. The base is as simple as it gets — double cream, sweetened condensed milk, and vanilla — but the result is rich, smooth, and genuinely impressive. Set it in ice cream bar moulds, freeze until solid, unmould, dip in dark chocolate, and you’re done. The chocolate sets almost immediately on contact with the frozen ice cream, giving you that satisfying snap with every bite. The best part? They keep in the freezer for weeks, which means you can make a batch on a Sunday and pull one out whenever you need it. Summer sorted. Why No Churn Ice Cream Actually Works Traditional ice cream needs churning to break up ice crystals as it freezes, which is what gives it that smooth, creamy texture. No churn ice cream gets around this entirely by using whipped double cream and sweetened condensed milk — the whipped cream adds air and lightness, while the condensed milk provides sweetness and a high sugar content that prevents large ice crystals from forming. The result is scoopable, creamy, and smooth without a machine in sight. It is also, frankly, one of the most versatile base recipes you’ll find. The vanilla version is the classic starting point, but once you’ve made it once you’ll start seeing flavour possibilities everywhere. More on that below. Why Set Them in Ice Cream Bar Moulds? Cakesicle moulds — the oval, bar-shaped moulds designed for cake pops — are the secret weapon here. They give you that classic ice cream bar shape, make the dipping step infinitely easier than trying to dip a scoop, and mean every portion is perfectly sized. No slicing, no mess, no uneven scoops. The moulds come out of the freezer, the bars pop out cleanly after a couple of hours, and from there it’s just a straight dip in melted dark chocolate and back into the freezer to set. The whole process from start to finish is about 15 minutes of actual hands-on time. The freezer does the rest. On the Chocolate I use dark chocolate from The Cake Decorating Company for dipping — it melts smoothly, sets with a clean snap, and has a deep, slightly bitter flavour that cuts through the sweetness of the ice cream beautifully. Good quality chocolate really does make a difference here, because it’s the only other flavour in the recipe. Don’t use chocolate chips if you can avoid it — they’re designed not to melt fully and the coating won’t be as smooth. Melt the chocolate slowly in a bowl set over barely simmering water, or in the microwave in 20-second bursts, stirring between each one. Let it cool slightly before dipping — chocolate that’s too hot will melt the surface of the ice cream bar before it has a chance to set. No Churn Vanilla Ice Cream Bars Makes 6–8 bars · Prep: 15 mins · Freeze: 1.5–2 hours Ingredients 300ml double cream, cold ½ can (approximately 200g) sweetened condensed milk 1 tsp vanilla extract Good quality dark chocolate, for dipping Equipment Cakesicle moulds (oval bar-shaped moulds) Ice lolly sticks or cakesicle sticks Piping bag or spoon for filling Method The Ice Cream Base Pour the cold double cream into a large bowl or stand mixer fitted with the whisk attachment. Whip on medium-high speed until soft peaks form — the cream should hold its shape but still have a slight wobble. Don’t take it to stiff peaks or the texture will be too dense. Add the sweetened condensed milk and vanilla extract. Fold together gently with a spatula until just combined and no streaks remain. Be careful not to knock the air out — this is what keeps the ice cream light and creamy. Filling the Moulds Spoon or pipe the ice cream mixture into the cakesicle moulds, filling each one to the top. Tap the moulds gently on the worktop to remove any air bubbles and smooth the surface with a small palette knife or the back of a spoon. Insert a cakesicle or ice lolly stick into each one, pressing down gently until it sits in the centre of the bar. Place the moulds on a flat tray and transfer to the freezer. Freeze for a minimum of 1.5 hours — 2 hours is ideal for a fully set bar that unmoulds cleanly. Unmoulding and Dipping Remove the moulds from the freezer. Gently flex the mould to release each bar, then pull out by the stick. Work quickly — the bars will start to soften as soon as they leave the freezer. Melt the dark chocolate slowly in a heatproof bowl over barely simmering water, or in the microwave in 20-second bursts, stirring between each one. Allow to cool slightly. Pour the melted chocolate into a deep, narrow container — a tall glass or a deep mug works well. Dip each ice cream bar into the chocolate, allow the excess to drip off for a few seconds, then place on a lined tray. The chocolate will set almost immediately on contact with the frozen bar. Return to the freezer for 10 minutes to firm up fully before serving or storing. Notes & Tips Cold cream whips faster and gives you a better texture — take it straight from the fridge and don’t let it sit out before whipping. Don’t overmix once the condensed milk is added. Fold gently and stop as soon as it’s combined — overmixing deflates the cream and gives you
White Chocolate & Raspberry Cookies – Soft, Chewy and Perfect for Summer

If you only bake one thing this summer, make it these. White chocolate and raspberry is one of those combinations that just works – sweet, sharp, a little indulgent and unmistakably seasonal. These cookies are thick and chewy with golden edges, pools of melted white chocolate throughout the dough, pockets of intense freeze-dried raspberry and a white chocolate ganache finish topped with fresh berries. They look like they came from a bakery. They take under two hours start to finish. And they are very hard to stop eating. Why White Chocolate and Raspberry? White chocolate and raspberry is a classic summer pairing for good reason. The sweetness of white chocolate needs something sharp to balance it – and raspberry, with its natural tartness and vivid colour, does exactly that. Freeze-dried raspberries in particular are one of the best things you can add to cookie dough. Unlike fresh fruit, they hold their shape during baking, don’t add excess moisture and deliver an intense, concentrated raspberry flavour in every bite. This cookie works year-round but feels particularly at home in summer – the colour alone, flecked pink and cream, is enough to make them a talking point on any table. What Makes These Cookies So Good A few deliberate choices make these cookies stand out from a standard drop cookie. Melted butter rather than creamed butter gives a denser, chewier texture. There’s no air whipped in, which means these cookies spread slightly more and set with a fudgy, almost brownie-like interior. Two sugars – light brown and caster – do different jobs. Brown sugar adds depth and a slight caramel quality; caster sugar helps the edges crisp up just enough to contrast with the soft centre. Cornflour is a small addition with a big impact. It tenderises the crumb and helps the cookies stay soft for days rather than drying out by the following morning. Chilling the dough is the step that makes the most difference to the final result. A 45–60 minute rest in the fridge allows the flour to hydrate, the butter to firm back up and the flavours to deepen. It also means the cookies hold their shape better in the oven rather than spreading too thin. Chocolate chunks rather than chips – roughly chopping the white chocolate yourself creates a mix of larger chunks and smaller shards that melt at different rates throughout the cookie. Some pieces stay intact and gooey, some melt into the dough entirely. The result is far more interesting than uniform chips. The Ingredients White Chocolate The quality of white chocolate matters more in cookies than in almost any other bake, because the flavour is right at the front. A good white chocolate is creamy, vanilla-forward and not excessively sweet. The Cake Decorating Company’s Choctastique white chocolate is worth using here – it melts beautifully and has a clean, rich flavour that holds up against the raspberry. Roughly chop the chocolate so you get a mix of larger chunks and finer pieces. The larger pieces give you those dramatic visible pools of chocolate; the smaller pieces melt into the dough and flavour it throughout. Freeze-Dried Raspberries Freeze-dried raspberries are one of the most useful ingredients in baking and, if you haven’t used them before, they will quickly become a staple. They have all the flavour of fresh raspberries with none of the moisture – which means they can go straight into cookie dough without making it wet or causing the cookies to spread unevenly. Lightly crush them before folding through the dough so you get a mix of larger pieces and finer dust – the dust tints the dough the most beautiful pale pink. Vanilla Extract A good vanilla extract makes a noticeable difference to the flavour of the base dough. The Cake Decorating Company vanilla extract is excellent here – use the full two teaspoons for a dough that smells as good as it tastes. The Recipe Makes: approximately 12–14 large cookies Prep time: 15 minutes Chill time: 45–60 minutes Bake time: 11–13 minutes Ingredients 170g unsalted butter, melted and cooled slightly 170g light brown sugar 60g caster sugar 2 medium eggs 2 tsp vanilla extract 260g plain flour 15g cornflour ½ tsp baking powder ½ tsp bicarbonate of soda ½ tsp fine sea salt 200g white chocolate, roughly chopped (a mix of chunks and smaller pieces) 18–20g freeze-dried raspberries, lightly crushed For the topping: Extra white chocolate chunks and freeze-dried raspberry pieces (to press into the tops before baking) White chocolate ganache Fresh raspberries Method 1. Make the dough. Whisk together the melted butter and both sugars until glossy and well combined. Add the eggs and vanilla, whisking until smooth. In a separate bowl, combine the flour, cornflour, baking powder, bicarbonate of soda and salt. Fold the dry ingredients into the wet mixture until only a few streaks of flour remain. 2. Add the chocolate and raspberries. Stir through the chopped white chocolate, then gently fold in most of the freeze-dried raspberries, saving a small handful for pressing into the tops before baking. 3. Chill. Cover the dough and refrigerate for 45–60 minutes. Don’t skip this step – it makes a significant difference to the texture and shape of the finished cookies. 4. Portion and top. Preheat your oven to 180°C (160°C fan). Scoop the dough into balls of approximately 70g each and place on lined baking trays, leaving plenty of space between them. Press a few extra white chocolate chunks and freeze-dried raspberry pieces into the tops of each ball. 5. Bake. Bake for 11–13 minutes, until the edges are lightly golden and the centres still look slightly underbaked. This is exactly right – they will continue to set as they cool on the tray. Leave on the tray for 10 minutes before transferring to a wire rack. 6. Finish with ganache and fresh raspberries. Once completely cool, spoon or drizzle white chocolate ganache over each cookie and top with a fresh raspberry or two. Assembling the Cake This is
Chocolate, Pistachio & Raspberry Cake – The Ultimate Euro Summer Showstopper
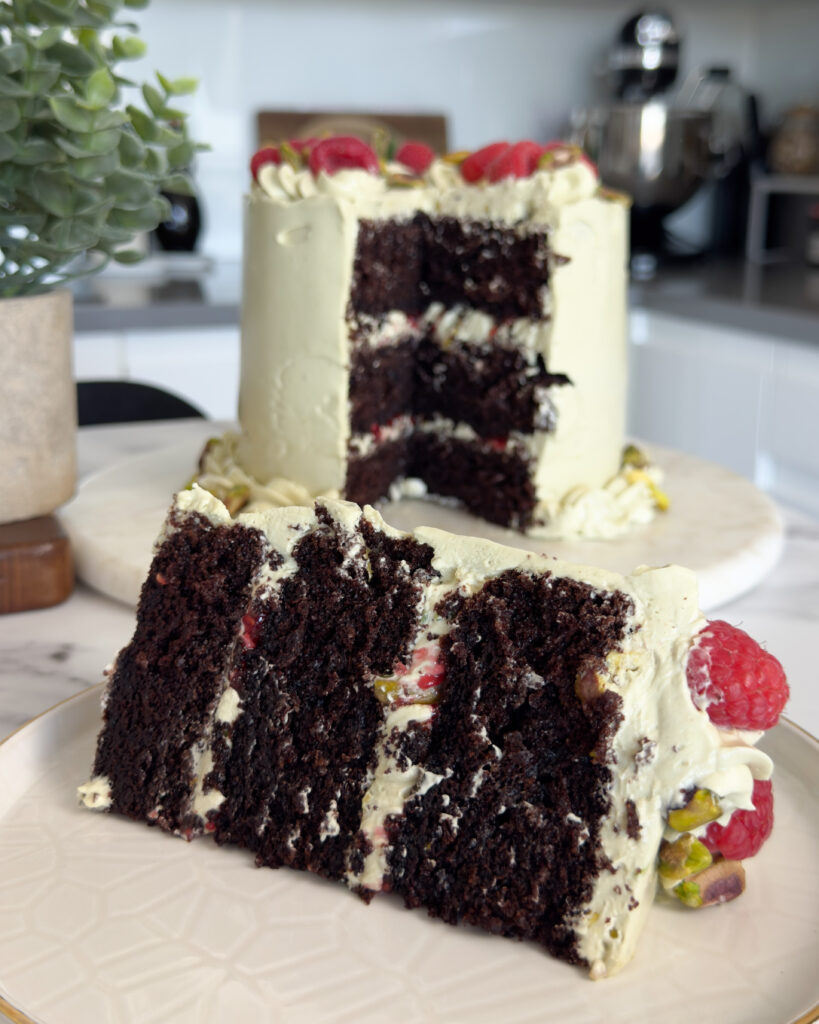
Some flavour combinations are timeless. Chocolate and raspberry has been gracing patisserie counters for decades. Add pistachio to the equation and you have something that feels unambiguously European, deeply sophisticated, and completely impossible to resist. This is the ultimate summer celebration cake – it looks like it came from a bakery in Rome and tastes even better than it looks. Built on the best one-bowl chocolate cake you’ll ever make, filled with pistachio Swiss meringue buttercream, swirls of raspberry compote and finished with classic piped rosettes, fresh raspberries and crushed pistachios, this is the cake for birthdays, garden parties, long summer evenings and every occasion in between. Why This Combination Works For me, chocolate, pistachio and raspberry is the Euro ultimate summer flavour combination. Each element pulls its weight: Chocolate is the deep, fudgy base – rich without being heavy, with that almost bittersweet edge that makes it the ideal backdrop for fruit and nuts. Pistachio adds an earthy, buttery nuttiness with a naturally sweet flavour. Pistachio paste – rather than just chopped nuts – gives the buttercream an intensity you can’t achieve any other way. Raspberry is the sharp, jewel-bright contrast. The compote cuts through the richness of both the chocolate sponge and the buttercream, adding a tart ribbon of fruit that ties every bite together. Together, they’re the kind of flavour profile you’d find in a glass cabinet in a Milanese pasticceria. On your own kitchen counter. The Base: The Best One-Bowl Chocolate Cake This cake starts with my favourite chocolate cake recipe – a one-bowl, no-mixer wonder that produces a crumb so moist and deeply chocolatey it will become your default chocolate sponge for everything. The entire batter comes together in a single bowl from just ten ingredients, with no stand mixer required – only a whisk and a little effort. What makes it work Fine dark cocoa powder is non-negotiable for a truly deep chocolate flavour – less acidic than regular cocoa, it gives the cake an almost-dark colour and intense richness. Invest in a quality cocoa; it genuinely makes the difference. Buttermilk is the secret to an impossibly tender, moist crumb – it reacts with bicarbonate of soda to give the cake lift while adding a subtle tang that balances the sweetness. Strongly brewed coffee amplifies the cocoa without making the cake taste of coffee at all – it deepens and intensifies the chocolate flavour like nothing else. Don’t skip it! Vegetable oil rather than butter keeps the cake incredibly moist for days. The chocolate chip addition Fold a generous handful of quality dark chocolate chips into the batter just before dividing it between the tins. This adds pockets of melted chocolate throughout the crumb that deepen the flavour further and give each slice an almost brownie-like richness in places. Use good-quality chips – the Cake Decorating Company stock excellent options. The Filling: Pistachio Swiss Meringue Buttercream Swiss meringue buttercream is silkier, lighter and less sweet than American buttercream, which is exactly what this cake needs. The base is neutral enough that pistachio paste can really shine through, giving you a buttercream that is pale green, intensely nutty and almost floral.Simply follow the steps for my go-to Swiss meringue buttercream recipe and add some pistachio paste. For the filling, also add some chopped pistachios for that extra flavour. What is pistachio paste? Pistachio paste is made from ground, blanched pistachios – essentially a nut butter but more refined, with a concentrated flavour that is hard to replicate using chopped nuts alone. Stirred into Swiss meringue buttercream transforms it completely. The Raspberry Compote Raspberry compote is one of the simplest and most effective things you can add to a chocolate cake. Sharp, glossy and deeply red, it contrasts with the pistachio buttercream in both flavour and colour in exactly the right way. You’ll need: 200g fresh or frozen raspberries 2 tbsp caster sugar 1 tsp lemon juice Method: Combine everything in a small saucepan over a medium heat. Stir until the sugar dissolves, then cook for 5–8 minutes until the mixture has reduced and thickened enough to coat the back of a spoon. Remove from the heat and leave to cool completely before using – it will thicken further as it cools. Assembling the Cake This is a cake that rewards confidence. Take your time with the layers and the finished result will speak for itself. Step 1 – Level your layers. Use a serrated knife to trim any domed tops so each layer sits perfectly flat. Step 2 – First layer. Place your base sponge on a cake board or stand. Spread a generous layer of pistachio buttercream across the surface, then pipe or spoon a border around the outer edge to act as a dam. Step 3 – Raspberry swirl. Add some raspberry compote to a piping bag and swirl on top of the pistachio buttercream – you want a visible ribbon of red running through the filling, not a fully incorporated mix. Step 4 – Repeat. Add the next sponge layer and repeat the process. If using three layers, you’ll have two full filling layers. Step 5 – Crumb coat. Apply a thin layer of pistachio buttercream all over the outside of the cake and smooth as best you can. Chill for 20–30 minutes until firm. Step 6 – Final coat. Apply the final layer of buttercream and smooth with a bench scraper. It doesn’t need to be perfectly sharp – this cake is beautiful at every level of finish, from fully smooth to slightly textured. Decorating: Classic Piped Rosettes and the Wilton 1M Tip The decoration on this cake is classic, confident and completely achievable at home. A pretty swirly border piped with a Wilton 1M tip is one of the most satisfying techniques in cake decorating – it looks impressive, takes minutes to learn and always lands beautifully. Pipe some shells around the bottom of the cake for that extra finish. Finishing touches Once the rosettes are piped, arrange the
Dot Cake Martini Glasses — a Viral Trend Made Pinterest Worthy for Summer Hosting
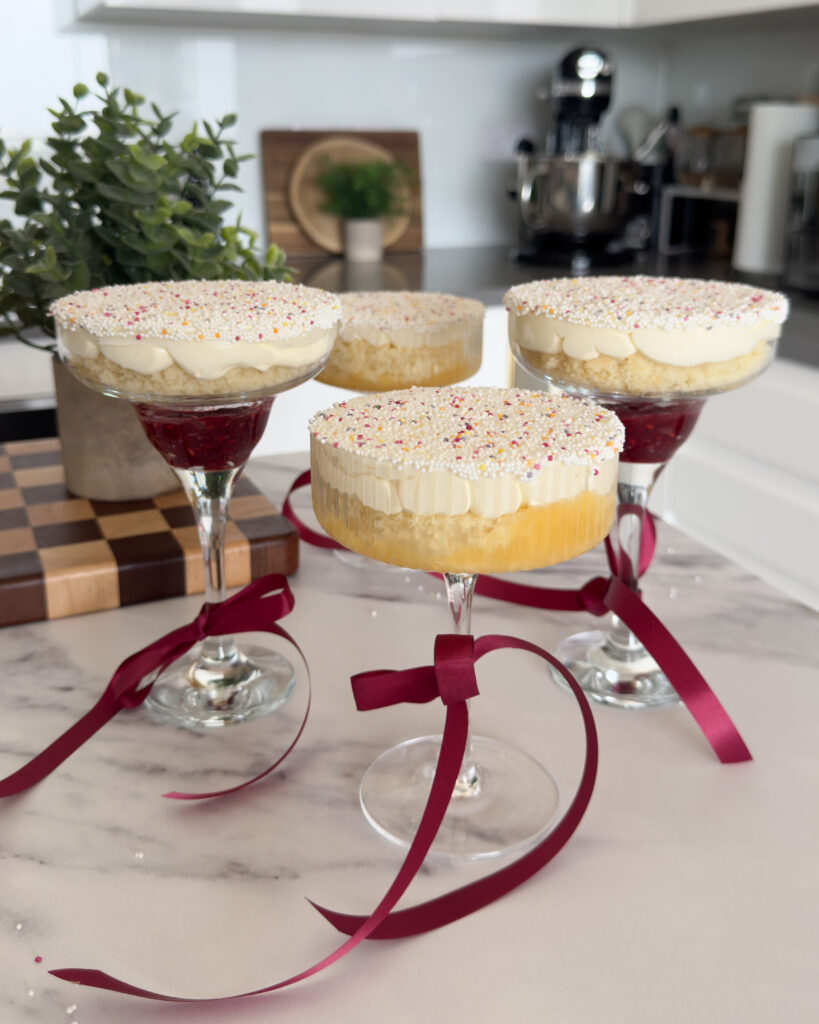
A riff on the viral dot cake trend — but individual, elegant, and made for a summer table rather than a social media moment. Each glass has a layer of vanilla sponge sitting over either a sharp lemon curd or a jammy raspberry compote, topped with silky Swiss meringue buttercream and dipped entirely in non-pareils for that signature dot finish. Finished with a ribbon bow tied at the base of each glass, they are genuinely one of the most Pinterest-worthy things I’ve put on a table. Two flavours, two glass styles — lemon curd in the martini glasses, raspberry compote in the margarita glasses — so every guest gets to choose. Or, more realistically, has one of each. The Dot Cake Trend, but Make it Hosting-Worthy If you’ve spent any time on baking corners of the internet recently, you’ll have seen the dot cake. A cake coated entirely in non-pareils — those tiny, coloured sugar balls — for a finish that is maximalist, joyful, and surprisingly simple to achieve. The original trend works beautifully on full-sized cakes, but individual glasses take it somewhere else entirely. Portion-controlled, endlessly customisable, and far easier to serve at a dinner party or garden gathering than slicing a cake in front of people. The vanilla sponge is baked flat on a tray and cut into rounds using the rim of a martini or margarita glass as your cutter — no special equipment needed. The whole thing comes together in stages that can be prepared well ahead of time, which is exactly what good summer hosting should look like. Two Flavours, Two Glasses The lemon curd version — served in a classic martini glass — is sharp, bright, and very Amalfi. That deep, almost floral lemon flavour against the vanilla sponge and sweet buttercream is one of those combinations that just works. Use Bonne Maman lemon curd for ease, or make your own if you have the time. The raspberry compote version — served in a margarita glass — is jammy, slightly tart, and a beautiful deep pink against the white buttercream and coloured dots. It takes about 10 minutes to make and keeps well in the fridge, so it’s worth making a day ahead. Both versions get the same Swiss meringue buttercream on top and the same full dip in non-pareils. The ribbon bow at the base of each glass is a small detail that makes the whole thing feel considered — use whatever colour works with your table setting. Dot Cake Martini Glasses Makes 4–6 glasses · Serves 4–6 The Vanilla Sponge Half a batch of my vanilla cake recipe, baked flat on a tray The Lemon Curd Filling (for martini glasses) Bonne Maman lemon curd The Raspberry Compote (for margarita glasses) 200g fresh or frozen raspberries 2 tbsp caster sugar Squeeze of fresh lemon juice The Topping One batch of Swiss meringue buttercream, vanilla flavoured Non-pareils, for dipping To Finish Ribbon, cut into lengths for bows Method The Vanilla Sponge Make half a batch of the vanilla cake batter as written. Line a large flat baking tray — a Swiss roll tin or similar — with greaseproof paper and pour the batter in, spreading it evenly to roughly 1–2cm depth. Bake at 190°C (170°C fan) for 12–15 minutes until lightly golden and springy to the touch. A skewer should come out clean. Leave to cool completely on the tray before cutting. Once cool, use the rim of a martini or margarita glass to press firmly into the sponge and cut out rounds — one per glass. The glass rim acts as your cutter, so each round will be exactly the right size. Set the rounds aside. The Raspberry Compote Place the raspberries, caster sugar, and lemon juice in a small saucepan over medium heat. Stir gently and simmer for 8–10 minutes until the raspberries have broken down and the mixture is thick and jammy. Remove from the heat and leave to cool completely. The compote will thicken further as it cools. Refrigerate until ready to use. Assembling the Glasses Spoon a generous layer of lemon curd into the base of each martini glass — about 2–3 tablespoons per glass. For the margarita glasses, spoon in the cooled raspberry compote to the same depth. Place a sponge round on top of the filling in each glass, pressing down gently so it sits level. Pipe or spoon the Swiss meringue buttercream generously on top of each sponge round, building it up slightly above the rim of the glass. Smooth the top and sides into a neat dome — this is the surface that will be dipped in non-pareils, so it needs to be even enough to hold them. Refrigerate for 15–20 minutes to allow the buttercream to firm up slightly before dipping. The Dot Finish Pour non-pareils into a wide, shallow bowl — you’ll need enough to dip the top of each glass generously. Take each glass and press the buttercream top firmly and evenly into the non-pareils, rotating slightly to ensure full coverage. The entire surface of the buttercream should be coated. Press gently to help the dots adhere. Return to the fridge until ready to serve. The Finishing Touch Tie a length of ribbon into a small bow around the stem of each glass just before serving. Keep it neat and simple — a small bow sits better than a large one on a martini or margarita glass. Notes & Tips The sponge rounds and compote can both be made a day ahead — store the sponge wrapped at room temperature and the compote in the fridge. Assemble the glasses on the day of serving for the best result. The buttercream and non-pareils hold well for a few hours in the fridge once assembled. Use gel food colouring to tint the buttercream if you want a coloured base under the non-pareils — pale pink under pink dots, pale yellow under yellow, and so on. Non-pareils are widely available in supermarkets and from
Vanilla, Raspberry & Lemon Cake – The Ultimate Picnic Season Bake
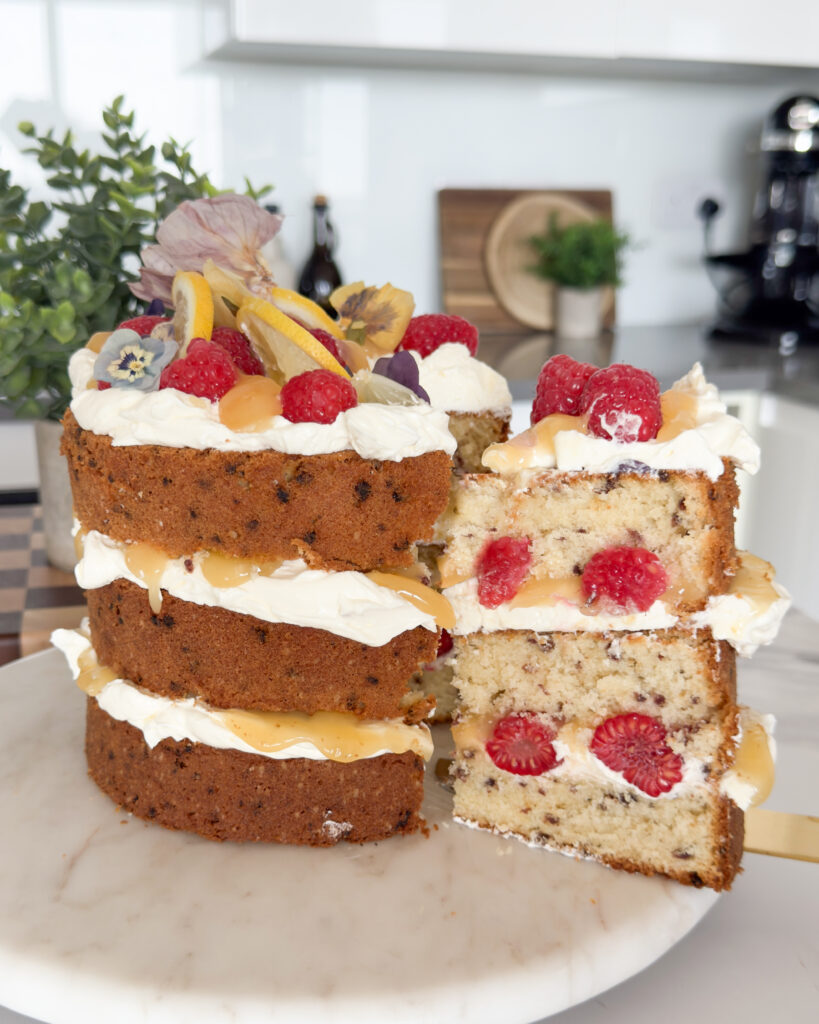
If there’s one cake that captures the spirit of a European summer, it’s this one. Vanilla, raspberry and lemon is a combination that has been gracing patisserie counters from Paris to Positano for good reason – it’s bright, balanced and completely irresistible. This naked cake brings all of that together in a build that’s relaxed enough for a kitchen hitting 24°C, and beautiful enough to sit on a linen cloth in the sunshine. Why a Naked Cake for Summer? Naked cakes are having a moment for good reason. With no thick shell of buttercream to worry about, there’s no chasing sharp edges in a warm kitchen. The layers are the show – and with a filling this good, you want them on display. The exposed sides also make this one of the easiest celebration cakes to assemble at home. No specialist tools needed, no crumb coat stress. Just good ingredients, confident layering, and a generous hand with the toppings. The Flavours: A Classic Euro Summer Combination Vanilla, raspberry and lemon is essentially a summer mood in cake form. It calls to mind long lunches, outdoor tables and the kind of dessert that disappears before you’ve had a chance to photograph it properly. Vanilla provides the soft, warm base – deep and bakery-style when you use a quality extract or paste Raspberry (here in two forms – freeze-dried in the sponge and fresh between the layers) brings sharpness and a vivid, jewelled colour Lemon – via a silky lemon curd – cuts through the richness of the buttercream and ties the whole thing together The Components Broken Down The Vanilla Sponge with Freeze-Dried Raspberries Start with my classic vanilla sponge – light, even crumbed, with enough structure to hold the layers without collapsing. Fold freeze-dried raspberries directly into the batter before baking. Unlike fresh fruit, freeze-dried raspberries won’t add excess moisture or sink to the bottom. They bake in as concentrated pockets of flavour and colour, giving every slice a beautiful pink-flecked crumb. The quality of your vanilla really does matter here. A deep, aromatic vanilla – the kind that fills the kitchen when the oven door opens – elevates what might otherwise be a straightforward sponge into something that tastes like it came from a proper bakery. Swiss Meringue Buttercream My Swiss meringue buttercream is silkier and less sweet than American buttercream, which makes it the ideal pairing for fruit-forward flavours. It’s made by warming egg whites and sugar over a bain-marie before whipping to stiff peaks and adding butter gradually. I trust this recipe for years and I made it uncountable time in my previous life as a cake decorator. In warm weather, it holds better than whipped cream and pipes cleanly for a semi-naked finish. It’s also the kind of buttercream that doesn’t overpower – it lets the lemon curd and raspberries do the talking. Lemon Curd A good lemon curd is sharp, glossy and deeply lemony. Spread generously between layers, it seeps into the buttercream just enough to create a tart, creamy ribbon running through every slice. You can use a shop-bought curd if time is short, but a homemade version takes around 15 minutes and is worth every one of them. Fresh Raspberries Fresh raspberries go between the layers and on top. They’re acidic, juicy and interrupt the richness of the buttercream in exactly the right way. Choose firm berries for the filling so they hold their shape when sliced. Vanilla, Raspberry and Lemon Naked Cake Makes 3 × 6-inch layers · Serves 10–12 The Sponge One full batch of my vanilla cake recipe, with the following addition: 1 cup freeze-dried raspberries The Filling One batch of Swiss meringue buttercream, vanilla flavoured 1 jar Bonne Maman lemon curd 150g fresh raspberries Decoration Fresh raspberries Lemon slices Edible flowers Method The Sponge Make one full batch of the vanilla cake batter as written. Read through the full recipe before you start if it’s your first time making it. Once the batter is complete, fold through the freeze-dried raspberries until evenly distributed. The batter will take on a subtle pink hue — this is exactly right. Divide evenly between three lined 6-inch cake tins, weighing for accuracy, and bake as per the original recipe instructions — 22–25 minutes at 190°C (170°C fan) until a skewer comes out clean. Leave to cool in the tins for 10 minutes, then turn out onto a wire rack and allow to cool completely before assembling. The Assembly Make one full batch of Swiss meringue buttercream as per the linked recipe, flavoured with vanilla throughout. Place the first sponge layer on your cake board or serving plate. Pipe or spread a generous layer of Swiss meringue buttercream over the top, then spoon over a layer of lemon curd and scatter with fresh raspberries. Place the second layer on top and repeat — buttercream, lemon curd, fresh raspberries. Place the final layer on top. Apply a thin, intentionally loose coat of buttercream to the outside of the cake — this is your naked finish. Don’t aim for smooth or even. Use a palette knife or bench scraper to pull back most of the buttercream from the sides, leaving just a light veil that lets the sponge show through. Refrigerate for 20–30 minutes to allow the buttercream to firm up slightly before decorating. The Decoration Arrange fresh raspberries, lemon slices, and edible flowers over the top of the cake. Keep it natural and slightly asymmetric — this cake is meant to look like summer, not a showpiece. Serve at room temperature for the best texture, and keep refrigerated if not serving immediately. Topping Ideas The decoration on this cake is intentionally seasonal and loose. Think: Lemon slices – thin rounds placed upright or flat across the top Fresh raspberries – piled generously in clusters Edible flowers – pansies, violas or dried cornflowers add colour and a garden-party feel A light dusting of freeze-dried raspberry powder – optional, but it deepens the colour beautifully Tips
NYC-Style Pistachio Stuffed Chocolate Cookies — Inspired by the Pistachios of Sicily
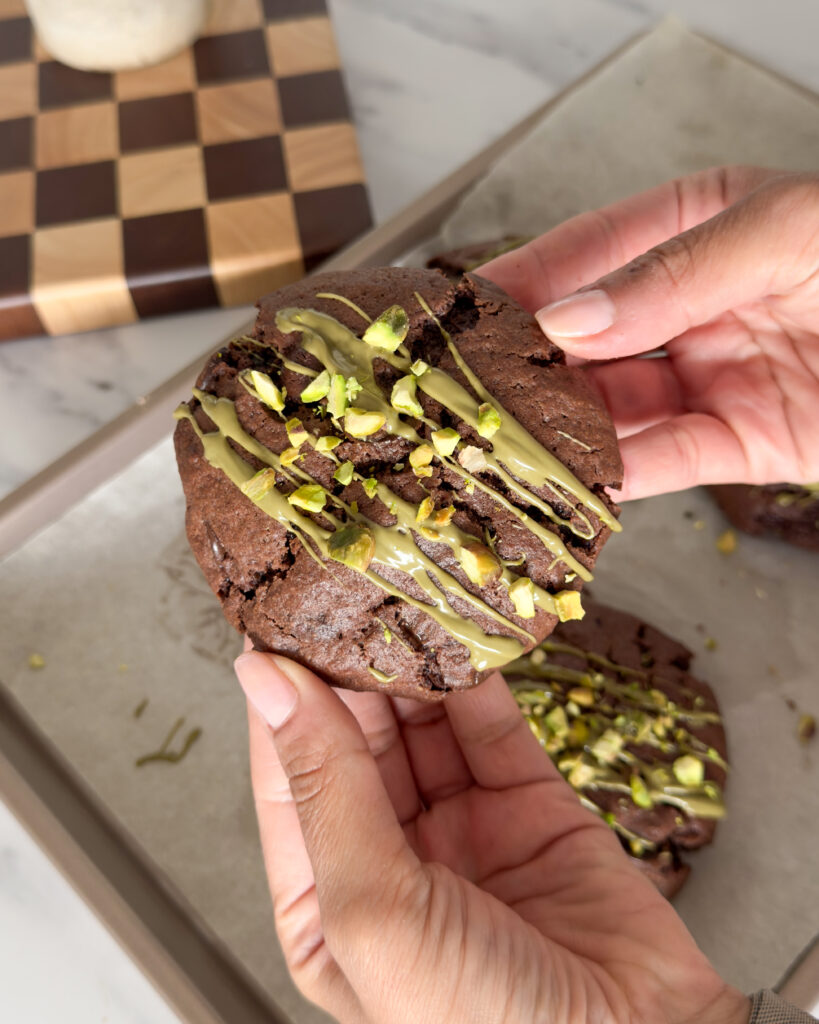
If you’ve ever been to Sicily, you’ll know that pistachios there are something else entirely. The ones from Bronte – a small town on the slopes of Mount Etna – are deeper in colour, more intensely flavoured, and sweeter than anything you’ll find anywhere else. I came back from Sicily thinking about them for weeks. They ended up in my cheesecake, they ended up in my kitchen cupboard in embarrassing quantities, and eventually they ended up here – stuffed inside the most indulgent chocolate cookies I’ve ever made. These are NYC-style in every sense. Oversized, thick, crisp on the outside and completely molten in the middle. Each one has a pocket of pistachio cream at the centre that melts into the dark chocolate dough when you bite into it. Finished with a drizzle of pistachio cream and a scattering of chopped pistachios, they look like something from a very good bakery and taste even better than that. The secret to getting that bakery-style result at home is freezing the dough before baking and using a preheated tray – two steps that make all the difference between a flat, spreading cookie and one that holds its shape, stays thick, and has that perfect contrast between the crisp edge and the gooey centre. Why These Cookies Work So Well Most stuffed cookie recipes ask you to make a separate filling, chill it, portion it, and then wrap the dough around it. This one is simpler. The pistachio cream goes straight from the jar – just microwave it briefly to loosen it – add some chopped white chocolate and spoon directly into the centre of each cookie before rolling. The dough itself is a dark, deeply chocolatey base made with cocoa powder and dark chocolate chips. It’s thick enough to hold the filling without collapsing during baking, and the combination of baking powder and bicarbonate of soda gives you that slight rise and chew that makes a great cookie. Freezing the dough balls before baking is non-negotiable. It slows the spread in the oven, keeps the filling contained, and gives you that thick, bakery-style result. Don’t skip it – even 60 minutes makes a real difference. A Note on the Pistachio Cream and Chocolate The quality of the pistachio cream matters here. A good pistachio cream – silky, intensely nutty, and deeply flavoured – transforms the filling entirely. The Cake Decorating Company sells an excellent one, and it’s worth ordering if you can’t find one locally. Avoid anything too oily or loose as it can leak out of the dough during baking. If you want to go full Sicilian, Bronte pistachio cream is available online from a number of Italian food importers and is absolutely worth the splurge for a batch of these. The chocolate I use is from Choctastique and you can get white, milk or dark at The Cake Decorating Company too. NYC-Style Pistachio Stuffed Chocolate Cookies Makes 12 cookies Chocolate Cookie Dough 200g unsalted butter, slightly softened 100g light brown sugar 100g white caster sugar 3 medium eggs, room temperature 350g plain flour 3 tsp baking powder ½ tsp bicarbonate of soda 55g cocoa powder ½ tsp salt 100g milk chocolate chips Pistachio Filling 100-150g pistachio cream 1 cup white chocolate, roughly chopped Decoration Pistachio cream, melted Chopped pistachios Method The Pistachio Filling Remove the lid from the pistachio cream and microwave for 10-20 seconds. Stir until smooth and loose enough to spoon easily. Stir through the roughly chopped white chocolate until evenly combined. Set aside to cool slightly while you make the dough. The Cookie Dough Take the butter out of the fridge 30 minutes before starting – you want it slightly softened but not at room temperature. Chop into chunks and beat with an electric mixer for a few minutes until soft and broken up, but not creamed. Add both sugars and mix until combined and the mixture looks like wet sand. Don’t overmix at this stage – if the butter gets too soft the cookies will spread too much in the oven. Add the eggs one at a time, mixing well after each addition. The mixture may look a little curdled at this point — don’t worry, it will come together once the flour goes in. In a separate bowl, whisk together the plain flour, baking powder, bicarbonate of soda, cocoa powder, and salt until combined. Add the dry ingredients to the butter mixture and fold together to form a thick, dark cookie dough. Fold through the milk chocolate chips. Fill, Roll, and Freeze Line a baking tray that fits in your freezer with greaseproof paper. Break off large heaped tablespoons of cookie dough and flatten in the palm of your hand. Spoon a teaspoon of the pistachio filling into the centre, then wrap the dough up and around it to form a ball. Seal well so the filling is fully enclosed. Repeat until all the dough is used up – you should get 8-10 cookies in total. Place the rolled cookie balls on the lined tray, cover tightly with foil, and freeze for 90 minutes. If you’re short on time, 60 minutes will work, but 90 gives the best result. Bake Towards the end of the freezing time, preheat your oven to 200°C fan / 220°C conventional. Line a large baking tray with greaseproof paper and place it in the oven for 5 minutes to heat up. A hot tray is what gives you a crisp base and gooey middle — don’t skip this step. Place 4-5 frozen cookie balls on the preheated tray, leaving plenty of space between each one. Bake for 12-15 minutes until the edges are firm but the centres still look soft. The cookies should be thick with very little spread. If they’ve gone slightly uneven in the oven, use a round cookie cutter to scoot them back into shape immediately after baking while they’re still warm and pliable. Leave to cool on the tray for 15 minutes