The No-Bake Strawberry Cheesecake Inspired by strawberry season in the South of France
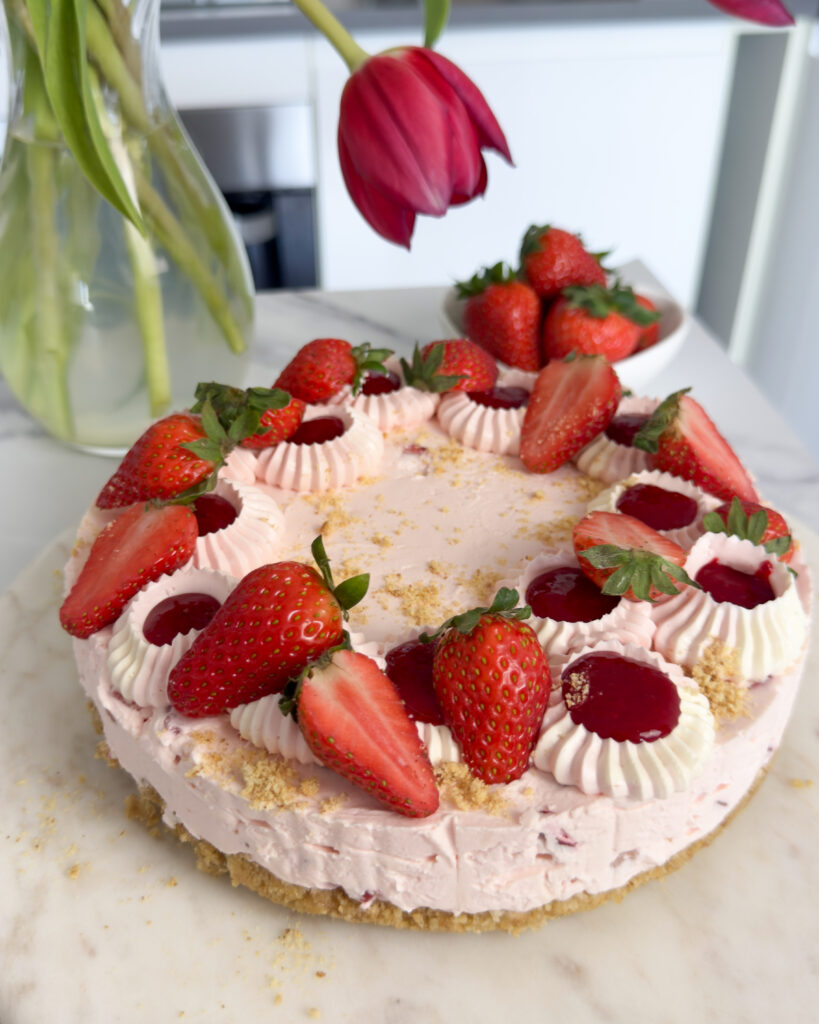
There is something about the markets in Nice that stay with you long after you’ve left. The Cours Saleya on a spring morning – flowers on one side, produce on the other, and somewhere in the middle, stalls piled high with strawberries so red and so ripe they barely make it home. I bought a punnet and ate most of them walking along the Promenade des Anglais. The rest made it into my bag and, eventually, into my head for a long time afterwards. This cheesecake is where that memory ended up. A buttery digestive base, a soft and creamy filling with real strawberries folded through, a cloud of mascarpone cream on top, and a strawberry coulis that gives it a real patisserie look. It’s become my go-to summer entertaining dessert – and every time I make it I think of the Cours Saleya and how good a perfectly ripe strawberry can be when you find it at the right time of year. Why This Cheesecake Works So Well The filling uses chopped fresh strawberries rather than a jam or a purée, which means you get pieces of real fruit throughout rather than just a flavoured cream. A touch of pink food colouring deepens the colour to something that looks genuinely beautiful when sliced, without affecting the flavour at all. The mascarpone cream on top is softer and more delicate than a standard whipped cream finish – it has a slight richness from the mascarpone that sits really well against the tanginess of the cream cheese filling. Paired with fresh strawberries and a drizzle of coulis, it makes for a dessert that looks like it came from a French pâtisserie and tastes every bit as good. The coulis can be swirled through the top of the mascarpone cream before serving, drizzled over the whole cheesecake at the table, or served alongside in a small jug and left for people to pour themselves. All three work – it just depends on how you want to present it. A Note on the Strawberries The quality of the strawberries matters here more than in most recipes, because they’re doing a lot of the work. If you can find good ones – from a farm shop, a market, or simply a supermarket variety that actually smells of something – use them. If the strawberries available to you are on the watery or flavourless side, a tablespoon of icing sugar mixed through the chopped fruit and left to sit for 10 minutes will draw out the juice and intensify the flavour considerably. No-Bake Strawberry Cheesecake Makes one 8-inch cheesecake · Serves 10–12 Biscuit Base 300g digestive biscuits 150g unsalted butter or baking spread, melted Cheesecake Filling 400g full-fat soft cream cheese, room temperature 300ml double cream, cold 75g icing sugar, sifted 1 tsp vanilla extract 100g fresh strawberries, finely chopped A touch of pink food colouring Strawberry Coulis 200g fresh strawberries, hulled 2-3 tbsp icing sugar Squeeze of fresh lemon juice Mascarpone Cream 150g cold mascarpone 250ml cold double cream 3 tbsp icing sugar Vanilla extract, to taste To Finish Fresh strawberries Strawberry coulis Method The Base Blitz the digestive biscuits in a food processor until fine crumbs, or bash in a sealed bag with a rolling pin. Pour in the melted butter and mix until the crumbs are evenly coated and the mixture resembles wet sand. Press firmly into the base of a lined 8-inch springform tin, using the back of a spoon or the base of a glass to compact it into an even layer. Refrigerate while you make the filling. The Filling Beat the cream cheese, icing sugar, and vanilla together until smooth. Add a small amount of pink food colouring and mix through — add gradually until you reach a soft blush pink. In a separate bowl, whip the cold double cream to soft peaks. Fold the whipped cream into the cream cheese mixture in two additions, being careful not to knock out the air. The filling should be thick, smooth, and hold its shape. Fold through the finely chopped strawberries. Spoon onto the chilled biscuit base and smooth the top with a palette knife. Refrigerate for a minimum of 6 hours, or overnight for the best results. The Strawberry Coulis Place the strawberries, icing sugar, and lemon juice in a blender and blitz until smooth. Pass through a fine sieve to remove the seeds. Taste and adjust the sugar if needed. Refrigerate until ready to serve. The Mascarpone Cream Using a chilled bowl, whip the cold mascarpone and cold double cream together with the icing sugar and vanilla until stiff, spreadable peaks form. Stop as soon as it holds its shape — over-whipping mascarpone cream can make it grainy. Finishing Transfer the set cheesecake to a serving plate or cake stand and remove the springform collar carefully. Pipe the mascarpone cream over the top generously and naturally — keep it soft rather than overly structured. Arrange fresh strawberries over the cream, drizzle with the strawberry coulis, and serve immediately or keep refrigerated until ready to serve. Notes & Tips Full-fat cream cheese is non-negotiable here – reduced fat versions hold too much water and the filling won’t set properly. The cheesecake needs at least 6 hours to set, but overnight is always better. It slices much more cleanly when it’s had time to firm up fully. Make the mascarpone cream on the day of serving – it doesn’t keep well once whipped. The set cheesecake (without the mascarpone topping) will keep in the fridge for up to 3 days. This cheesecake is best served cold, straight from the fridge. Notes & Tips Full-fat cream cheese is essential – reduced fat versions hold too much water and the filling won’t set properly. The cheesecake needs at least 6 hours to set, but overnight is always better. It slices much more cleanly when fully chilled. Make the mascarpone cream and decorate on the day of serving —
Triple Layer Vanilla and Chocolate Cake
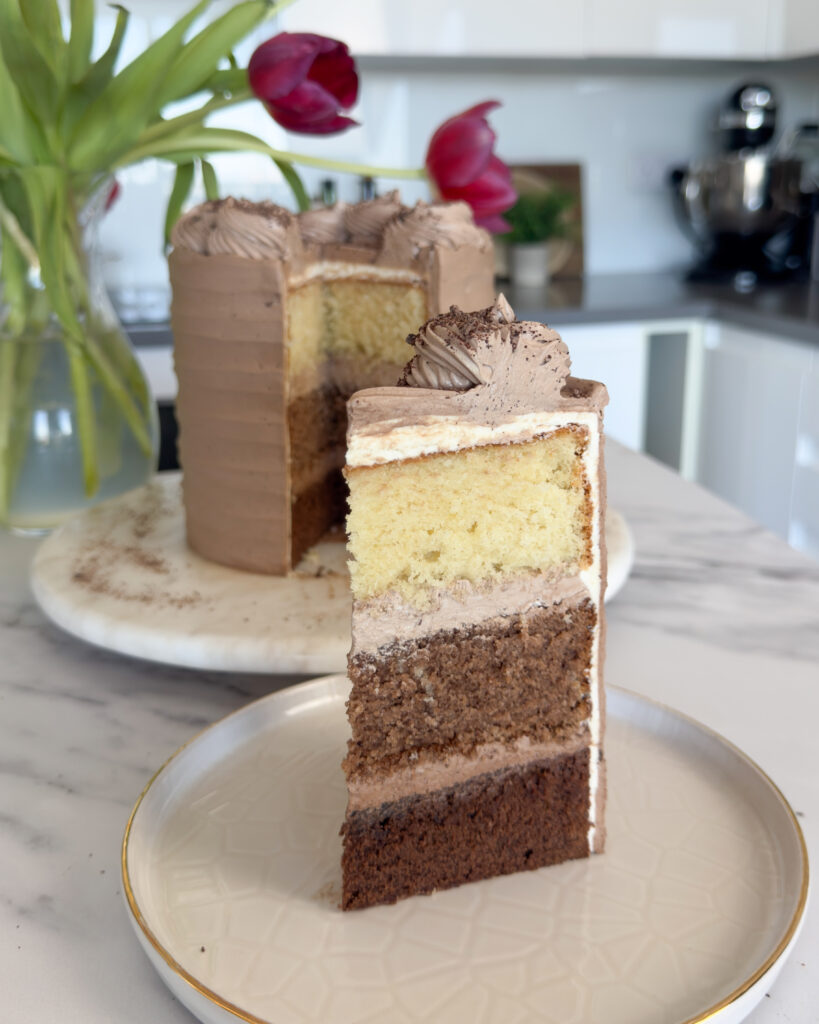
I’ve wanted to share this one for a while. It started as a question I kept coming back to in my head: what if you could get three distinct cake flavours — vanilla, milk chocolate, and rich dark chocolate — from a single batter, without the faff of making three separate recipes? The answer is this cake. One base batter, split into three, with each portion adapted just enough to give you a graduated flavour and colour from top to bottom. When you slice into it you get a clean shift from pale vanilla through to a deep chocolate base, and every layer has the same soft, even crumb. It’s one of those bakes that looks much more complicated than it is, and I mean that as a compliment to the technique, not an undersell of the result. The base is my go-to vanilla cake — the one I’ve been making for years and the one that never lets me down. The buttercream is my super versatile Swiss meringue recipe, flavoured two ways: milk chocolate for the filling between the top layers, and dark chocolate for the base. If you’ve made either of those recipes before, this will feel very familiar. If you haven’t, both are linked throughout this post and worth reading before you start. Why One Batter? The obvious and most important answer is convenience — one set of equipment to wash, one batter to make. Of course it would be great to make three different recipes that are absolutely perfect for each of the flavours but let’s be honest… who has the time? I’ve trialled this recipe a few times and this one was the best version. The adjustments for the chocolate layers are minimal — cocoa powder, a small amount of melted chocolate, and a little extra liquid to compensate for the thickening effect of the cocoa. That’s it. A Note on the Chocolate Layers Cocoa powder absorbs liquid, which means adding it to a batter without compensating will give you a denser, drier layer. The fix is straightforward: a tablespoon or two of milk or buttermilk added alongside the cocoa keeps the consistency in line with the vanilla portion. For the middle layer, a small amount of melted milk chocolate adds a gentle sweetness and a slightly fudgier quality without overwhelming the crumb. For the base layer, melted dark chocolate gives you a deeper, more pronounced chocolate flavour and a richer colour — this is the layer that anchors the whole cake. The goal is for all three layers to look and feel similar when they come out of the oven, with the difference being in colour and flavour rather than texture. If the chocolate batter feels noticeably thicker than the vanilla, add milk one tablespoon at a time until they match. On the Buttercream I use my Swiss meringue buttercream for this cake, flavoured in two ways. The full base recipe and method is on the blog here — make a full batch before you start. For the milk chocolate SMBC: melt 50-75g of good quality milk chocolate, allow it to cool to room temperature, then fold it through a portion of your finished buttercream. It should be smooth, silky, and a pale milk-chocolate brown. For the dark chocolate SMBC: do the same with 50-75g of melted dark chocolate (70% works well here). The flavour is deeper and slightly less sweet, which balances beautifully against the richness of the chocolate base layer. Use the milk chocolate buttercream between the top two layers and for the crumb coat. The dark chocolate buttercream works best as the outer finish — it gives the cake a beautiful deep colour and a flavour that builds from the first slice through to the last. Triple Layer Vanilla and Chocolate Cake Makes 3 × 6-inch layers · Serves 10–12 The Vanilla Batter Make one full batch of my vanilla cake recipe. The full ingredients and method are on that post — read it through before you start if it’s your first time making it. Once the batter is ready, weigh the total and divide it equally into three bowls. Weighing rather than eyeballing is important here — even layers mean an even bake. For me, each of the layers is about 400-425g. Adapting the Three Portions Bowl 1 — Vanilla (top layer) Leave this portion exactly as it is. No additions needed. Bowl 2 — Milk Chocolate (middle layer) Add to the second portion: 1 tsp cocoa powder (sifted) 1-2 tbsp milk 20-30g melted milk chocolate, cooled to room temperature (optional but recommended) Fold together carefully until smooth and evenly combined. The colour should be a light, warm brown. Bowl 3 — Dark Chocolate (base layer) Add to the third portion: 1.5 tbsp cocoa powder (sifted) 40-50g melted dark chocolate, cooled to room temperature 2-3 tbsp milk Mix carefully until fully combined. The batter should be noticeably deeper in colour than the milk chocolate portion but still smooth and easy to pour. Consistency Check Before baking, compare all three batters side by side. They should look similar in texture — smooth, light, and pourable. If either chocolate portion feels thicker than the vanilla, add milk one tablespoon at a time and fold carefully through until they match. This step is worth taking the time over and you don’t want to overmix. Baking Preheat your oven to 190°C (170°C fan). Grease and line three 6-inch cake tins. Pour each batter into its own prepared tin and smooth the tops. Bake at 170°C fan for 22–25 minutes, or until a skewer inserted into the middle comes out clean. Given these are three different sponges, check each one individually — ovens vary and the chocolate layers may bake slightly differently to the vanilla. Allow the cakes to cool in their tins for 7-10 minutes, then turn out onto a wire rack and leave to cool completely before assembling. Assembly Layer in this order, bottom to top: Dark chocolate layer (base) Milk chocolate
The Ultimate No-Bake Pistachio Raspberry Cheesecake
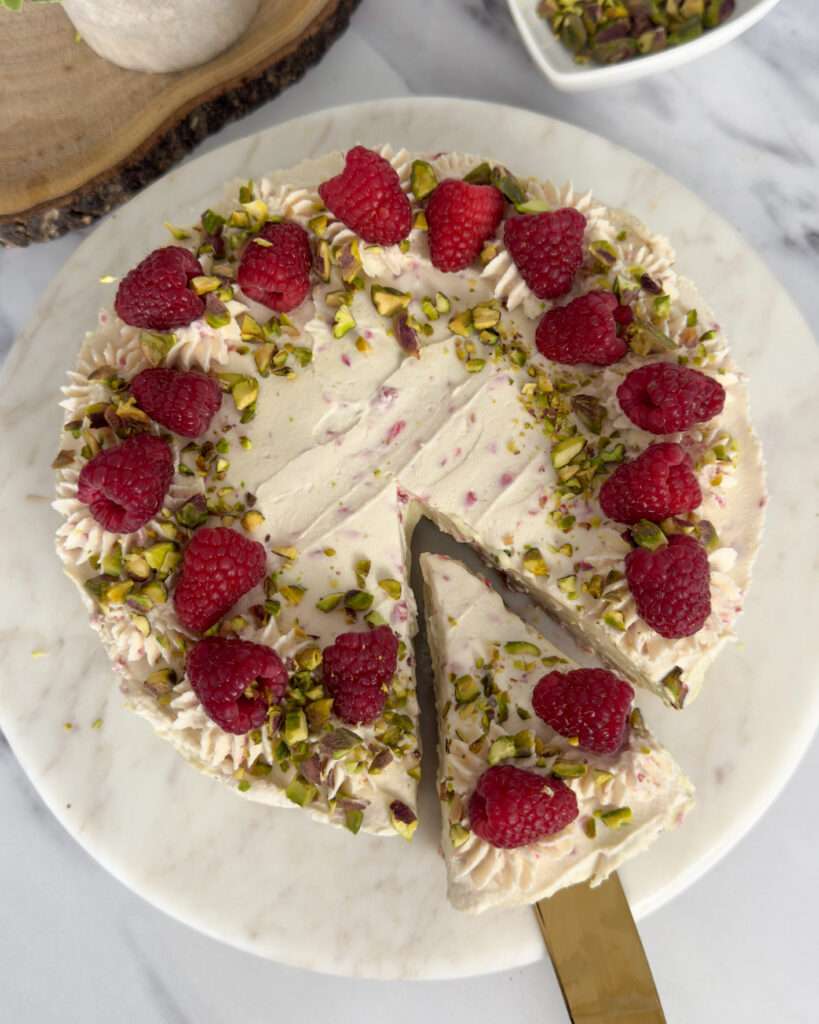
Some places stay with you long after you’ve left. Sicily is one of them. The markets piled high with pistachios from Bronte, the smell of jasmine in the evening air, the way every meal feels like it was made with complete and utter love. I’m heading back in a few weeks and I genuinely cannot wait – but until then, this cheesecake is keeping the dream alive in my kitchen. It has everything I love about Sicilian flavours: rich, slightly sweet pistachio, the sharp brightness of fresh raspberry, and a creamy filling that feels indulgent without being heavy. No oven required. No stress. Just a beautiful, show-stopping dessert that comes together in under 30 minutes and needs nothing more than a few hours in the fridge. Why This Combination Works So Well Pistachio and raspberry is one of those pairings that is addictive once you try it. The pistachio spread — I use the one from The Cake Decorating Company — gives the filling a richness and depth that plain cheesecake simply doesn’t have. The raspberries cut straight through that richness with their sharpness, keeping every mouthful feeling fresh. The base is classic with crushed digestive biscuits and melted butter – simple, reliable, and the perfect contrast to the creamy filling above it. Don’t be tempted to skimp on pressing it down firmly into the tin. A well-packed base is what holds the whole thing together when you slice it. If you’re under time pressure, you can put the base in the freezer for 10-15 minutes to fully set. A Note on the Pistachio Spread The pistachio spread from The Cake Decorating Company is worth seeking out for this. That said, if you can’t get hold of it, any good quality pistachio cream will work. Avoid anything too oily or loose, as it can affect the set of the filling. No-Bake Pistachio Raspberry Cheesecake Makes one 8-inch cheesecake · Serves 10–12 Biscuit Base 300g digestive biscuits 150g unsalted butter or baking spread, melted Cheesecake Filling 400g full-fat soft cream cheese, room temperature 300ml double cream, cold 75g icing sugar, sifted 100g pistachio spread 50g pistachios, roughly chopped Mascarpone Cream 150g cold mascarpone 250ml cold double cream 3 tbsp icing sugar Vanilla extract, to taste Decoration Fresh raspberries Chopped pistachios Crushed fresh raspberries (folded through the mascarpone cream) Method The Base Blitz the digestive biscuits in a food processor until you have fine crumbs, or bash them in a sealed bag with a rolling pin. Pour in the melted butter and mix until the crumbs are evenly coated and the mixture resembles wet sand. Press firmly into the base of a lined 8-inch springform tin. Use the back of a spoon or the base of a glass to compact it into an even layer. Refrigerate while you make the filling. The Filling Beat the cream cheese and icing sugar together until smooth. Add the pistachio spread and mix until fully combined and evenly coloured. In a separate bowl, whip the cold double cream to soft peaks. Fold the whipped cream gently into the cream cheese mixture in two additions, being careful not to knock out the air. The filling should be thick, smooth, and hold its shape. Fold through the chopped pistachios. Spoon the filling onto the chilled biscuit base and smooth the top with a palette knife or the back of a spoon. Refrigerate for a minimum of 6 hours, or overnight for the best results. The Mascarpone Cream Using a chilled bowl, whip the cold mascarpone and cold double cream together with the icing sugar and vanilla. Whisk until stiff, spreadable peaks form – stop as soon as it holds its shape. Over-whipping mascarpone cream can make it grainy. Crush a small handful of fresh raspberries and fold them through the mascarpone cream for a rippled, blush-pink effect and a hit of berry flavour. Finishing Transfer the set cheesecake to a serving plate or cake stand and remove the springform collar carefully. Pipe the mascarpone cream over the top using a Wilton 6B tip. Decorate with fresh raspberries and a scattering of roughly chopped pistachios. Serve immediately or keep refrigerated until ready to serve. Notes & Tips Full-fat cream cheese is non-negotiable here – reduced fat versions hold too much water and the filling won’t set properly. The cheesecake needs at least 6 hours to set, but overnight is always better. It slices much more cleanly when it’s had time to firm up fully. Make the mascarpone cream on the day of serving – it doesn’t keep well once whipped. The set cheesecake (without the mascarpone topping) will keep in the fridge for up to 3 days. This cheesecake is best served cold, straight from the fridge. No-Bake Cheesecake Questions, Answered Why isn’t my no-bake cheesecake setting? The most common reason is under-whipped cream or using a low-fat cream cheese. Make sure your double cream is whipped to soft peaks before folding it in, and always use full-fat cream cheese. The cheesecake also needs adequate time in the fridge – don’t rush it. Can I make this cheesecake ahead of time? Yes – and I’d actively encourage it. The filling sets better and slices more cleanly after a full night in the fridge. Make the mascarpone cream and decorate on the day of serving. Can I use a different biscuit for the base? Digestives are the classic for a reason, but ginger nut biscuits work really well here too and add a subtle warmth that complements the pistachio beautifully. Oreos (cream removed) also work if you want a darker, more chocolatey base. Can I freeze this cheesecake? The cheesecake filling freezes well – freeze it without the mascarpone topping, well wrapped, for up to one month. Defrost overnight in the fridge and decorate before serving. Where can I buy pistachio spread in the UK? The Cake Decorating Company sells it online and it’s well worth ordering. Some specialist delis and Italian food shops also stock
My Ultimate Carrot Cake Recipe – and the One I Make Every Easter
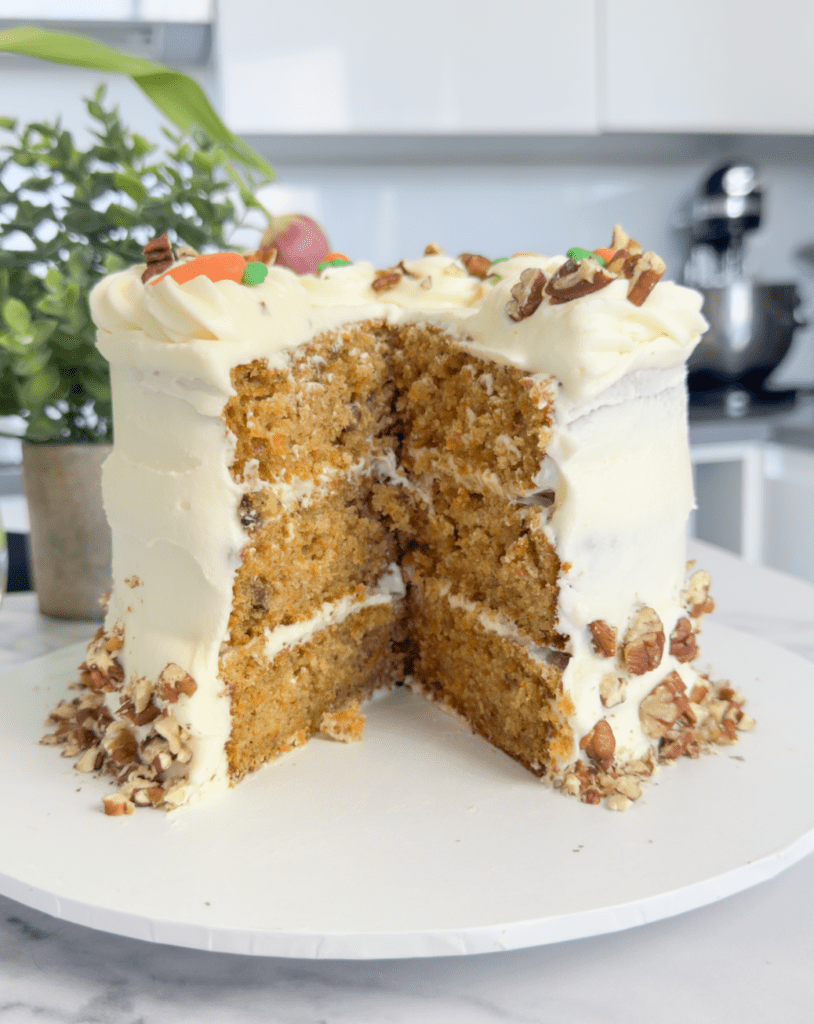
I’ve made a lot of cakes. This is the one people ask me for the recipe for every single time. A warmly spiced, soft three-layer carrot cake that always becomes the star of the show, even though it’s one of the easiest bakes and comes together in only a few minutes. It’s even better the day after baking and stays soft for days. Perfect for the Easter table, but honestly brilliant all year round too. It’s one of my favourite recipes and I hope you enjoy it as much as I do. Why This Carrot Cake Works So Well A lot of carrot cakes end up either too dense or, strangely, too dry – which should not be possible but somehow happens. This one avoids both. The combination of vegetable oil (rather than butter) and Greek yoghurt keeps the cake moist without making the it greasy, and the balance of three different warming spices means every bite has depth rather than just a one-note hit of cinnamon. The carrots are finely grated – and I do mean finely. It makes a difference. Coarsely grated carrot can make the texture a bit stringy, whereas fine grating means they almost melt into the batter and you just get that subtle sweetness and colour without any odd texture. The nuts are optional but I’d encourage you to add them. Roughly chopped pecans and walnuts give you a little contrast in each bite, and they feel very Easter-appropriate and absolutely delicious. I use about 35–40g of each, which is enough to notice without overwhelming the cake. The Sugars: Why Both? Using a mix of light brown sugar and caster sugar is a small thing that makes a real difference. The light brown sugar brings a gentle caramel depth – not molasses-heavy, just a warmth that sits well with the spices. The caster sugar keeps the texture light. If you only use brown, the cake can end up a little more dense; if you only use caster, you lose some of that flavour complexity. Make It Your Own This recipe works beautifully with a classic cream cheese frosting – I’ll share my go-to version below. But it’s also lovely with just a dusting of icing sugar if you’re keeping things simple, or a brown butter cream cheese situation if you’re feeling ambitious (highly recommend for a special occasion). For decoration, I usually keep it simple. A few royal icing carrots, whole pecans on top, maybe a light scattering of chopped nuts around the base of the cake. Some dried edible flowers if I want to add a touch of pretty. Carrot Cake Recipe Makes 3 × 6-inch layers · Serves 10–12 Dry Ingredients 200g plain flour 1¼ tsp baking powder 1¼ tsp bicarbonate of soda 1¼ tsp ground cinnamon ½ tsp ground nutmeg ½ tsp ground ginger ½ tsp fine salt Wet Ingredients 120g light brown sugar 120g caster sugar 140ml vegetable oil 3 eggs, room temperature 1¼ tsp vanilla extract 120g full-fat Greek yoghurt or sour cream Add-ins 200g carrots, finely grated 35–40g pecans, roughly chopped (optional) 35–40g walnuts, roughly chopped (optional) Method Heat your oven to 175°C (155°C fan) / 350°F. Grease three 6-inch cake tins and line the bases with baking paper. In a large bowl, whisk together all the dry ingredients — flour, baking powder, bicarbonate of soda, cinnamon, nutmeg, ginger, and salt. Set aside. In a separate bowl, whisk together both sugars and the vegetable oil until combined. Add the eggs one at a time, whisking well after each addition. Mix in the vanilla extract and Greek yoghurt (or sour cream) until smooth. Add the dry ingredients to the wet and fold together gently with a spatula until just combined — don’t overmix. A few streaks of flour are fine at this stage. Fold in the finely grated carrots, followed by the chopped pecans and walnuts if using. The batter will be fairly thick — that’s exactly right. Divide the batter evenly between the three prepared tins (weighing them is the easiest way to keep the layers consistent). Smooth the tops with a spatula. Bake for 28–32 minutes, or until a skewer inserted into the centre comes out clean and the tops are deep golden. They should spring back very slightly when pressed. Leave to cool in the tins for 10 minutes, then turn out onto a wire rack and allow to cool completely before frosting. Patience here really does pay off. Cream Cheese Frosting This is the frosting I always come back to for this cake. It’s tangy, smooth, and just works incredibly well with carrot cake. Ingredients 200g full-fat cream cheese, cold 100g unsalted butter, softened to room temperature 330g icing sugar, sifted 1 tsp vanilla extract Method Beat the softened butter on its own for 2–3 minutes until pale and creamy. This step matters – it’s what gives the frosting a light, smooth base rather than a dense one. Add the cold cream cheese and beat again until just combined and smooth. Don’t over-beat at this stage or the frosting can turn loose and difficult to work with. Sift in the icing sugar, add the vanilla and salt, then mix on low until incorporated. Turn the speed up briefly to bring it together, then stop. Use immediately or refrigerate for up to 30 minutes to firm up slightly before spreading – this makes it much easier to work with, especially for a stacked cake. A note on temperature: The key here is cold cream cheese and room temperature butter. Flip those and you’ll likely end up with a runny frosting that won’t hold its shape on the cake. Notes & Tips Eggs and yoghurt at room temperature make a real difference to the batter — take them out of the fridge 30 minutes before you start. Finely grate the carrots on the smallest setting of your box grater. If they seem particularly wet, blot lightly with kitchen roll. Layers can be baked a day ahead and
Vanilla Easter Egg Cake with Lemon Curd and Swiss Meringue Buttercream

This vanilla Easter sheet cake is soft, buttery and light, filled with lemon curd, finished with silky Swiss meringue buttercream, and decorated in a simple oval design that looks so lovely for spring tables, Easter gatherings, picnics or afternoon tea. It has that fresh, delicate look that feels a little special, but it’s still very easy to make at home. I made this in a 15 x 10 inch sheet cake tin, then used the oval cake plates from The Cake Decorating Company to cut and shape the layers. The finished cake gives you two soft vanilla sponge layers, a generous filling of lemon curd and buttercream, and enough slices for around 20 people, depending on how generously you cut it. If you love a classic vanilla cake recipe but want something a little prettier for the season, this is such a good one to keep in your back pocket. Why you’ll love this vanilla Easter cake You’ll love it because: it’s based on a reliable soft vanilla cake recipe the lemon curd filling adds freshness and stops it feeling too sweet it’s easy to decorate even if you’re not confident with piping the oval shape gives it that lovely old-fashioned spring cake feel it’s ideal for Easter entertaining or any spring occasion it serves a crowd without needing a towering layer cake It also feels a bit more relaxed than a traditional celebration cake. A sheet cake is easier to bake, easier to assemble and easier to transport. Ingredients 300g caster sugar 80ml neutral oil (vegetable or sunflower) 200g unsalted butter, softened 5 eggs, at room temperature 1 tsp vanilla extract 60g sour cream 300g self-raising flour Pro tip: Room temperature eggs and sour cream are super important here – they emulsify into the batter much more smoothly and are part of why you get that even, velvety crumb. Take them out of the fridge at least 30 minutes before you start. Method 1. Prep your tins and oven Preheat your oven to 190°C (170°C fan). Grease and line your cake tin. 2. Cream the fats and sugar Add the caster sugar, oil, and softened butter to a stand mixer fitted with the paddle attachment – or a large mixing bowl if you’re using a hand mixer. Beat on medium-high speed for a few minutes until the mixture looks noticeably lighter and fluffier. This step is incredibly important. You’re building air into the batter here, and that air is what gives the finished cake its soft, open structure. 3. Add the vanilla and eggs Add the Vanilla and then the eggs one at a time, mixing well after each addition. The mixture may look slightly split or curdled at this point but that’s completely normal. Keep going. It’ll come together once the flour goes in, and it won’t affect the finished cake at all. 4. Fold in the flour Sift the self-raising flour directly over the bowl. Mix on the lowest speed, or fold in gently by hand, until most of the flour is just incorporated. The key word there is just – you want to keep as much air in the batter as possible, so don’t overwork it. 5. Finish with sour cream Add the sour cream and fold or mix gently until the batter is smooth and evenly combined. It should look glossy and uniform at this stage. 6. Bake Bake for 35-40 minutes, or until a skewer inserted into the centre comes out clean. All ovens are different and if you have to bake longer, keep checking every 5min to make sure the cake is fully baked without overbaking. 7. Let the cake cool completely Leave the cake in the tin for around 10 minutes, then carefully turn it out onto a wire rack to cool completely before cutting, filling or decorating. Don’t rush this part. A warm cake will melt buttercream and make decorating much harder than it needs to be. 8. Cut the oval cake shape Once the cake is completely cool, use the oval cake plates as a guide to cut out two oval cake layers. This is such an easy way to get that neat spring cake shape without needing a specialist tin. If you only get one clean oval from the sheet, you can carefully cut and piece together your second layer depending on the size of your template, but ideally your sponge should give you two layers. If you want very sharp edges, chill the sponge briefly before cutting. 9. Fill and Decorate I always use my signature Vanilla buttercream as base filling and for covering the cake. It’s incredibly versatile and I have another blog post to give you 9 different flavour options that go with my base recipe. Filling and Frosting Lemon curd Use a good quality lemon curd for the filling and for decoration on top. You’ll need enough for: a generous layer inside the cake small spoonfuls or swirls on top for decorating The lemon curd cuts through the sweetness of the buttercream beautifully and gives the whole cake a fresher, more spring-like flavour. Swiss meringue buttercream Use my signature Swiss meringue buttercream recipe for this cake. It’s the one I always come back to because it’s: silky and smooth not too sweet easy to spread cleanly perfect for simple piping work ideal if you want a more elegant finish than standard buttercream If you already have the recipe on your blog, I’d link it here as: Use my Swiss Meringue Buttercream Recipe You’ll want enough to: fill the centre crumb coat if needed fully frost the outside pipe the border and top decoration Storing Your Vanilla Cake This is one of those cakes that really improves after a short rest – which is a big part of why I relied on it so much when I was decorating professionally. I’d almost always bake the day before, let the sponges sit overnight in the fridge, and decorate the next morning. Once baked and cooled, the sponges can be: Wrapped tightly and stored at
Wisteria Season in London: The Best Spots to See It (and When to Go)
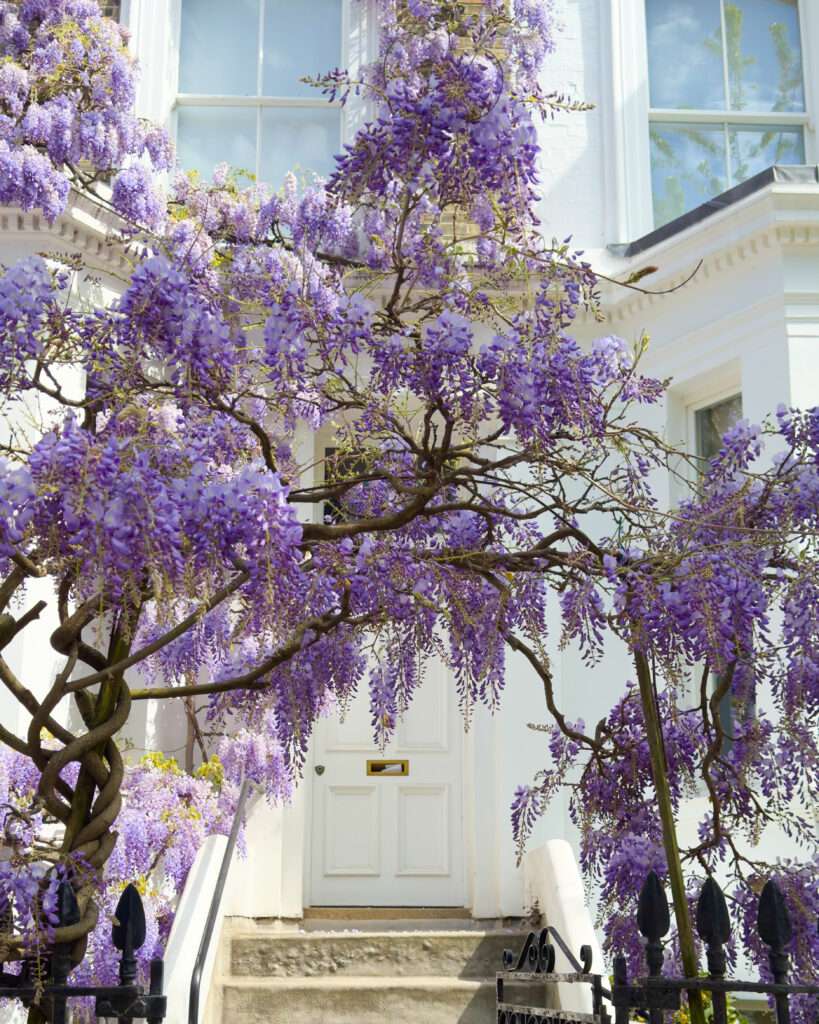
Every spring, London does something extraordinary. The grey gives way, the mornings smell different, and then – almost overnight – entire streets disappear behind curtains of purple. Wisteria season in London is one of those things you hear about and then, the first time you actually see it in person, you understand why half of Instagram loses its mind over it every April. I’ve spent the last few springs chasing down the best wisteria spots across the city – some you’ll have seen all over your feed, others that are genuinely worth tracking down. This is the guide I wish I’d had: the right timing, the best streets by neighbourhood, a few spots that don’t get nearly enough attention, and everything you need to actually plan a wisteria walk without wasting a Saturday on bad timing. When Is Wisteria Season in London? In London, wisteria usually starts appearing from mid to late April and often peaks in early May, though exact timing shifts with the weather. In a mild, sunny spring it can appear a little earlier; a cold snap can push it back by a week or two. So mid-April is when you want to start paying attention, and the first two weeks of May are usually your best bet for peak bloom. The window is short. Each vine holds its flowers for around two to three weeks before the petals drop and the whole thing goes green again until next year. The good news is that different streets and neighbourhoods tend to bloom at slightly different times – so even if one spot has already peaked, another might be just getting started. Instagram is actually useful here: search #wisteriahysteria or #wisteria London in late April and you’ll get a real-time read on what’s currently blooming and where. Pro tip: Weekday mornings are your best bet for crowd-free photos, especially at the well-known spots. The really popular streets fill up fast on weekends. Before we get into the best Wisteria locations… Please respect the residents. These are people’s homes, so don’t block driveways, keep the noise down, and remember that someone has to live behind the most photographed door in London every single spring. There’s been plenty of footage of crowds of creators hanging around outside people’s houses – some even with suitcases and outfit changes – and I think we can all agree that’s really not okay. If you do decide to stop for a few photos or videos, keep it brief and make sure you’re not disturbing the residents or the rest of the street. It’s simply the respectful thing to do. Kensington: The Undisputed Capital of Wisteria Hysteria If you only have time for one neighbourhood, make it Kensington. The concentration of wisteria here is extraordinary – grand white stucco houses dripping in purple, cobbled mews streets that look like they belong in a different century entirely. You could spend an entire morning here and still find new corners. Bedford Gardens, W8 One of the most photographed wisteria houses in London is arguably in Bedford Gardens – a white façade with a pink door completely engulfed in purple. There’s a blue plaque here too, commemorating composer Frank Bridge who once lived here. Arrive early on weekdays to stand any chance of a quiet shot; weekends are a queue situation. Head further down the street for a slightly less crowded but equally lovely display. Stafford Terrace, W8 Stafford Terrace is the other big one – specifically the corner where purple blooms cascade down to the second floor, filling the fence with grape-like clusters. It’s stunning in the way that makes you stop walking entirely. This spot gets a lot of sun, so bring sunglasses if you’re shooting in the morning and don’t be surprised to find a small crowd of fellow admirers. Gordon Place, W8 Just around the corner from Bedford Gardens, Gordon Place is quieter and arguably more beautiful for it. The whole street gets in on the wisteria action – it’s less about one statement house and more about that cumulative effect of purple creeping across an entire row. Horbury Mews, W11 (Notting Hill border) A quiet pathway just off the main drag of Notting Hill, Horbury Mews has one of the more special wisteria displays in the area – a wisteria-covered home at the rear of a pastel courtyard. There are benches, multiple angles to work with, and it tends to be significantly less crowded than the streets nearby. One of those spots that rewards the people who actually look for it. South Kensington and Chelsea: Mews Streets and Riverside Blooms Kynance Mews, SW7 Kynance Mews is one of those spots that doesn’t feel like London at all – the teal-green windows, the cobbled street, the archway entrance. In spring, wisteria climbs up the historic carriage houses across several metres of façade. It’s a bit of a pilgrimage for photographers and for good reason. The narrow street makes angles interesting, so experiment rather than just going straight on. Closest tube: Gloucester Road. Sumner Place, SW7 A row of white mews houses with weeping wisteria trailing across balconies and columns. Sumner Place is one of the lesser-known South Kensington spots, which means you’re more likely to have it to yourself. It’s elegant in a low-key way that the more famous streets can’t quite match when there are thirty people queueing for the same shot. Elm Place, SW3 A short street in Chelsea where multiple houses get involved – the wisteria here feels more rustic, less curated than the grand Kensington displays, which I actually prefer. Pair it with a walk down to Cheyne Walk if you’re in the area. Cheyne Walk, SW3 One of London’s most historic streets, right along the Thames. During wisteria season the purple blooms curl around wrought iron railings and spill over first-floor balconies, with the river just steps away. Worth combining with a walk along the Embankment – the whole thing feels distinctly like a spring day in London done
The Most Beautiful Lakes in Switzerland: A Complete Guide (2026)
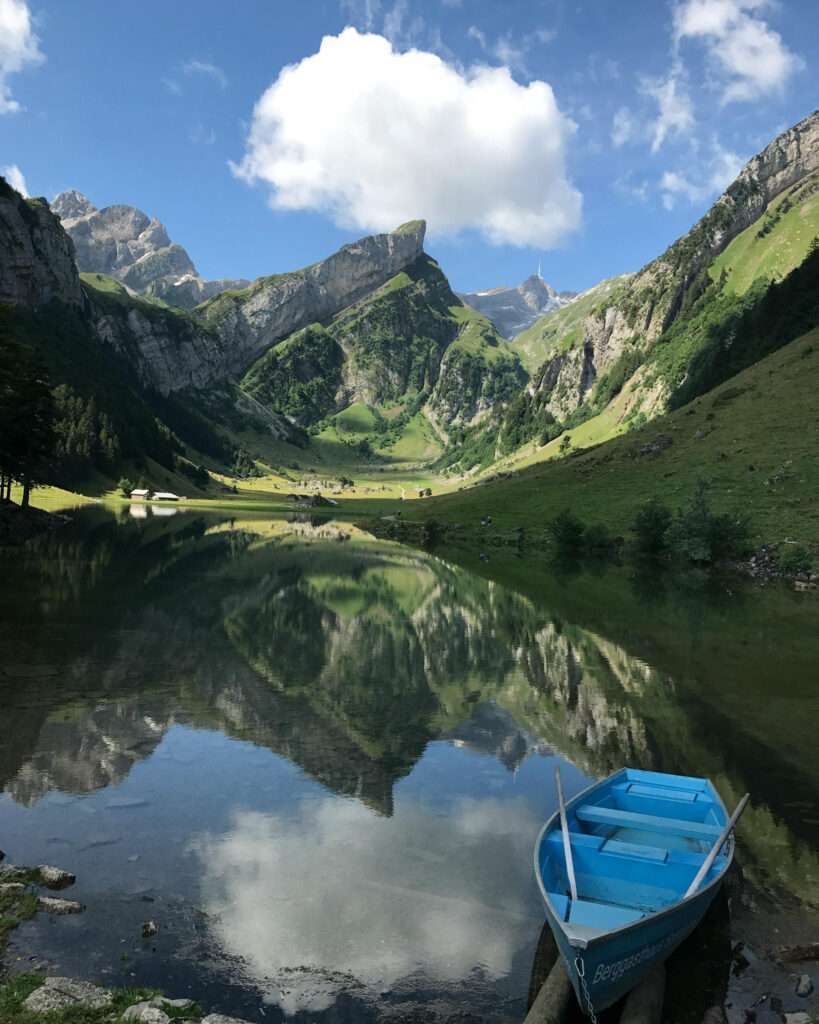
If there’s one thing Switzerland does better than anywhere else in Europe, it’s lakes. The combination of Alpine peaks, impossibly clear water and charming lakeside villages creates the kind of scenery that feels almost too good to be true. I’m not joking when I say you’ll stand there, fully overwhelmed, wondering how this place actually exists. But here’s the thing – with around 1,500 lakes dotted across the country, knowing where to focus your time can feel seriously daunting. Should you head to the Italian south and sip Merlot by Lake Lugano? Cruise the fjord-like arms of Lake Lucerne? Or base yourself in the Bernese Oberland for the turquoise drama of Lakes Thun and Brienz? This guide breaks down the best lakes in Switzerland by vibe, what to do at each one, and all the practical information you need to plan your visit – including how the Swiss Travel Pass fits in, which lakes are best for swimming, and which scenic train routes connect them all. Save this. You’ll want to come back to it. Why Switzerland’s Lakes Are Worth the Hype The colour alone is enough to justify a trip. Swiss lakes get their distinctive turquoise and blue hues from glacial meltwater carrying fine particles of rock (called glacial flour) that reflect light in extraordinary ways. The result is water that ranges from deep cobalt to almost unreal turquoise depending on the lake, the season, and how the light falls. Switzerland’s excellent public transport network – trains, buses, and boats – means most lakes are easy to reach without a car. The Swiss Travel Pass covers regular boat services on the major lakes, which makes hopping between lakeside villages genuinely enjoyable rather than logistically stressful. In 2026, a 3-day consecutive Swiss Travel Pass starts from CHF 254 for 2nd class, and it covers unlimited travel on trains, buses, and lake boats across the Swiss Travel System network. The Best Lakes in Switzerland 1. Lake Geneva (Lac Léman) – The Grand Dame Best for: Culture, vineyards, cosmopolitan energy, and classic Swiss elegance Lake Geneva is Switzerland’s largest lake, sitting on the border with France. At the western tip, Geneva itself is one of Europe’s most sophisticated cities – home to the United Nations headquarters and a formidable arts and dining scene. Head east along the northern shore and you’ll pass through the UNESCO-listed Lavaux vineyards before reaching Lausanne, then Montreux. Montreux is the standout stop. It sits on the lake’s eastern shore, famous for its annual jazz festival (held each July), the Freddie Mercury statue on the promenade, and the jaw-dropping Château de Chillon – a medieval fortress built directly on the water’s edge. It’s the most visited historical building in all of Switzerland, and honestly, it earns that title. The promenade along Lake Geneva is one of Switzerland’s most beautiful, and walking between Montreux and Vevey on a sunny day is the kind of experience that quietly ruins you for everything that comes after. What to do: Visit Château de Chillon (allow 2–3 hours) Walk or cycle the promenade from Montreux to Vevey Take a boat from Lausanne east to Montreux, stopping at lakeside towns Explore the Lavaux vineyards – pick up a local Chasselas white and find a terrace with a view Getting there: Direct trains run from London St Pancras via Eurostar to Paris, then Paris Gare de Lyon to Geneva. From London, the total journey takes around 7–8 hours. The Golden Pass Express connects Montreux to Interlaken for onward travel into the Swiss Alps. Best time to visit: May to September for warm lakeside weather. The jazz festival in July draws huge crowds to Montreux, so book accommodation far in advance if you’re visiting then. 2. Lake Lucerne (Vierwaldstättersee) – The One That Keeps Giving Best for: Scenic drama, boat hopping, mountain excursions, and Swiss history Lake Lucerne is one of those places that genuinely surprises you with how much it offers. It covers 114 km² with a deeply irregular shape – multiple arms and peninsulas create constantly changing scenery, so the views on a boat trip never feel repetitive. The southern sections, particularly the Urnersee arm, are the most dramatic: steep mountainsides plunge directly into the water in a way that feels more Scandinavian fjord than Swiss lake. The city of Lucerne sits at the lake’s northwestern tip and is one of Switzerland’s most beautiful cities. The iconic Chapel Bridge – a covered wooden footbridge dating to 1332 – crosses the River Reuss right in the heart of the medieval old town. The Lion Monument, the Water Tower, and the Jesuitenkirche all sit within easy walking distance, making a half-day in Lucerne before a lake cruise a genuinely rewarding combination. From Lucerne’s boat station, right next to the main train station, cruises head out across the lake in multiple directions. A ride toward Vitznau gives access to Mount Rigi – from where, on a clear day, you can see four countries. Mount Pilatus (home to the world’s steepest cogwheel railway) is another spectacular option. What to do: Walk the Chapel Bridge and explore Lucerne’s medieval old town Take an afternoon lake cruise toward Vitznau or Flüelen – allow 2–4 hours depending on your route Ride the cogwheel train up Mount Pilatus (50% discount with Swiss Travel Pass) – the full circular route via cable car costs around CHF 72 without discount Visit the Swiss Museum of Transport (free with Swiss Travel Pass) Rent a pedalo from SNG Boat Rental along the waterfront – around CHF 30 per hour, with a CHF 20 deposit Getting there: Lucerne is 45 minutes from Zurich by direct train on SBB Rail. Best time to visit: Year-round, though summer boat timetables run fully from April through October. The lake has a reduced autumn timetable from mid-September. 3. Lake Brienz – The Turquoise One Best for: Dramatic colour, a quieter atmosphere, and the Giessbach Waterfalls If you only have time for one lake in the Bernese Oberland, make it
One Bowl Bakery-Style Brownies – Fudgy, Rich & Ridiculously Easy (No Mixer Needed)
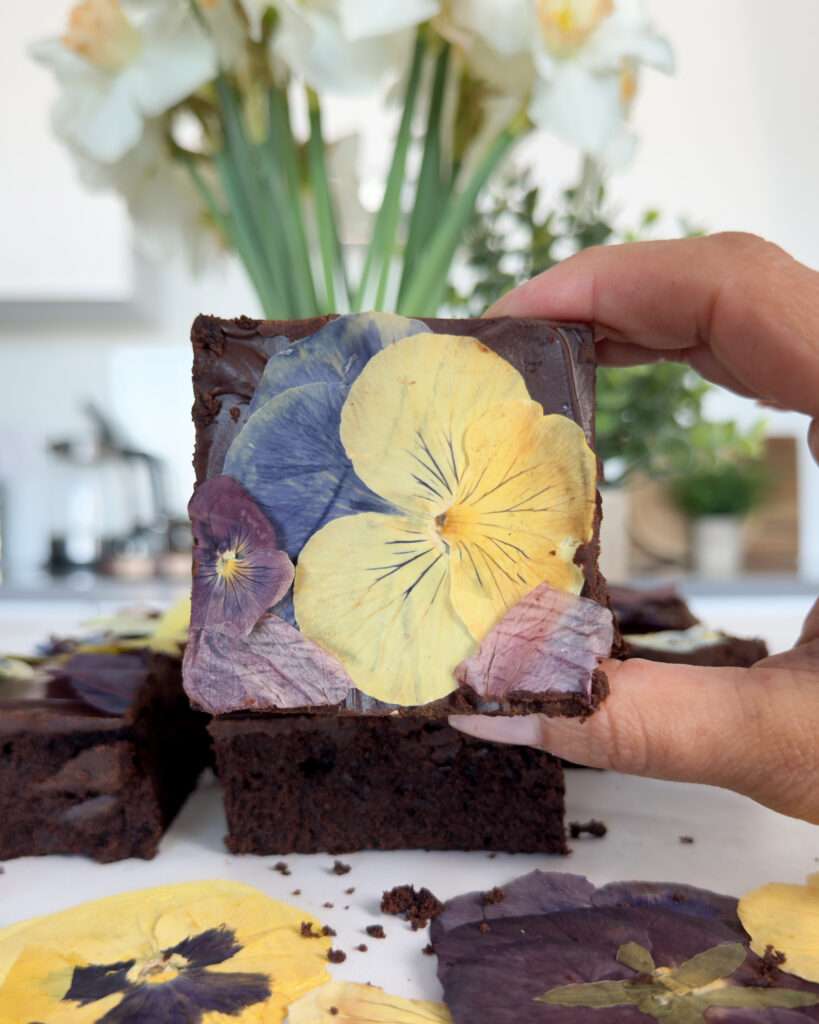
A good brownie doesn’t need much explaining, but the difference between an average one and one you’d go out of your way for usually comes down to small details. The texture needs to be just right – soft in the centre, slightly dense, and stable enough to slice cleanly without turning cakey or dry. This is the kind of brownie you’ll recognise from good bakeries, where the focus is on getting the balance right rather than overcomplicating things. It’s rich without being overly sweet, deeply chocolatey, and thick enough to feel a bit more indulgent than a standard tray bake. The recipe is made in one bowl, which keeps it simple, but the method still gives you that crackly top and fudgy centre that people look for. After testing different ratios and bake times, this version lands in that middle ground where it feels reliable and worth coming back to. Why you’ll love this recipe one bowl method with no unnecessary steps thick brownies in a 9-inch tin – not flat or thin fudgy centre with a crackly top less sweet, more chocolate-forward flavour easy to make but still feels bakery-level Ingredients (9-inch / 23cm square tin) 210g unsalted butter 185g caster sugar 120g light brown sugar 4 medium eggs (room temperature) 1 tsp vanilla extract 85g unsweetened cocoa powder 105g plain flour 3/4 tsp fine sea salt 100g dark chocolate, chopped How to make one bowl brownies Start by lining a 9-inch square tin with baking paper and preheating your oven to 170°C fan (190°C conventional). Melt the butter until just liquid, making sure it isn’t too hot, then whisk in both sugars until the mixture looks glossy and slightly thickened. This step helps create the thin, crackly top once baked. Add the eggs one at a time, whisking well after each addition, followed by the vanilla extract. Continue whisking for about a minute until the mixture looks smooth and slightly lighter, which helps build structure while keeping the texture soft. Sift in the cocoa powder, flour and salt, then fold gently until just combined. Stop mixing as soon as the dry ingredients are incorporated to avoid overworking the batter. Fold through the chopped dark chocolate, which will melt into the brownies as they bake and create pockets of richness throughout. Pour the batter into your prepared tin, smooth the top, and bake for 22 to 28 minutes. The edges should be set while the centre still has a slight softness, which keeps the brownies fudgy rather than dry. Leave them to cool completely in the tin before slicing. For cleaner slices, chill them in the fridge for one to two hours. Optional – chocolate ganache and edible flowers If you want to give them a more finished look, especially for hosting or gifting, a layer of chocolate ganache and a few edible flowers are a non-negotiable. The ganache was made using Choctastique dark chocolate from The Cake Decorating Company, which melts smoothly and sets with a soft, glossy texture. Once the brownies were fully cooled, spread the ganache evenly over the top and finished with pressed edible flowers from Nurtured in Norfolk. To make the ganache, melt 200g of dark chocolate and stir in 100ml of cold cream. Stir until smooth and let it cool slightly before spreading so it sits neatly on top. The texture you’re aiming for These brownies are thick and slightly dense, with a soft centre and a thin crackly top. They hold their shape when sliced but still feel fudgy, with melted chocolate running through each piece. They sit somewhere between a classic homemade brownie and something you’d expect from a small bakery, where the focus is on texture and flavour rather than decoration. How to serve They work well slightly warm with a scoop of vanilla ice cream, or simply on their own with coffee. They also travel easily, which makes them a good option for taking with you on a walk, a picnic or a weekend away. A few small tips avoid overbaking, as the centre should still feel slightly soft when removed from the oven use a good quality cocoa powder for a deeper chocolate flavour allow them to cool fully before slicing for the best texture add a light sprinkle of flaky sea salt before baking if you want a bit of contrast Let me know if you make these 🍫
Lake Lucerne: A Complete Guide to a Long Weekend in Spring (2026)
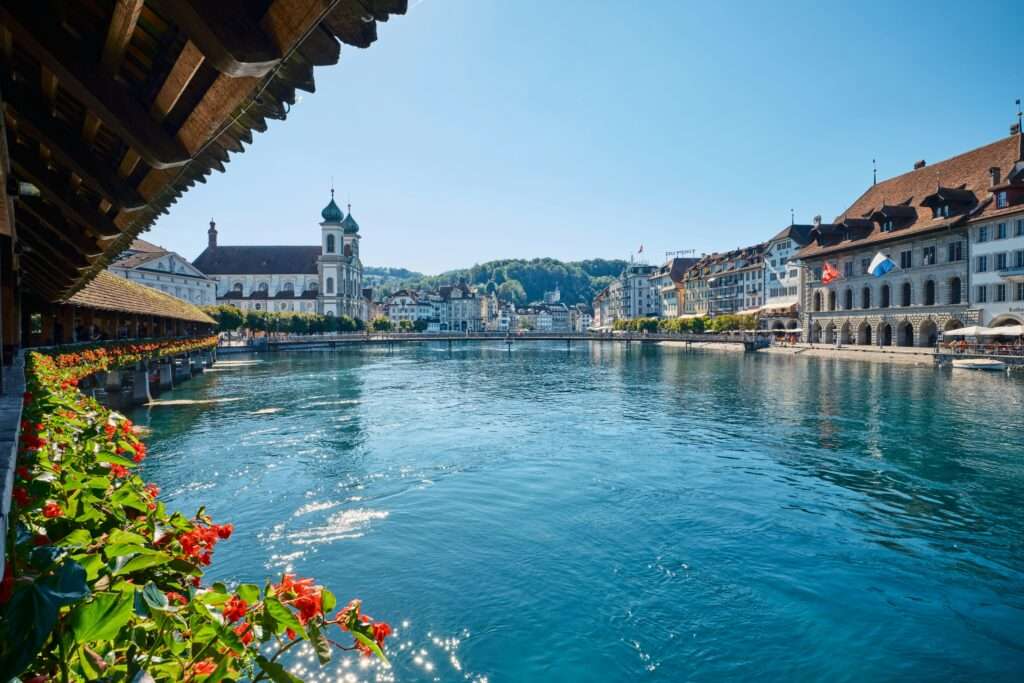
There’s a moment on the Lake Lucerne boat cruise – somewhere between watching the mountains rise steeply out of the water and realising you’ve been quietly staring for twenty minutes – where Switzerland fully justifies every word ever written about it. The lake earns it. You’ll feel it too. We spent a long weekend here in spring, and I’ll be honest: it completely delivered. The city is one of the most beautiful in Europe (genuinely), the boat trip is one of those experiences you talk about for years, and the surrounding mountains offer some of the best accessible hiking you’ll find anywhere. Add in villages that look straight out of a painting and you’ve got a trip that works from basically every angle. Here’s the full guide – city, lake, villages, hikes, practical tips – so you can plan yours properly. Why Spring Is the Best Time to Visit Lake Lucerne Spring visits to Lucerne hit a very specific sweet spot. April through early June brings wildflowers on the mountain slopes, clear air that makes the peaks look genuinely close, and noticeably fewer crowds than peak summer. The lake boat services run on spring timetables from mid-April, and the mountain railways at Rigi and Pilatus operate throughout – though some cable cars come back online in April, so it’s worth checking specific timetables if you’re planning a mountain day. The light is also extraordinary in spring. Low sun angles, green hillsides still fresh, snow dusting the higher peaks. Everything looks slightly more cinematic than it has any right to. Temperature-wise, expect 10-18°C at lake level in May – good walking weather, especially combined with long daylight hours. First: Lucerne City Before you get on a boat or up a mountain, give Lucerne itself proper time. Most people underestimate it. Two to three hours in the old town is the minimum – a half-day is better. Chapel Bridge (Kapellbrücke) Start here. The Chapel Bridge is Lucerne’s most photographed landmark and, unusually for something so famous, it completely lives up to the hype. It’s a covered wooden footbridge built in the 14th century, spanning the River Reuss between the old and new towns, with the octagonal Water Tower rising from the water at its midpoint. Under the roof, triangular 17th-century paintings depict scenes from Swiss history and the lives of Lucerne’s patron saints. Much of the bridge was destroyed by a fire in 1993 and rebuilt within a year – some charred panels were deliberately left in place as a reminder. Worth knowing before you visit. The best time to be here is early morning before the tour groups arrive, or in the hour before sunset when the light on the water is genuinely exceptional. The photo spot opposite the tower from the riverbank gives the most satisfying full-frame view. The Old Town (Altstadt) Cross the Chapel Bridge and spend an hour getting genuinely lost in the old town. Car-free cobbled streets, frescoed facades, painted fountains, and squares that open up unexpectedly. The Weinmarkt, Hirschenplatz, and Kornmarkt are all worth wandering through. There are independent shops and good cafés woven throughout – this isn’t a sanitised tourist district, it’s an actual working city that happens to look like this. The Musegg Wall Walk the 14th-century city walls for the best views over Lucerne’s rooftops, the lake, and the mountains beyond. Nine towers punctuate the wall, four of which are open to climb for free during summer months. The Zytturm – home to Lucerne’s oldest clock – is the most famous. The views from up here are properly special, especially in clear spring weather. The Lion Monument (Löwendenkmal) A few minutes’ walk from the old town, a dying lion carved directly into a sandstone cliff. It was created in 1820 to commemorate Swiss Guards who died defending the French Royal Family during the Revolution of 1792. Mark Twain called it “the most mournful and moving piece of stone in the world.” It’s not overstating it. Practical Lucerne Tips Lucerne is 45 minutes by direct train from Zurich on SBB Rail, and 3 hours from Geneva. The main boat station for lake cruises is right next to the train station – Pier 1 serves Weggis, Vitznau, Brunnen, and Flüelen. Overnight guests in Lucerne receive a free Visitor Card that covers local buses and trams in Zone 10 – ask your hotel for it at check-in. The Lake Lucerne Boat Trip Do not skip this. It is, without question, one of the best ways to spend four hours in Switzerland. Lake Lucerne – or Vierwaldstättersee in German, meaning “lake of the four forest cantons” – covers 114 km² and has 32 boat piers dotted around its shores. Its shape is deeply irregular, with multiple arms and peninsulas that create constantly changing scenery. The northern section between Lucerne and Brunnen is open and green, with villages on the hillsides and the Alps in the distance. The southern Urnersee section – from Brunnen south toward Flüelen – is a different experience altogether: steep cliffs drop almost vertically into the water, the scale becomes dramatically bigger, and the whole thing starts to feel more like a Norwegian fjord. It’s one of the most spectacular stretches of water in Central Europe. Choosing Your Route For a full lake experience, the boat to Flüelen and back takes around 3.5 hours each way – most people do a partial route and hop off along the way. The classic approach is: Lucerne – Vitznau (30-40 minutes): The most popular section for combining with a Mount Rigi excursion. The cogwheel railway departs from the jetty in Vitznau. Lucerne – Weggis (30 minutes): Weggis is the “Riviera” of the lake – mild microclimate, palm trees along the promenade, the Rigi cable car accessible from here. Good for a short escape with a coffee and a walk. Lucerne – Brunnen (1.5 hours): Takes you through the widest part of the lake before the scenery starts to close in. Brunnen has a lovely waterfront. Lucerne
The Lemon Posset in a Lemon Shell Dessert That Will Transport You Straight to the Amalfi Coast
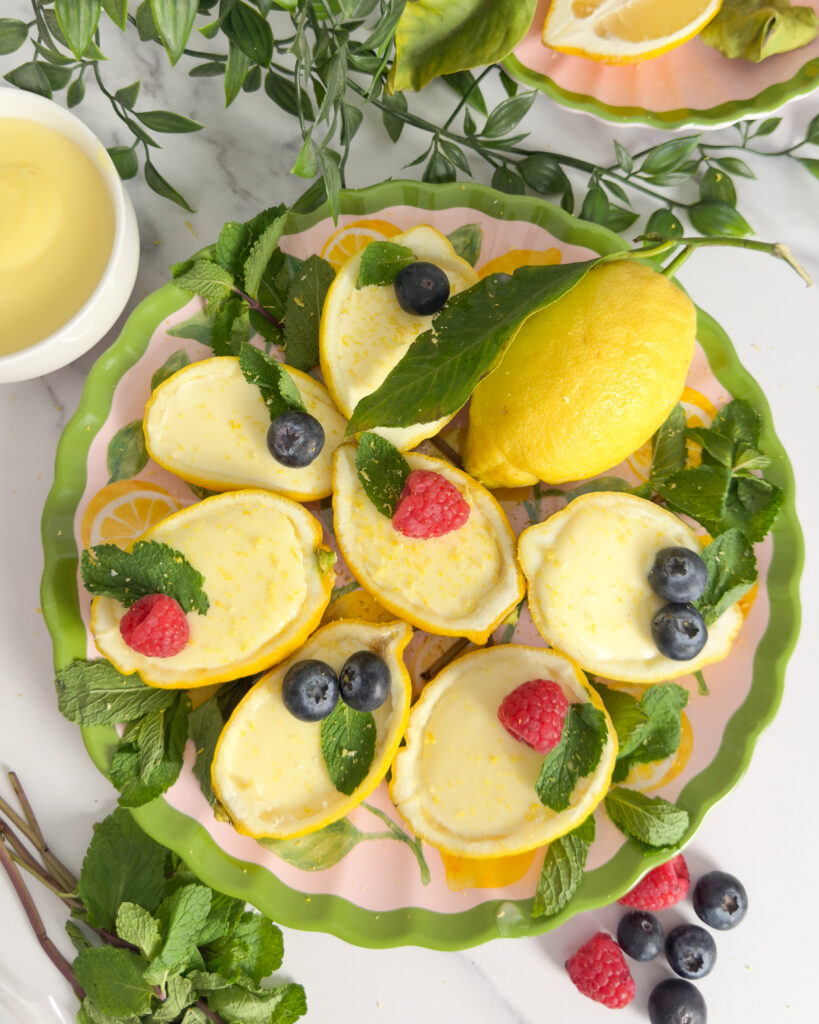
Creamy, tangy, impossibly elegant – this no-bake lemon posset served in its own hollowed-out shell is the dessert you’ll make on repeat all summer long. Inspired by those giant sfusato lemons that line the cliffs of southern Italy. This lemon posset in a lemon shell is one of those desserts that looks wildly impressive but is genuinely one of the easiest things you’ll ever make. Three ingredients. No gelatine. No water bath. Just cream, sugar, and lemon juice doing their quiet chemical magic in the fridge while you get on with your life. Why lemon posset is the most underrated British dessert Before we go full Amalfi-mode, let’s give credit where it’s due: lemon posset is a British classic. It’s been around since the 15th century – originally a hot drink of milk curdled with wine or ale – and it’s evolved into this gloriously simple, silky set cream that requires absolutely zero faff. No eggs, no gelatine, no bain-marie. The cream sets when the lemon’s acidity causes the proteins to tighten up, giving you a texture that’s somewhere between panna cotta and a very, very good lemon curd. The Amalfi Coast connection? Those legendary sfusato amalfitano lemons are enormous, fragrant, and intensely flavoured. They’re practically grown for this recipe. Serving posset inside an actual lemon shell is a nod to that Italian tradition of using the whole fruit, and honestly, it elevates a dinner party dessert from “lovely” to “excuse me, I need to take a photo of this before I eat it.” What you’ll need The beauty of this recipe is its simplicity. You want large, unwaxed lemons – the bigger, the better. Look for lemons that feel heavy for their size, which usually means they’re juicy and full of flavour. Sicilian or Amalfi lemons if you can find them (some UK supermarkets now stock them, or try your local Italian deli), but honestly, any good unwaxed lemon will do. For the posset itself, use double cream – nothing else will work here. The fat content is what allows the set to happen. Don’t be tempted to swap in single cream or crème fraîche. I’ve been there. It’s a sad, soupy situation. Lemon posset in lemon shells Ingredients 6 large unwaxed lemons 600ml double cream 150g caster sugar 75ml fresh lemon juice (from the scooped lemons) Zest of 2 lemons Fresh mint or edible flowers, to garnish You’ll also need Sharp serrated knife Small spoon or melon baller Fine sieve Heavy-bottomed saucepan Jug for pouring Muffin tin (to keep shells upright) Method Slice the top off each lemon (about a quarter of the way down) and set the lids aside. Use a small spoon or melon baller to scoop out all the flesh and juice into a bowl, taking care not to pierce the skin. Squeeze the flesh through a sieve to collect the juice – you’ll need about 75ml. Pop the empty shells and lids into a muffin tin and transfer to the freezer for 20 minutes while you make the posset. Combine the double cream and caster sugar in a heavy-bottomed saucepan over a medium heat. Stir until the sugar dissolves, then bring to a rolling boil. Let it boil for exactly 3 minutes, stirring frequently – watch it closely as cream loves to boil over. Remove from the heat and add the lemon juice and zest. Give it a good stir and leave to cool for 10 minutes. It should smell absolutely incredible at this point. Pour the posset mixture into a jug (easier for filling the shells), then carefully fill each lemon shell to just below the rim. Don’t overfill – it will expand slightly as it sets. Place the filled shells back in the muffin tin and refrigerate for a minimum of 4 hours, or overnight. The longer they set, the firmer and more sliceable the posset. To serve, pop the lemon lids back on at an angle, add a sprig of fresh mint or a few edible flowers, and bring them straight to the table. Watch the faces. Tips for the perfect set The boil is everything Three minutes of a proper rolling boil is non-negotiable. Too little and the posset won’t set; too much and it can take on a slightly buttery, grainy texture. Set a timer, stay near the hob, and resist the urge to wander off to check your phone. Chill the shells first Popping the prepared lemon shells in the freezer for 20 minutes before filling them helps the posset start setting from the outside in, giving you a cleaner, more defined result – especially useful if you’re making these in a warm kitchen. The lemon-to-cream ratio matters More lemon juice = firmer set, more tangy flavour. Less = softer, creamier, more delicate. This recipe sits at 75ml for a reliable set that still feels luxuriously silky. If your lemons are particularly tart, reduce to 65ml. If you want a really sharp kick, go up to 85ml. Make it ahead: These will keep happily in the fridge for up to 48 hours – ideal for dinner party prep. Cover loosely with cling film once set. The lemon shells may look slightly dull after 24 hours, so give them a quick buff with a piece of kitchen roll before serving to restore that glossy finish. How to serve your lemon posset shells These are dramatic enough on their own, but if you want to take things up a notch, here are some serving ideas that lean into the Amalfi aesthetic: Limoncello drizzle. A teaspoon of good limoncello poured over the top just before serving adds a boozy, intensely lemony hit that tastes like a holiday. Highly recommend. Candied lemon zest. Thin strips of lemon zest simmered in sugar syrup and left to dry. Curled on top, they look like something from a patisserie window and add a lovely chewy-sweet contrast to the creamy posset. Crushed amaretti. A scattering of crushed amaretti biscuits right before serving gives you crunch