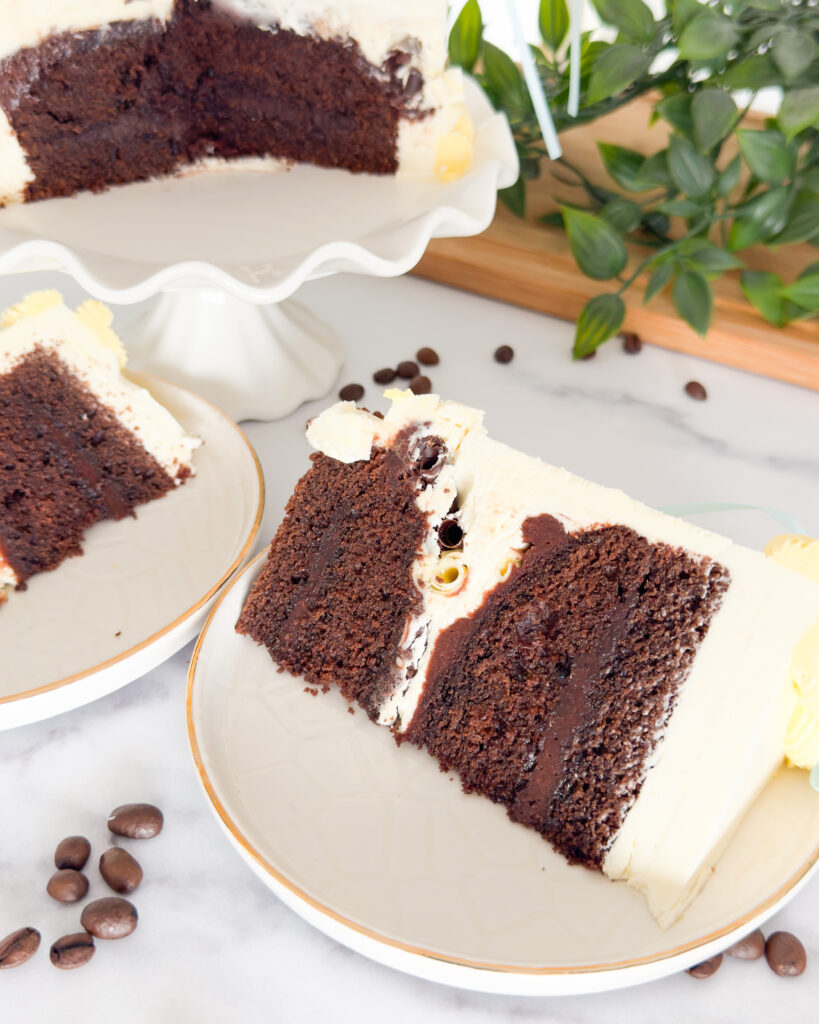
9 Swiss Meringue Buttercream Flavours Worth Trying (And Exactly How to Make Them)

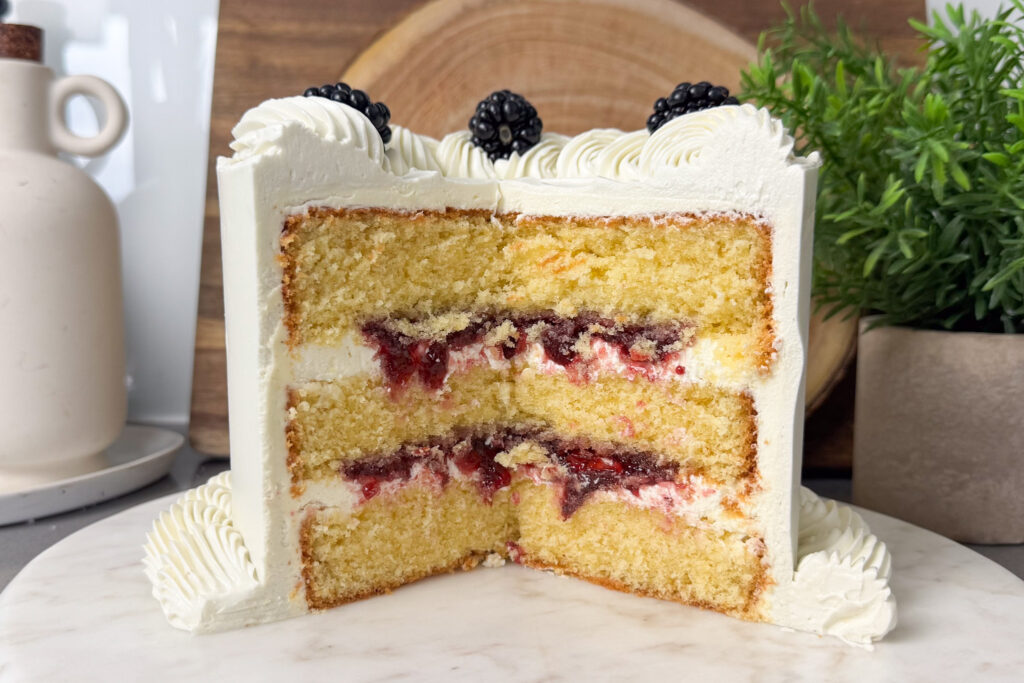
If you’ve already made the base Swiss Meringue Buttercream and you’re now standing in the kitchen wondering what to do with it – this is the article for you. One of the things I love most about SMBC is how ridiculously well it takes on flavour. The base itself is light, silky, and not overly sweet, which means it lets other ingredients shine rather than fighting them. You’re not masking anything with icing sugar – you’re genuinely building flavour into something already delicious. Below are all nine of my favourite variations, each one tested and trusted. Every single one is built on my base recipe – so if you haven’t made that yet, start there first, then come back here and pick your flavour. A Few Things to Know Before You Start All quantities below are based on the full base recipe (500g sugar, 250g egg whites, 500g butter). If you’re making a smaller or larger batch, scale accordingly. Add your flavouring at the very end – after the paddle attachment step — and mix through on low speed until fully combined. For anything liquid or spreadable, fold it in gently to avoid knocking the air out of your beautifully whipped buttercream. Taste as you go. The amounts I’ve given are to my taste, and taste is personal. Start with slightly less than the recipe suggests, taste, and add more from there. 1. Chocolate Swiss Meringue Buttercream Milk, white, or dark – your call This is probably the most requested variation I make, and honestly it’s easy to see why. The combination of silky SMBC with rich chocolate is genuinely hard to beat. It pipes beautifully, tastes incredible, and works on almost any cake flavour you can think of. What to add: 200–250g melted and cooled chocolate How to do it: Melt your chocolate gently in the microwave in short bursts, stirring between each one. I tend to do this right at the start of making the base recipe, so by the time the buttercream is ready, the chocolate has had plenty of time to cool to room temperature. You want it fully liquid but not warm – if it’s even slightly too hot it can cause the buttercream to melt and split. Pour it in slowly with the mixer on low and watch it transform. Which chocolate to use: Dark chocolate gives you a more intense, bittersweet result. Milk chocolate is richer and sweeter. White chocolate creates something almost caramel-like and pairs brilliantly with fruit cake layers. All three work – it just depends on the cake you’re making. Best paired with: Chocolate sponge (obviously), vanilla, hazelnut, or raspberry cake layers. 2. Caramel Swiss Meringue Buttercream If dark chocolate SMBC is the classic, caramel SMBC is the one that makes people absolutely lose their minds. There’s something about the combination of the buttery, silky base and that deep, slightly salty caramel that is just outrageously good. It also looks stunning – a warm golden hue against a white cake crumb. What to add: 4–5 tbsp salted or unsalted caramel How to do it: Add the caramel a tablespoon at a time on low speed, tasting as you go. Salted caramel gives you that gorgeous sweet-salty contrast that I personally love; unsalted is more straightforward and a little gentler. Either works. A note on consistency: Caramel adds liquid to the buttercream, so if it starts to look a little soft after adding it, pop the bowl in the fridge for 10 minutes and then mix again. It’ll firm right back up. Best paired with: Apple, banana, vanilla, or brown butter sponge layers. Also incredible sandwiched between layers of chocolate cake. 3. Lemon Swiss Meringue Buttercream Bright, fresh, and zingy – this one is a total showstopper on a summer cake. The combination of lemon extract and lemon curd gives you both depth of flavour and a lovely citrus sharpness that cuts through the richness of the buttercream beautifully. It’s the kind of thing that makes people say they didn’t think they liked buttercream, and then eat three slices. What to add: Replace the vanilla extract in the base recipe with lemon extract, and add 4-5 tbsp of lemon curd How to do it: Skip the vanilla entirely when making the base and use lemon extract in its place. Then, once the buttercream has come together, fold in the lemon curd a tablespoon at a time on low speed. Homemade vs shop-bought curd: Honestly, both work. A good-quality shop-bought lemon curd is completely fine and saves you a step. If you do have time to make your own, it’s absolutely worth it – the flavour is brighter and more intensely lemony. Best paired with: Lemon, elderflower, vanilla, or blueberry sponge layers. 4. Berry Swiss Meringue Buttercream Raspberry, strawberry, blueberry, or blackberry This one is as pretty as it is delicious. Depending on the berry you use, you get everything from a deep jewel-toned purple to a soft dusty pink – all completely natural, no food colouring required. The berry compote adds a subtle tartness that keeps things from being too sweet, and the flavour is genuinely fruity rather than artificial. What to add: 5 tbsp of berry compote (homemade or shop-bought) How to do it: Fold the compote in a tablespoon at a time on low speed. Make sure the compote is completely cool before adding – warm compote will melt the buttercream. If it looks a little soft after adding, refrigerate the bowl for 10-15 minutes and mix again. Which berry to use: Raspberry gives you a beautiful pink with a sharp, punchy flavour Strawberry is softer, sweeter, and a little more delicate Blueberry creates a stunning lilac-purple and a slightly floral flavour Blackberry gives a deeper, darker purple and a more intense taste Homemade compote: If you have time, making your own is easy and makes a real difference. Simmer your chosen berries with a little sugar and a squeeze of lemon until jammy, then cool completely before
The Best Chocolate Cake Recipe (One Bowl, No Mixer!)
Hello, fellow chocolate cake obsessives. I’ve been on a mission to find the best homemade chocolate cake recipe for what feels like forever, and I can officially say: the search is over. This is it. We’re talking deep, rich, fudgy chocolate flavour with a crumb so moist it’s almost offensive. Slathered in a glossy, silky chocolate buttercream that sets like a dream. And the best bit? The whole thing comes together in one bowl with just ten ingredients — no stand mixer required. Why You’ll Love This Chocolate Cake One bowl — minimal washing up, maximum reward No mixer needed — a whisk and some elbow grease is all it takes Super moist crumb — thanks to buttermilk and a secret ingredient (more on that in a sec) Deeply chocolatey — but not in an overwhelming way; it hits that perfect sweet spot Endlessly adaptable — bake it as a two-layer showstopper or a simple sheet cake Ingredients For the Cake 350g caster sugar 90g fine dark cocoa powder 260g plain flour 2 tsp baking powder 1½ tsp bicarbonate of soda 1 tsp salt 100ml vegetable oil 2 tsp vanilla extract 3 medium eggs, at room temperature 225g buttermilk 175g strongly brewed coffee, cooled to room temperature What You Need to Know About the Ingredients This moist chocolate cake is made almost entirely from cupboard staples, which is exactly how I like my baking. Let me walk you through the key players: Fine dark cocoa powder — this is non-negotiable for a truly deep chocolate flavour. It’s less acidic than regular cocoa and gives the cake that almost-dark colour and intense richness. Invest in a good quality one — it genuinely makes the difference between a good cake and a great cake. Buttermilk — the secret to an impossibly tender, moist crumb. It reacts with the bicarbonate of soda to give the cake lift, while also adding a subtle tang that balances out the sweetness. No buttermilk? Make your own by adding a tablespoon of lemon juice or white wine vinegar to 227ml of whole milk and leaving it for five minutes. Strongly brewed coffee — before you panic: your cake will not taste like coffee. I promise. What it will taste like is deeper, richer, more intensely chocolatey chocolate. Coffee amplifies cocoa like nothing else. Just make sure it’s cooled to room temperature before you pour it in, otherwise you’ll scramble the batter. Plain flour — no need for fancy cake flour here. Regular plain flour gives you that gorgeous velvety crumb without any faff. Vegetable oil — oil rather than butter keeps this cake incredibly moist for days (if it lasts that long, which in my house it doesn’t). How to Make the Best Chocolate Cake Step 1: Prep Your Tins Preheat your oven to 180°C / 160°C fan (350°F). Grease and line two 8-inch or three 6-inch round cake tins with baking parchment. Set aside. Step 2: Mix the Dry Ingredients In a large mixing bowl, whisk together the caster sugar, cocoa powder, plain flour, baking powder, bicarbonate of soda, and salt. Step 3: Add the Wet Ingredients Make a well in the centre of your dry ingredients. Add the vegetable oil, vanilla extract, eggs, and buttermilk directly into the well. Starting from the centre, whisk outward in circular motions, gradually pulling the dry ingredients into the middle as you go. Whisk until no lumps remain — the batter will be thick at this point, which is exactly right. Step 4: Add the Coffee Pour in the cooled brewed coffee and whisk until the batter is completely smooth and glossy. It will thin out considerably — don’t be alarmed, this is what we want. Step 5: Bake Divide the batter evenly between your prepared tins. Bake for 25–30 minutes, until the tops spring back when lightly pressed and a skewer inserted into the centre comes out with just a few moist crumbs attached (not wet batter). Do not overbake. A dry chocolate cake is a tragedy. Take the cakes out slightly earlier than you think — they’ll continue to bake as they cool. Leave to cool in the tins for 10 minutes, then turn out onto a wire rack and leave to cool completely before frosting. Step 6: Fill and decorate I filled my cake with espresso ganache and my signature Swiss Meringue buttercream, which I also used to add some piping details – but you can use any filling you like, American buttercream, white or dark chocolate ganache. You could even add some fruit filling like raspberry compote which is simply divine with a rich chocolate cake. Three Tips for the Perfect Chocolate Cake 1. Use good quality cocoa powder. I cannot stress this enough. The quality of your cocoa is the single biggest factor in how your cake tastes. Splurge the extra pound or two — your future self will thank you enormously. 2. Don’t overbake. Pull the cakes out when a skewer comes out with a few moist crumbs still attached. The residual heat will finish the job as they cool, and you’ll end up with a beautifully fudgy texture rather than a dry, disappointing one. 3. Cool completely before frosting. I know, I know — it feels impossible. But if you try to frost a warm cake, the buttercream will melt, slide off, and you’ll end up with a chocolatey mess (delicious, but chaotic). Give the layers a full hour to cool properly. Use the time to make the frosting, do a bit of tidying, walk the dog — whatever gets you through. You can even bake the layers the day ahead and store them wrapped in the fridge until you’re ready to fill and decorate. Frequently Asked Questions How do I store leftover chocolate cake? Store in an airtight container at room temperature for up to three days, or in the fridge for up to five. Bring to room temperature before serving for the best texture. Can I freeze it? Yes!
Lucerne to Lago Maggiore: The Ultimate Alpine Pass Road Trip Guide (2026)

There are road trips, and then there is this one. The loop from Lucerne through the heart of the Swiss Alps – ticking off the Klausen, Susten, Furka, and Gotthard passes before dropping down into the palm-tree warmth of Lago Maggiore – is one of the finest drives in Europe. You get cobblestone hairpin bends, glacier-edge roads, the meadow where Switzerland was born, a James Bond film location, and a Mediterranean lake town at the end of it, all connected by some of the most extraordinary mountain scenery on the continent. This guide covers the full route from Lucerne to Lago Maggiore with detailed breakdowns of each pass, what to stop for, how long each section takes, and every practical piece of information you need to drive it well. Bookmark it before you go. The Route: Overview The core loop covers roughly 300 kilometres of driving, though distances mean very little on Swiss Alpine passes – what looks like 30km on the map can take 90 minutes to drive properly, and you’ll want to stop often. Allow a minimum of two full driving days, or three if you want a night in Andermatt and time to actually breathe at Lago Maggiore. The sequence: Lucerne – Klausen Pass – Andermatt (Day 1) Susten Pass side excursion from Andermatt, then Furka Pass – Airolo/Gotthard Pass area (Day 2) Gotthard Pass south into Ticino – Biasca – Bellinzona – Locarno/Lago Maggiore (Day 2-3) The passes connect logically because they all converge around Andermatt – the mountain village in Canton Uri that sits at the intersection of eight Alpine passes and effectively acts as the hub of central Switzerland’s road network. If you’re doing this trip, Andermatt is both your most logical overnight stop and one of the most satisfying places in the country. Before You Go: Essential Practicalities Swiss Motorway Vignette If you use any Swiss motorway (Autobahn) en route – which you will – you need a Swiss Motorway Vignette. It costs CHF 40 per calendar year and covers all Swiss motorways. It can be purchased online before arrival as a digital e-vignette (by far the easiest option) or as a sticker at the border or at petrol stations near entry points. Driving on a Swiss motorway without one carries a fine. Buy it before you travel. Pass Opening Dates 2026 All four passes covered in this guide are seasonal – they close in winter and don’t reopen until spring or early summer. This is non-negotiable: check official status before you travel. Based on typical 2026 schedules (confirmed against alpen-paesse.ch): Klausen Pass: Expected to open mid-May 2026 (snow clearance begins mid-April 2026) Gotthard Pass: Expected to open around end of May 2026 Susten Pass: Typically opens early to mid-June; one of the last to clear Furka Pass: Scheduled to open 1 June 2026, weather permitting The window when all four passes are reliably open is late June through mid-October. If you’re travelling in early June, the Gotthard and Klausen are likely open while Furka and Susten may be borderline – check individual pass status at alpen-paesse.ch the morning of your drive. They update in real time. For October travel: Passes begin closing from the top down. Furka typically closes first (mid-October), then the others through late October. Check daily. Fuel Petrol stations become very scarce above 1,500m. Fill up properly in valley towns before beginning any pass climb. Key fuelling stops: Lucerne, Altdorf (foot of Klausen), Andermatt, Meiringen or Innertkirchen (before Susten), and Airolo or Biasca (south of Gotthard). Don’t rely on finding petrol on the passes themselves. Road Rules Speed limits on Alpine passes are typically 50km/h through villages, 80km/h on open pass roads (though you’ll rarely want to push it) Uphill traffic has right of way over downhill traffic on narrow sections Coaches and PostBuses have priority over private vehicles – pull into passing places when you see them coming No towing trailers on Klausen Pass for private vehicles Carry a warning triangle and high-visibility vest (Swiss law) Check alpen-paesse.ch or the TCS Switzerland app for real-time pass status Lucerne to Andermatt via the Klausen Pass Distance: approximately 100km | Driving time: 2.5-3.5 hours without stops The Klausen Pass is the opening act and, at 1,948m, perhaps the least famous of the four passes in this guide. That’s largely why it’s so good. While the Furka draws Bond fans and the Gotthard has history books written about it, the Klausen sits quietly delivering one of the most varied and genuinely surprising drives in Switzerland, with traffic that reflects its under-the-radar status. Leave Lucerne heading south toward the A4/A14. The drive down to Altdorf (at the base of the pass, roughly 40 minutes from Lucerne) takes you past the southern end of Lake Lucerne through the Urnersee – the dramatic fjord-like arm of the lake that you may have seen from the water if you did the Lake Lucerne boat trip. From the water this section looks impossibly steep; from the road you’ll understand why. Altdorf and Bürglen – William Tell Country Before the climb begins, the small town of Altdorf is worth a brief stop. The famous bronze Tell Monument stands in the main square – a heroic statue of William Tell with his son at his feet, one of the most photographed Swiss landmarks. Altdorf is the centre of the William Tell legend: the story goes that Tell was forced to shoot an apple from his son’s head here in the 14th century by the Habsburg governor Gessler. Bürglen, the village at the entrance to the Schächental valley a few minutes south of Altdorf, is considered Tell’s actual birthplace according to the tradition. The Tell Museum in the village centre houses the largest collection of objects, documents, and depictions relating to the Swiss national hero. The Klausenpassrennen – the legendary hillclimb race run between 1922 and 1934, at the time considered the toughest mountain race in Europe – also started here. From 2026, this historic event is being
The Only Swiss Meringue Buttercream Recipe You’ll Ever Need

If you’ve ever bitten into a cake and thought: how is this buttercream so impossibly smooth? There’s a very good chance it was Swiss Meringue Buttercream. And once you try it, I promise you’ll never go back to anything else. I’m not exaggerating when I say this recipe changed the way I bake. It’s the kind of buttercream that makes people stop mid-bite and ask what on earth you put in it. The answer? Egg whites, sugar, butter, and a little patience. That’s it. This is my signature recipe – the one I use for every celebration cake, every tall layer cake, every time I need something that looks stunning and tastes even better. I’m sharing every detail here so you can nail it first time. What Is Swiss Meringue Buttercream? Swiss Meringue Buttercream — SMBC if you’re in the know — is made by heating egg whites and sugar together over a bain-marie until the sugar fully dissolves, then whipping the mixture into a glossy meringue before adding butter. The result is a buttercream that is silky smooth, not overly sweet, and absolutely luscious to work with. Compared to American buttercream (the classic icing sugar and butter combo), SMBC is far less sweet, far more stable, and dramatically smoother. It’s also incredibly versatile — you can flavour it almost any way you like. It does take a little longer than chucking icing sugar in a bowl, but the results are absolutely worth it. Think of it as the kind of bake that you make slowly, with a glass of something nice, on a Sunday afternoon. Why This Recipe Works There are a few things that set this recipe apart from others you might have tried: It uses a 2:1:2 ratio of sugar to egg whites to butter — perfectly balanced and reliable every time. The optional addition of vegetable shortening (Trex in the UK) gives you that gorgeous bright white finish and extra stability — brilliant for warmer weather. The final step of mixing on low with the paddle attachment for 8–10 minutes is the secret weapon. It removes every last air bubble and gives you the smoothest, most velvety texture imaginable. It can be flavoured endlessly — chocolate, Biscoff, lemon, pistachio, matcha, caramel. You name it, it works. What You’ll Need This recipe makes enough to fill and cover a 5-inch, four-layer cake. The Essentials 500g sugar (caster or granulated both work) 250g egg whites (fresh or pasteurised carton — I use carton) 500g unsalted butter, softened ½ tsp salt 1 tsp vanilla extract Optional but Recommended 1/8 tsp cream of tartar (helps stabilise the meringue) 50–75g vegetable shortening, such as Trex (for a whiter, more stable result) Vinegar or lemon juice (for wiping down your equipment) A quick note on egg whites: carton pasteurised egg whites are my personal preference. The meringue whips up a little softer, but the end result is just as incredible — and it saves the faff of separating eggs. Both work brilliantly. Before You Start: The Prep That Matters This is the bit most people skip and then wonder why their meringue won’t whip. Please don’t skip it. Read the full recipe before you do anything else. Seriously. Get your butter out of the fridge an hour before you start. You want it soft enough to leave a dent when you press your finger in — not melting, not cold. Wipe your stand mixer bowl, spatula, and whisk attachment with vinegar or lemon juice. Even a trace of fat will stop your meringue from whipping. This step is non-negotiable. Measure everything out and have it ready to go. Swiss Meringue Buttercream rewards organisation. Get a sugar thermometer if you don’t already have one. You’ll need it to hit the safe temperature range for the meringue. Three Tips for the Perfect Chocolate Cake 1. Use good quality cocoa powder. I cannot stress this enough. The quality of your cocoa is the single biggest factor in how your cake tastes. Splurge the extra pound or two — your future self will thank you enormously. 2. Don’t overbake. Pull the cakes out when a skewer comes out with a few moist crumbs still attached. The residual heat will finish the job as they cool, and you’ll end up with a beautifully fudgy texture rather than a dry, disappointing one. 3. Cool completely before frosting. I know, I know — it feels impossible. But if you try to frost a warm cake, the buttercream will melt, slide off, and you’ll end up with a chocolatey mess (delicious, but chaotic). Give the layers a full hour to cool properly. Use the time to make the frosting, do a bit of tidying, walk the dog — whatever gets you through. You can even bake the layers the day ahead and store them wrapped in the fridge until you’re ready to fill and decorate. The Method, Step by Step Take it one step at a time and you’ve got this. Stage 1: The Bain-Marie Set up a bain-marie: heat water in a saucepan over medium-high heat until it simmers. Combine the sugar and egg whites in a heat-proof bowl (I use the KitchenAid bowl directly). Place it over the simmering water, making sure the bowl doesn’t touch the water. Stir continuously for around 10 minutes until all the sugar is fully dissolved. To check, rub a small amount between your fingers — it should feel completely smooth with no grittiness. Keep going until it does. Use your sugar thermometer to monitor the temperature. Aim for 75°C — the safe range is 65–80°C. Stage 2: Building the Meringue Transfer the mixture to your stand mixer (or attach the bowl if you used it for the bain-marie). Fit the whisk attachment. Start on low-medium speed (speed 3 on a KitchenAid) and add the salt and cream of tartar. Mix for one minute. Increase to medium speed (speed 5) for another 1–2 minutes. Increase to high (speed 7) and keep whisking
Greenwich Neighbourhood Guide: A Local’s Perspective on Southeast London’s Maritime Village
Greenwich feels like it shouldn’t work. A UNESCO World Heritage Site sitting next to a riverside market selling vintage band t-shirts and handmade jewellery. Historic naval buildings backing onto indie record shops and craft beer pubs. Yet somehow, this Southeast London neighbourhood has managed to be both a significant historical site and an actual place where people live, work, and spend Saturday afternoons. I’ve been visiting Greenwich for years, and what keeps bringing me back isn’t just the obvious attractions (though the park views are genuinely spectacular). It’s the way you can spend a morning in the 17th century at the Royal Observatory, have lunch at a Vietnamese café that’s been run by the same family for 20 years, then browse independent bookshops before ending the day with a pint overlooking the Thames. Greenwich has layers, and the longer you spend here, the more you discover. This isn’t a guide to ticking off the tourist sites. It’s the Greenwich I’ve come to know through early morning park walks, lazy Sunday lunches, evening drinks by the river, and those perfect autumn afternoons when the whole neighbourhood seems to glow. Getting to Greenwich By Train: Greenwich National Rail (from London Bridge, Cannon Street, or Charing Cross) – 10-15 minutes from central London, right in the heart of Greenwich Maze Hill (one stop further) – quieter station, good if you’re heading straight to the park By DLR (Docklands Light Railway): Cutty Sark for Maritime Greenwich – Right by the river, closest to the market and main attractions Greenwich – Just up the hill from Cutty Sark, closer to the town centre By River: Thames Clippers run regularly from central London piers (Westminster, Embankment, Tower). Takes about 45 minutes but the journey itself is lovely. You arrive right at Greenwich Pier. By foot through the Greenwich Foot Tunnel: If you’re already at Island Gardens on the north side of the Thames, you can walk through the Victorian foot tunnel under the river. Atmospheric, free, and you emerge right by the Cutty Sark. Best approach: Train is fastest. DLR gives you views over Docklands. River boat is the most scenic but takes longest. Choose based on your priorities. When to Visit Greenwich Weekday mornings: The neighbourhood at its best. Park walks without crowds, cafés with available tables, market stalls setting up without the weekend chaos. You can actually appreciate the architecture without fighting through tour groups. Saturday (market days): Busiest day. Greenwich Market is in full swing, streets are packed, riverside pubs are rammed by 2pm. Arrive before 11am or after 4pm to avoid peak crowds. Sunday afternoons: Lovely balance. Market is on but slightly calmer than Saturday. The park is busy with families and dog walkers, giving it that proper neighbourhood feel. Many Londoners make this their Sunday routine. Avoid: Bank holiday weekends (overwhelmed), Saturday afternoons in summer (too crowded to enjoy properly), and late December when Christmas market crowds are at their peak. Best seasons: Spring for park blossoms and longer daylight, early autumn for golden light on those Georgian terraces and fewer tourists. Greenwich Park: The Main Event Let’s start with the obvious. Greenwich Park isn’t just a park – it’s one of London’s eight Royal Parks, covers 180 acres, and has some of the best views in the city. The Classic Walk Enter at the riverside gate (near Cutty Sark), walk up the tree-lined avenue, past the Flower Garden on your left, and climb to the Royal Observatory at the top. The views from here stretch across Canary Wharf, the City, and on clear days you can see right into central London. Time: 20-30 minutes if you walk steadily, longer if you stop to actually enjoy it Difficulty: Uphill all the way but not steep. Paved paths. Best for: Views, first-time visitors, photos that make your friends jealous The Quiet Side Most visitors follow the central avenue. Go left instead, towards the Flower Garden and Wilderness Deer Park. Ancient sweet chestnut trees, fewer people, and if you visit early morning you might see the deer. Time: 30-45 minutes loop Best for: Peaceful walks, nature, avoiding crowds When: Weekday mornings, early Sunday before noon The Long Route Enter at Maze Hill station, walk through the wild eastern side of the park, past the tennis courts and children’s playground, up to the Observatory, then down through the centre. This gives you the full Greenwich Park experience. Time: 1-1.5 hours Best for: Proper walks, seeing the whole park, exercising dogs (on leads in certain areas) Practical Park Details Open: 6am – 6pm (winter), until 9:30pm (summer) Toilets: Near the Pavilion Café and at the Observatory Café: Pavilion Café (good coffee, decent pastries, outdoor seating) Dogs: Welcome but must be on leads near deer and in certain areas Views: Best from the Observatory terrace and the statue of General Wolfe My favourite time: Early morning, 7-8am. You’ll have the place almost to yourself, the light is beautiful, and deer are more visible. The Royal Observatory and Prime Meridian The reason Greenwich exists as a tourist destination. This is where time begins – literally. The Prime Meridian (0° longitude) runs through the courtyard, and every timezone in the world is measured from here. Entry: £18.50 adults (includes Flamsteed House and Meridian courtyard) Worth it? If you’re interested in navigation, astronomy, or history – absolutely. If you just want the Instagram shot standing on the meridian line, you can do that for free in the courtyard outside the buildings. What’s included: Historic telescope rooms, Harrison’s marine chronometers (fascinating if you’re into problem-solving), planetarium shows, and yes, that brass line marking 0° longitude. Best time to visit: First thing when they open (10am) to beat tour groups, or late afternoon when day-trippers have left. Skip it if: You’re not particularly interested in maritime history or astronomy. The courtyard view is free and honestly that’s the main attraction for most people. National Maritime Museum Right at the base of the park, this is one of the best museums
Notting Hill Neighbourhood Guide: A Local’s Perspective on West London’s Most Charming Area
There’s something about Notting Hill that feels different from the rest of London. Maybe it’s the pastel-painted townhouses catching the afternoon light, or the way Portobello Road Market spills onto the pavement every Saturday. Whatever it is, this West London neighbourhood has held onto its village charm despite becoming one of the city’s most sought-after postcodes. I’ve been exploring Notting Hill for years now, and it never quite loses that initial magic. Yes, it’s become more polished since the film made it famous, but if you know where to look, you’ll still find the independent spirit that makes this area special. This isn’t a tourist’s hit-list of Instagram spots – it’s the Notting Hill I’ve come to know through countless Saturday mornings at the market, stolen weekday afternoons in quiet cafés, and those perfect summer evenings when the whole neighbourhood seems to spill onto the streets. Whether you’re planning your first visit or you’re a Londoner looking to rediscover this corner of West London, here’s what you actually need to know about Notting Hill. Getting to Notting Hill By Tube: Notting Hill Gate (Central, Circle, District lines) – the main station Ladbroke Grove (Circle, Hammersmith & City lines) – quieter, northern entrance Holland Park (Central line) – southern edge, near Kensington Best for: Portobello Market and main shopping street Quieter entrance: Come up at Ladbroke Grove for fewer crowds By Bus: Routes 7, 23, 52, 70, 94, and 390 all serve the area. The 52 is particularly useful if you’re coming from Victoria or King’s Cross. Walking from nearby areas: 15 minutes from Paddington Station 20 minutes from Hyde Park 25 minutes from Kensington High Street When to Visit Notting Hill Saturday mornings (8am-1pm): Peak Portobello Market time. Get there before 10am if you want to browse the antiques section without battling crowds. The market officially starts at 9am, but stallholders are setting up from 8am and it’s much quieter. Weekday mornings: The neighbourhood at its most authentic. Cafés filled with locals working on laptops, no queue for the Gail’s sourdough you’ve been eyeing, and Portobello Road as an actual street rather than a tourist attraction. Sunday afternoons: Most shops are closed, but the residential streets are beautiful for wandering. Locals are out walking dogs, the pubs have that perfect lazy Sunday atmosphere, and you get a real feel for what it’s like to actually live here. Avoid: Saturday afternoons after 1pm (market chaos), bank holiday weekends (overwhelmed), and August (peak tourist season). Best seasons: Spring for the wisteria-covered houses in full bloom, early autumn for golden afternoon light on those pastel facades. Portobello Road Market: What You Need to Know Let’s address the main reason most people come to Notting Hill. Portobello Market stretches for about a mile along Portobello Road, but it’s not one market – it’s several markets in one. The Antiques Section (Chepstow Villas to Elgin Crescent) Saturdays only, 9am-6pm This is the famous bit. Vintage jewellery, antique silverware, old cameras, vinyl records, and the kind of curiosities you didn’t know you needed. Quality varies wildly from genuine antiques to tat, but that’s part of the charm. My tip: Most dealers know their stuff, so proper bargains are rare. But if you’re looking for something specific and you visit regularly, you’ll start to recognise the dealers who specialise in your interest. They’re usually happy to chat and far more knowledgeable than a quick Google search. What to look for: Vintage jewellery (especially at the northern end), mid-century ceramics, old Penguin paperbacks, vintage prints and maps. The Food Market (Talbot Road to Lancaster Road) Monday-Saturday, 9am-6pm (Thursday until 1pm) Fresh produce, artisan bread, international food stalls, and some of the best street food in West London. This section runs all week, not just Saturdays. What to get: Gail’s sourdough if you haven’t already tried it, fresh pasta from the Italian deli, seasonal fruit from the greengrocer near Talbot Road, and coffee from any of the stalls—they’re all decent. Lunch here: The Moroccan food stall near Lancaster Road has been there for years. The falafel wraps are excellent and about £6. There’s also a Spanish tapas stall that does proper tortilla. The Fashion and Vintage Clothing (Westbourne Grove end) Fridays and Saturdays, 9am-5pm Less touristy than the antiques section. Vintage Levi’s, retro sportswear, second-hand designer pieces, and a lot of fast-fashion stalls mixed in. Worth it if: You enjoy digging for vintage finds and don’t mind that 80% of stalls are selling the same mass-produced festival clothing. General Market Survival Tips Start at the Notting Hill Gate end and walk north. You’ll hit the good antiques section first when you’re still fresh, and can decide if you want to continue up to the fashion bit. The real treasures are in the permanent shops, not on the street stalls. The antique shops along Portobello Road (especially in the arcade at 290) are open Tuesday-Saturday and often have better quality pieces. Watch your bag. Saturdays get packed, and pickpockets know this. Cafés Worth Your Time Farm Girl (59 Portobello Road) The Australian café that started the whole rose latte trend. Yes, it’s Instagram-famous. Yes, there’s often a queue. But the food is genuinely good—fresh, colourful, and the kind of breakfast you actually want on a Saturday morning. Order: The ricotta hotcakes or the green shakshuka. The coffee’s decent too. Best time: Weekday mornings (9-11am) to avoid the weekend crowd. Price: £12-18 for breakfast Granger & Co (175 Westbourne Grove) Bill Granger’s London outpost. More polished than Farm Girl, slightly less Instagrammable, arguably better food. The corn fritters and scrambled eggs are excellent. Why I like it: Large windows, lots of natural light, and they don’t rush you. Good spot for working if you’re okay with café noise. Best time: Any weekday morning Price: £14-20 for breakfast Gail’s Bakery (Multiple locations on Portobello Road) The London bakery chain that actually deserves the hype. Sourdough bread, excellent pastries, proper coffee. There are three Gail’s in Notting Hill, which tells
The Only Fudgy Dark Chocolate Brownie Recipe You’ll Ever Need
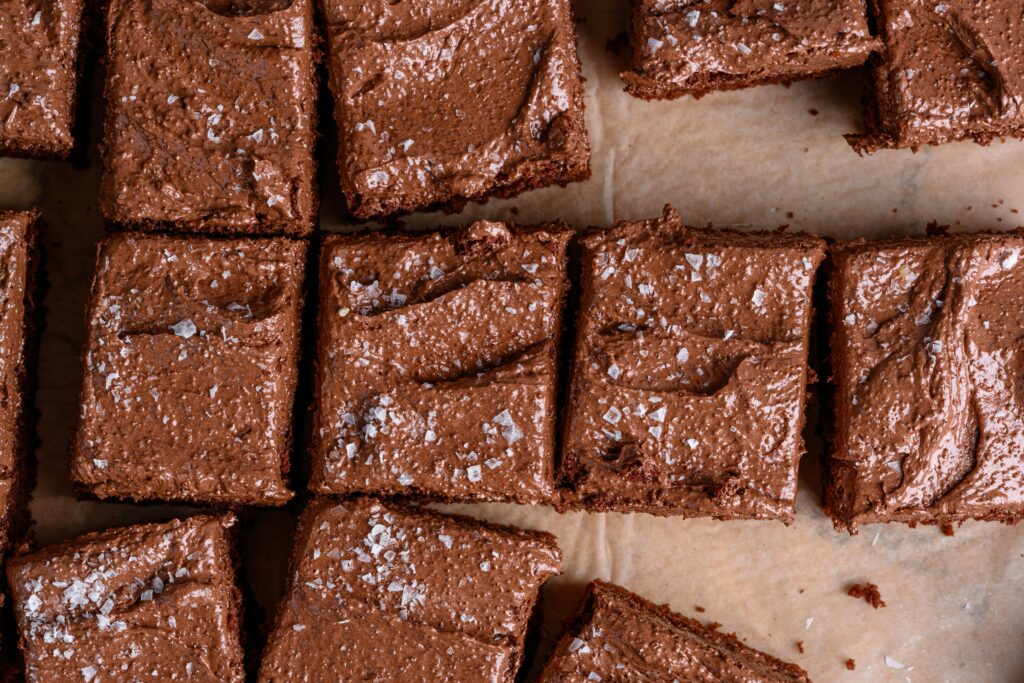
There is a specific kind of magic in a perfect brownie. I’m talking about that paper-thin, crackly top that shatters when you bite into it, giving way to a center so fudgy it’s almost like ganache. As someone with a background in cake decorating here in London, I have tried sooo many brownies. Many viral London “gems” look beautiful on Instagram but fall flat on texture and taste. This recipe is the “Little Black Dress” of my kitchen – classic, reliable, and perfectly styled. The Secret to the “Glossy” Top The secret isn’t just the chocolate – it’s the eggs and sugar. By whisking them until they reach a “ribbon stage” (thick, pale, and voluminous), you’re creating a meringue-like structure that rises to the top in the oven. Don’t skip the whisking time! Ingredients 180g Dark Chocolate: Use the good stuff (at least 70% cocoa). It balances the sugar. 180g Unsalted Butter: High-quality European butter for richness. 3 Large Eggs: Room temperature is best for volume. 250g Caster Sugar: For that perfect structure. 100g Plain Flour: Just enough to hold it together. 45g Cocoa Powder: Sifted, to avoid lumps. Optional (but divine): add a few dollops of your favourite jam or spread. I love using homemade berry compote. The Signature Finish: Choose Your Aesthetic A plain brownie is a snack; a topped brownie is an event. Depending on my mood, I finish these one of two ways. This is where the magic happens. Option 1: The “Cloud” (White Chocolate) For a high-contrast, minimalist look, I top the cooled brownies with white chocolate ganache. The Mix: 150g of white chocolate + 50ml double cream. The Tip: Use a high-quality white chocolate with cocoa butter (not vegetable fat) so it snaps when you bite into it. Option 2: The “Silk” (50% Cocoa Ganache) If I want something indulgent and glossy, I opt for a 1:1 dark chocolate ganache instead The Mix: 100g of 50% cocoa chocolate + 100ml double cream. The Method: Heat the cream until just simmering, pour over the chopped chocolate, let it sit for 2 minutes, then stir until it’s a mirror-like silk. The Look: Moody, rich, and incredibly satisfying. Method The Prep: Preheat your oven to 180°C (160°C Fan). Line a 9″ square baking tray with parchment paper. Melt & Cool: Melt the butter and dark chocolate together (bain-marie or microwave). Set aside to cool to room temperature. The “Mousse” Stage: Whisk the eggs and caster sugar together for 3–5 minutes until the mix doubles in volume and leaves a visible “trail” (the ribbon) for 2–3 seconds. The Gentle Fold: Pour your cooled chocolate mixture over the egg mousse. Use a spatula to fold gently—don’t knock out that air! Sift & Incorporate: Sift the cocoa powder and flour over the mix. Fold again until smooth. The Bake: Pour into the tin and bake for 25–30 minutes. It should have a slight wobble in the center. Leave to cool completely in the tin. The Final Touch: Once the brownie is stone cold, pour over your chosen white chocolate or 50% ganache. Let it set before slicing with a hot knife for those perfectly clean “Instagram” edges. Baking Ahead & Storage If you’re planning ahead, these actually taste better the next day once the flavours have had time to settle. You can keep them in an airtight container at room temperature for up to 4 days, or in the fridge if you prefer them extra chewy (especially with the ganache). They also freeze really well – just wrap the individual squares tightly in parchment and foil. Let me know if you make these.
The Vanilla Cake I’ve Been Making for Years
If you’ve followed me for a while, you’ll know I spent years working as a cake decorator. Celebration cakes, wedding cakes, last-minute orders, early starts, buttercream everywhere. And through all of that, there was one vanilla cake recipe I came back to again and again. I’ve shared bits and pieces of my baking over the years, but this is the first time I’m putting this one on the blog. All my customers commented on how amazing it tastes and the best thing is that it bakes up even layers so you don’t even need to trim the top. My go-to for these measurements is 3 6” layers as they bake up amazingly and give you layers that have the perfect thickness. What Makes This Vanilla Cake Different A lot of vanilla cake recipes go one of two ways: all butter (flavourful but can dry out quickly) or all oil (stays moist but lacks depth). This one sits right in the middle, and that balance is exactly what makes it so good. Butter gives you flavour and structure – you can’t replicate that richness with anything else Oil keeps the crumb soft and moist for days, not just the afternoon it was baked Sour cream adds a gentle richness and just enough tang to stop the whole thing tasting one-dimensional The result is a bakery-style vanilla cake with a velvety, even crumb that’s sturdy enough to layer – even in tall, statement cakes – without ever feeling dry, dense, or heavy. Ingredients Makes three 6″ layers 300g caster sugar 80ml neutral oil (vegetable or sunflower) 200g unsalted butter, softened 5 medium eggs, at room temperature 1 tsp vanilla extract 60g sour cream 300g self-raising flour Pro tip: Room temperature eggs and sour cream are super important here – they emulsify into the batter much more smoothly and are part of why you get that even, velvety crumb. Take them out of the fridge at least 30 minutes before you start. Method 1. Prep your tins and oven Preheat your oven to 190°C (170°C fan). Grease and line three 6″ cake tins. If you’re doing a layer cake, dividing the batter evenly between the tins is key – I always use a kitchen scale. 2. Cream the fats and sugar Add the caster sugar, oil, and softened butter to a stand mixer fitted with the paddle attachment – or a large mixing bowl if you’re using a hand mixer. Beat on medium-high speed for a few minutes until the mixture looks noticeably lighter and fluffier. This step is incredibly important. You’re building air into the batter here, and that air is what gives the finished cake its soft, open structure. 3. Add the vanilla and eggs Add the Vanilla and then the eggs one at a time, mixing well after each addition. The mixture may look slightly split or curdled at this point but that’s completely normal. Keep going. It’ll come together once the flour goes in, and it won’t affect the finished cake at all. 4. Fold in the flour Sift the self-raising flour directly over the bowl. Mix on the lowest speed, or fold in gently by hand, until most of the flour is just incorporated. The key word there is just – you want to keep as much air in the batter as possible, so don’t overwork it. 5. Finish with sour cream Add the sour cream and fold or mix gently until the batter is smooth and evenly combined. It should look glossy and uniform at this stage. 6. Bake Divide the batter evenly between your prepared tins and level the tops. Bake for 22–25 minutes, or until a skewer inserted into the centre comes out clean. If you’re baking all three tins at once, check them individually – ovens can be uneven and one layer might need an extra couple of minutes. 7. Let the cake cool completely Leave the cakes in their tins for around 10 minutes, then carefully turn them out onto a wire rack to cool completely before filling or decorating. Don’t rush this part. A warm cake will melt buttercream and make decorating much harder than it needs to be. 8. Fill and Decorate I always use my signature Vanilla buttercream as base filling and for covering the cake. It’s incredibly versatile and I have another blog post to give you 9 different flavour options that go with my base recipe. Storing Your Vanilla Cake This is one of those cakes that really improves after a short rest – which is a big part of why I relied on it so much when I was decorating professionally. I’d almost always bake the day before, let the sponges sit overnight in the fridge, and decorate the next morning. Once baked and cooled, the sponges can be: Wrapped tightly and stored at room temperature for up to a day Refrigerated for up to two days Frozen (wrapped well in cling film, then foil) for up to a month If your cake is already filled and frosted, keep it in an airtight container. It’ll hold well at room temperature for 2–3 days, or in the fridge for up to 5 days – just let it come back to room temperature before serving for the best texture. What to Fill It With This sponge is endlessly versatile. It holds fillings beautifully and pairs well with almost anything. A few combinations worth trying: Classic vanilla buttercream + raspberry jam – crowd-pleasing every single time Lemon curd + whipped cream – sharp, light, and perfect for spring and summer Chocolate ganache – for when you want a proper celebration cake moment Fresh strawberries + whipped cream – simple, seasonal, always a hit Frequently Asked Questions Can I use plain flour instead of self-raising?Yes – add 2 teaspoons of baking powder per 150g of plain flour to get the same lift. Can I make this as an 8″ cake?Absolutely. This quantity works well as two 8″ layers. Add 5–8
Strawberry Shortcake Layer Cake, with a Nod to Paris
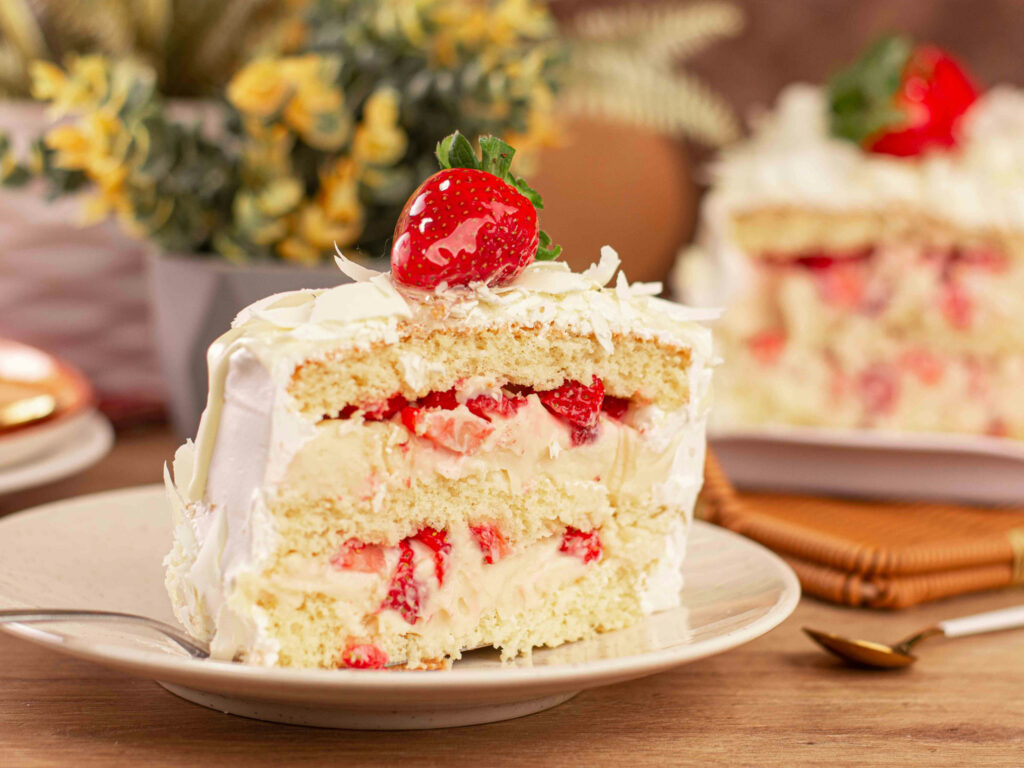
This strawberry shortcake is one of those recipes I’ll never stop making. No matter how many new ideas I bookmark or how many flavour combinations I flirt with, this is the cake I always come back to. It’s familiar in the best way – soft vanilla sponge, fresh strawberries, and whipped cream that’s just sweet enough to feel indulgent without tipping over. It’s also the cake that always makes me think of Paris. Not because it’s French by definition, but because of how strawberries and cream show up there. Walk past a pâtisserie in Paris around Valentine’s Day and you’ll spot le fraisier in the window – neat layers, glossy strawberries, pale cream, quietly beautiful. Romantic without being loud. Special without being heavy. That’s exactly the energy of this cake. I love it for Valentine’s Day because it doesn’t feel themed or performative. There’s no food colouring, no heart shapes, no drama. Just a cake that’s meant to be shared, sliced at the table, and eaten slowly enough to notice how good it actually is. Why I Always End Up Baking This One What makes this strawberry shortcake such a favourite is how easy it is to love. The sponge is light and tender, with real strawberry flavour coming from a reduction rather than anything artificial. The whipped cream keeps everything fresh, and the strawberries do most of the talking. It looks beautiful once it’s assembled, but it’s not precious. You don’t panic when you cut into it. You don’t need a special reason to make it. It’s the kind of cake that disappears quietly, one slice at a time, until suddenly there’s nothing left. Ingredients Strawberry Reduction 450g strawberries (fresh or frozen), hulled 50g caster sugar Vanilla Strawberry Sponge (3 x 6-inch layers) 170g unsalted butter, at room temperature 200g caster sugar 3 large eggs, at room temperature 1½ teaspoons vanilla extract 200g plain flour 1½ teaspoons baking powder ½ teaspoon salt 120ml whole milk 120ml cooled strawberry reduction Whipped Cream Frosting 600ml double cream, cold 90g icing sugar, sifted 1½ teaspoons vanilla extract Filling & Decoration 300–400g fresh strawberries, sliced Method Make the Strawberry Reduction Add the strawberries and sugar to a saucepan and cook over a medium heat until the fruit breaks down and the mixture thickens. This usually takes around 20–30 minutes. Blend until smooth and set aside to cool completely. Prepare the Tins Heat the oven to 170°C fan. Grease and line three 6-inch round cake tins. Make the Cake Batter Cream the butter and sugar until pale and fluffy. Add the eggs one at a time, mixing well after each addition, then stir in the vanilla. In a separate bowl, whisk together the flour, baking powder, and salt. Add this to the batter in two stages, alternating with the milk and strawberry reduction. Mix gently until just combined. Divide the batter evenly between the tins. Bake Bake for 30–35 minutes, until lightly golden and a skewer inserted into the centre comes out clean. Allow the cakes to cool completely before assembling. Whipped Cream Frosting Whip the double cream with the icing sugar and vanilla until soft, stable peaks form. Keep it light — the texture should feel smooth and airy. Assemble Place one sponge layer on a serving plate. Spread over a layer of whipped cream and scatter with sliced strawberries. Repeat with the second layer, then finish with the final sponge, a soft swirl of cream, and strawberries on top.
Pistachio & Vanilla Cake Inspired by a Persian Love Cake
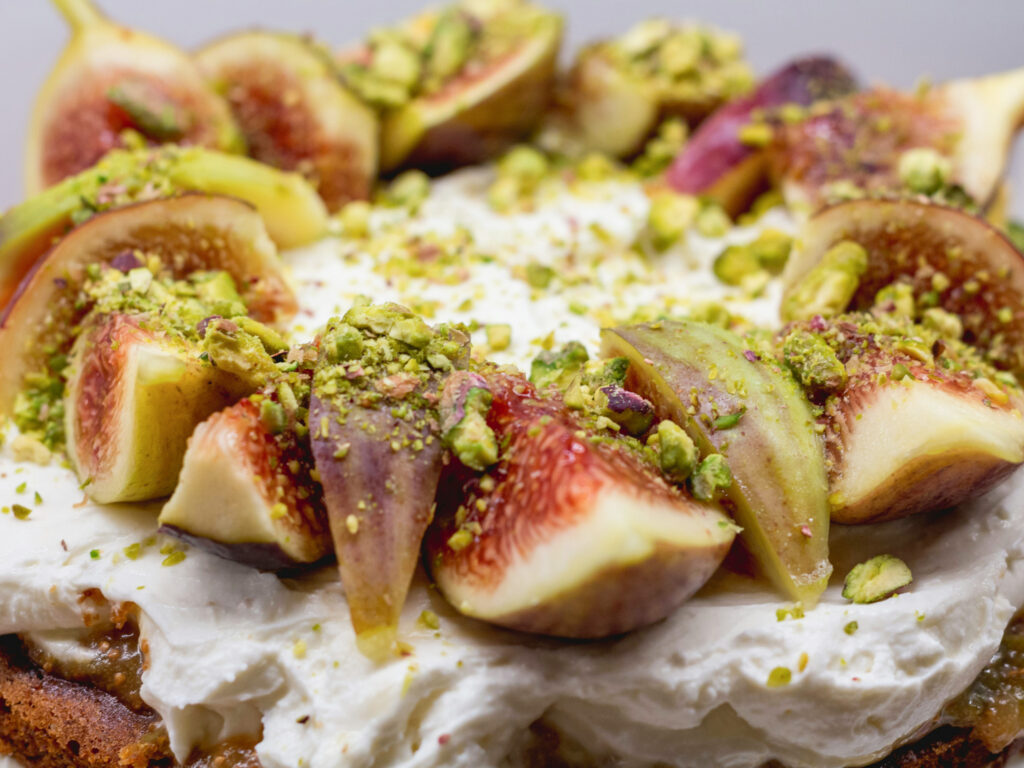
This pistachio and vanilla cake is inspired by a Persian love cake, making it a natural fit for Valentine’s Day baking. It takes cues from the original’s use of ground almonds, citrus zest, warming spices, and syrup-soaked crumb, but shifts the flavour profile away from floral notes. Instead, this version focuses on vanilla, orange zest, cardamom, and pistachios for a flavour that feels warm, balanced, and easy to enjoy. I’ve never really been a big fan of rose water in baking, so this recipe skips it entirely. The result is a cake that works well as a Valentine’s dessert, while still being versatile enough to make again for birthdays, dinners, or any occasion that calls for a layered cake without heavy icing. Designed as a three-layer 6-inch cake, this version uses plain flour instead of semolina, giving the layers a little more structure while keeping the crumb moist and tender thanks to ground almonds, yoghurt, and syrup. What Is a Persian Love Cake? Persian love cake is a Middle Eastern-inspired almond cake, typically made with ground almonds, citrus zest, and warming spices such as cardamom, then soaked in syrup after baking. It’s known for its dense yet moist texture and its aromatic flavour, which often includes floral notes like rose water. This recipe isn’t a traditional Persian love cake. Instead, it’s a layered cake inspired by those core flavours and techniques – the use of almonds, citrus, spice, and syrup – adapted into a format that stacks well and leans towards a more familiar vanilla-led profile rather than floral flavours. Why This Version Works Well as a Layer Cake Plain flour gives structure for stacking Ground almonds keep the crumb moist Pistachios add texture without weighing the cake down The syrup keeps the layers soft for days The flavour profile suits Valentine’s baking without being overly sweet If you make this, I’d love to know how you get on – especially if it becomes part of your Valentine’s plans. Pistachio & Vanilla Cake (Inspired by a Persian Love Cake – 3 × 6-inch Layers) Makes: 3 × 6-inch cake layersOven: 170°C fan / 190°C conventional Ingredients For the cake layers 180g ground almonds 110g plain flour 2 tsp baking powder ½ tsp bicarbonate of soda 1½ tsp ground cardamom Zest of 2 oranges 180g unsalted butter, softened 220g caster sugar 4 large eggs, at room temperature 2 tsp vanilla extract 180g Greek yoghurt 120g pistachios, finely chopped For the syrup 180ml water 150g caster sugar Juice of 1 orange 1 tsp vanilla extract To finish Chopped pistachios Icing sugar Method 1. Prepare the tins Grease and line the bases of three 6-inch round cake tins. Preheat the oven to 170°C fan. 2. Mix the dry ingredients In a large bowl, whisk together the ground almonds, plain flour, baking powder, bicarbonate of soda, cardamom, and orange zest. 3. Cream the butter and sugar Beat the butter and caster sugar until pale and fluffy. This step helps create even, tender layers. 4. Add the eggs and vanilla Add the eggs one at a time, beating well between each addition. Stir in the vanilla extract. 5. Combine Fold the dry ingredients into the butter mixture in two additions, alternating with the Greek yoghurt. Mix gently until just combined, then fold through the chopped pistachios. 6. Bake Divide the batter evenly between the prepared tins and level the tops. Bake for 22–25 minutes, until lightly golden and a skewer inserted into the centre comes out clean. 7. Make the syrup While the cakes bake, add the water, sugar, and orange juice to a small saucepan. Simmer gently for 6–8 minutes until slightly reduced. Remove from the heat and stir in the vanilla extract. 8. Syrup the layers As soon as the cakes come out of the oven, prick each layer all over with a skewer and spoon over the warm syrup. Leave the cakes to cool completely in their tins. Assembling the Cake Once fully cooled, stack the layers with: lightly sweetened whipped cream mascarpone or thick Greek yoghurt Finish with chopped pistachios and a dusting of icing sugar. Storage Store the assembled cake in the fridge for up to 3 days. Bring to room temperature before serving.Unfilled layers can be wrapped and stored at room temperature for 2 days.