The Best Chocolate Cake Recipe (One Bowl, No Mixer!)
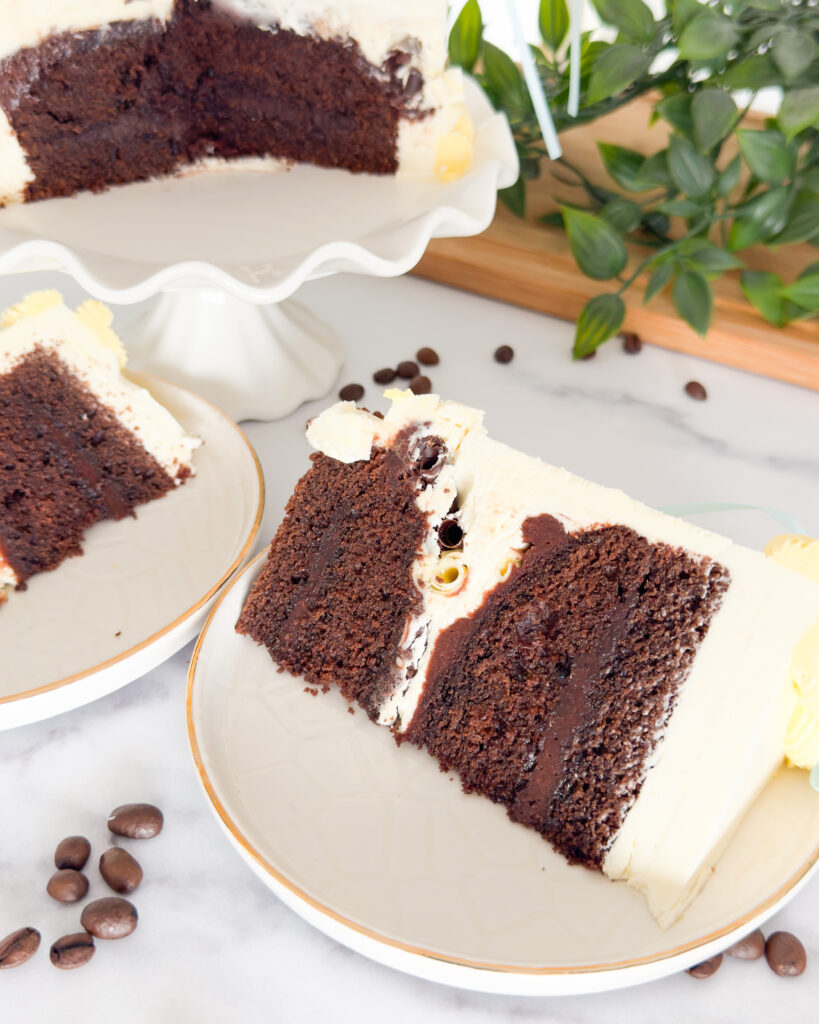
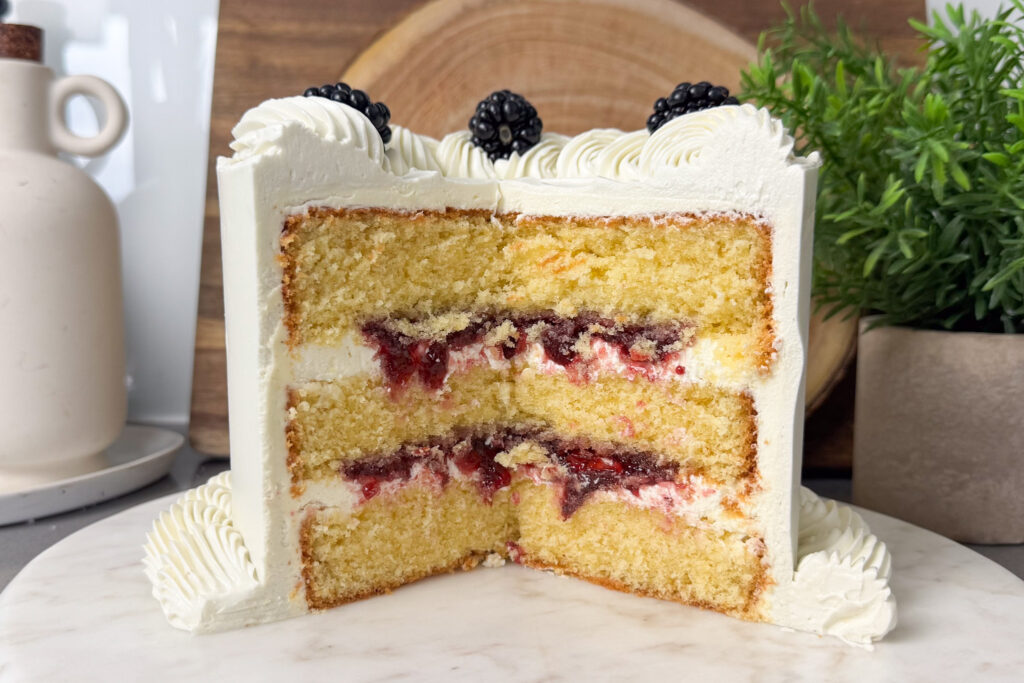
Hello, fellow chocolate cake obsessives. I’ve been on a mission to find the best homemade chocolate cake recipe for what feels like forever, and I can officially say: the search is over. This is it. We’re talking deep, rich, fudgy chocolate flavour with a crumb so moist it’s almost offensive. Slathered in a glossy, silky chocolate buttercream that sets like a dream. And the best bit? The whole thing comes together in one bowl with just ten ingredients — no stand mixer required. Why You’ll Love This Chocolate Cake One bowl — minimal washing up, maximum reward No mixer needed — a whisk and some elbow grease is all it takes Super moist crumb — thanks to buttermilk and a secret ingredient (more on that in a sec) Deeply chocolatey — but not in an overwhelming way; it hits that perfect sweet spot Endlessly adaptable — bake it as a two-layer showstopper or a simple sheet cake Ingredients For the Cake 350g caster sugar 90g fine dark cocoa powder 260g plain flour 2 tsp baking powder 1½ tsp bicarbonate of soda 1 tsp salt 100ml vegetable oil 2 tsp vanilla extract 3 medium eggs, at room temperature 225g buttermilk 175g strongly brewed coffee, cooled to room temperature What You Need to Know About the Ingredients This moist chocolate cake is made almost entirely from cupboard staples, which is exactly how I like my baking. Let me walk you through the key players: Fine dark cocoa powder — this is non-negotiable for a truly deep chocolate flavour. It’s less acidic than regular cocoa and gives the cake that almost-dark colour and intense richness. Invest in a good quality one — it genuinely makes the difference between a good cake and a great cake. Buttermilk — the secret to an impossibly tender, moist crumb. It reacts with the bicarbonate of soda to give the cake lift, while also adding a subtle tang that balances out the sweetness. No buttermilk? Make your own by adding a tablespoon of lemon juice or white wine vinegar to 227ml of whole milk and leaving it for five minutes. Strongly brewed coffee — before you panic: your cake will not taste like coffee. I promise. What it will taste like is deeper, richer, more intensely chocolatey chocolate. Coffee amplifies cocoa like nothing else. Just make sure it’s cooled to room temperature before you pour it in, otherwise you’ll scramble the batter. Plain flour — no need for fancy cake flour here. Regular plain flour gives you that gorgeous velvety crumb without any faff. Vegetable oil — oil rather than butter keeps this cake incredibly moist for days (if it lasts that long, which in my house it doesn’t). How to Make the Best Chocolate Cake Step 1: Prep Your Tins Preheat your oven to 180°C / 160°C fan (350°F). Grease and line two 8-inch or three 6-inch round cake tins with baking parchment. Set aside. Step 2: Mix the Dry Ingredients In a large mixing bowl, whisk together the caster sugar, cocoa powder, plain flour, baking powder, bicarbonate of soda, and salt. Step 3: Add the Wet Ingredients Make a well in the centre of your dry ingredients. Add the vegetable oil, vanilla extract, eggs, and buttermilk directly into the well. Starting from the centre, whisk outward in circular motions, gradually pulling the dry ingredients into the middle as you go. Whisk until no lumps remain — the batter will be thick at this point, which is exactly right. Step 4: Add the Coffee Pour in the cooled brewed coffee and whisk until the batter is completely smooth and glossy. It will thin out considerably — don’t be alarmed, this is what we want. Step 5: Bake Divide the batter evenly between your prepared tins. Bake for 25–30 minutes, until the tops spring back when lightly pressed and a skewer inserted into the centre comes out with just a few moist crumbs attached (not wet batter). Do not overbake. A dry chocolate cake is a tragedy. Take the cakes out slightly earlier than you think — they’ll continue to bake as they cool. Leave to cool in the tins for 10 minutes, then turn out onto a wire rack and leave to cool completely before frosting. Step 6: Fill and decorate I filled my cake with espresso ganache and my signature Swiss Meringue buttercream, which I also used to add some piping details – but you can use any filling you like, American buttercream, white or dark chocolate ganache. You could even add some fruit filling like raspberry compote which is simply divine with a rich chocolate cake. Three Tips for the Perfect Chocolate Cake 1. Use good quality cocoa powder. I cannot stress this enough. The quality of your cocoa is the single biggest factor in how your cake tastes. Splurge the extra pound or two — your future self will thank you enormously. 2. Don’t overbake. Pull the cakes out when a skewer comes out with a few moist crumbs still attached. The residual heat will finish the job as they cool, and you’ll end up with a beautifully fudgy texture rather than a dry, disappointing one. 3. Cool completely before frosting. I know, I know — it feels impossible. But if you try to frost a warm cake, the buttercream will melt, slide off, and you’ll end up with a chocolatey mess (delicious, but chaotic). Give the layers a full hour to cool properly. Use the time to make the frosting, do a bit of tidying, walk the dog — whatever gets you through. You can even bake the layers the day ahead and store them wrapped in the fridge until you’re ready to fill and decorate. Frequently Asked Questions How do I store leftover chocolate cake? Store in an airtight container at room temperature for up to three days, or in the fridge for up to five. Bring to room temperature before serving for the best texture. Can I freeze it? Yes!
Greenwich Neighbourhood Guide: A Local’s Perspective on Southeast London’s Maritime Village
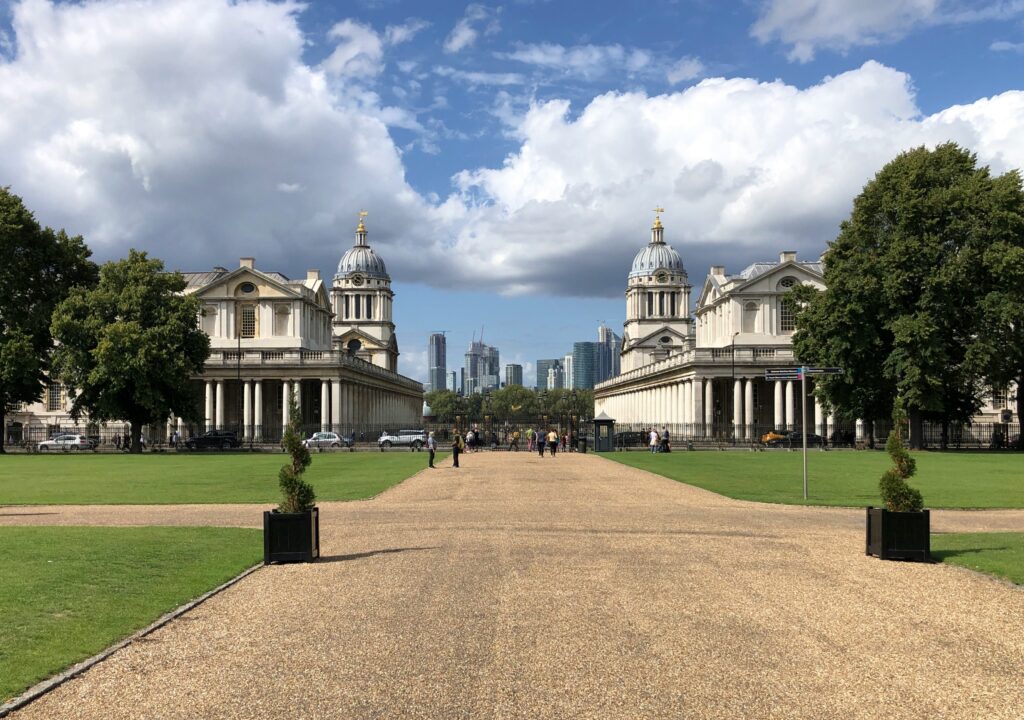
Greenwich feels like it shouldn’t work. A UNESCO World Heritage Site sitting next to a riverside market selling vintage band t-shirts and handmade jewellery. Historic naval buildings backing onto indie record shops and craft beer pubs. Yet somehow, this Southeast London neighbourhood has managed to be both a significant historical site and an actual place where people live, work, and spend Saturday afternoons. I’ve been visiting Greenwich for years, and what keeps bringing me back isn’t just the obvious attractions (though the park views are genuinely spectacular). It’s the way you can spend a morning in the 17th century at the Royal Observatory, have lunch at a Vietnamese café that’s been run by the same family for 20 years, then browse independent bookshops before ending the day with a pint overlooking the Thames. Greenwich has layers, and the longer you spend here, the more you discover. This isn’t a guide to ticking off the tourist sites. It’s the Greenwich I’ve come to know through early morning park walks, lazy Sunday lunches, evening drinks by the river, and those perfect autumn afternoons when the whole neighbourhood seems to glow. Getting to Greenwich By Train: Greenwich National Rail (from London Bridge, Cannon Street, or Charing Cross) – 10-15 minutes from central London, right in the heart of Greenwich Maze Hill (one stop further) – quieter station, good if you’re heading straight to the park By DLR (Docklands Light Railway): Cutty Sark for Maritime Greenwich – Right by the river, closest to the market and main attractions Greenwich – Just up the hill from Cutty Sark, closer to the town centre By River: Thames Clippers run regularly from central London piers (Westminster, Embankment, Tower). Takes about 45 minutes but the journey itself is lovely. You arrive right at Greenwich Pier. By foot through the Greenwich Foot Tunnel: If you’re already at Island Gardens on the north side of the Thames, you can walk through the Victorian foot tunnel under the river. Atmospheric, free, and you emerge right by the Cutty Sark. Best approach: Train is fastest. DLR gives you views over Docklands. River boat is the most scenic but takes longest. Choose based on your priorities. When to Visit Greenwich Weekday mornings: The neighbourhood at its best. Park walks without crowds, cafés with available tables, market stalls setting up without the weekend chaos. You can actually appreciate the architecture without fighting through tour groups. Saturday (market days): Busiest day. Greenwich Market is in full swing, streets are packed, riverside pubs are rammed by 2pm. Arrive before 11am or after 4pm to avoid peak crowds. Sunday afternoons: Lovely balance. Market is on but slightly calmer than Saturday. The park is busy with families and dog walkers, giving it that proper neighbourhood feel. Many Londoners make this their Sunday routine. Avoid: Bank holiday weekends (overwhelmed), Saturday afternoons in summer (too crowded to enjoy properly), and late December when Christmas market crowds are at their peak. Best seasons: Spring for park blossoms and longer daylight, early autumn for golden light on those Georgian terraces and fewer tourists. Greenwich Park: The Main Event Let’s start with the obvious. Greenwich Park isn’t just a park – it’s one of London’s eight Royal Parks, covers 180 acres, and has some of the best views in the city. The Classic Walk Enter at the riverside gate (near Cutty Sark), walk up the tree-lined avenue, past the Flower Garden on your left, and climb to the Royal Observatory at the top. The views from here stretch across Canary Wharf, the City, and on clear days you can see right into central London. Time: 20-30 minutes if you walk steadily, longer if you stop to actually enjoy it Difficulty: Uphill all the way but not steep. Paved paths. Best for: Views, first-time visitors, photos that make your friends jealous The Quiet Side Most visitors follow the central avenue. Go left instead, towards the Flower Garden and Wilderness Deer Park. Ancient sweet chestnut trees, fewer people, and if you visit early morning you might see the deer. Time: 30-45 minutes loop Best for: Peaceful walks, nature, avoiding crowds When: Weekday mornings, early Sunday before noon The Long Route Enter at Maze Hill station, walk through the wild eastern side of the park, past the tennis courts and children’s playground, up to the Observatory, then down through the centre. This gives you the full Greenwich Park experience. Time: 1-1.5 hours Best for: Proper walks, seeing the whole park, exercising dogs (on leads in certain areas) Practical Park Details Open: 6am – 6pm (winter), until 9:30pm (summer) Toilets: Near the Pavilion Café and at the Observatory Café: Pavilion Café (good coffee, decent pastries, outdoor seating) Dogs: Welcome but must be on leads near deer and in certain areas Views: Best from the Observatory terrace and the statue of General Wolfe My favourite time: Early morning, 7-8am. You’ll have the place almost to yourself, the light is beautiful, and deer are more visible. The Royal Observatory and Prime Meridian The reason Greenwich exists as a tourist destination. This is where time begins – literally. The Prime Meridian (0° longitude) runs through the courtyard, and every timezone in the world is measured from here. Entry: £18.50 adults (includes Flamsteed House and Meridian courtyard) Worth it? If you’re interested in navigation, astronomy, or history – absolutely. If you just want the Instagram shot standing on the meridian line, you can do that for free in the courtyard outside the buildings. What’s included: Historic telescope rooms, Harrison’s marine chronometers (fascinating if you’re into problem-solving), planetarium shows, and yes, that brass line marking 0° longitude. Best time to visit: First thing when they open (10am) to beat tour groups, or late afternoon when day-trippers have left. Skip it if: You’re not particularly interested in maritime history or astronomy. The courtyard view is free and honestly that’s the main attraction for most people. National Maritime Museum Right at the base of the park, this is one of the best museums
Notting Hill Neighbourhood Guide: A Local’s Perspective on West London’s Most Charming Area
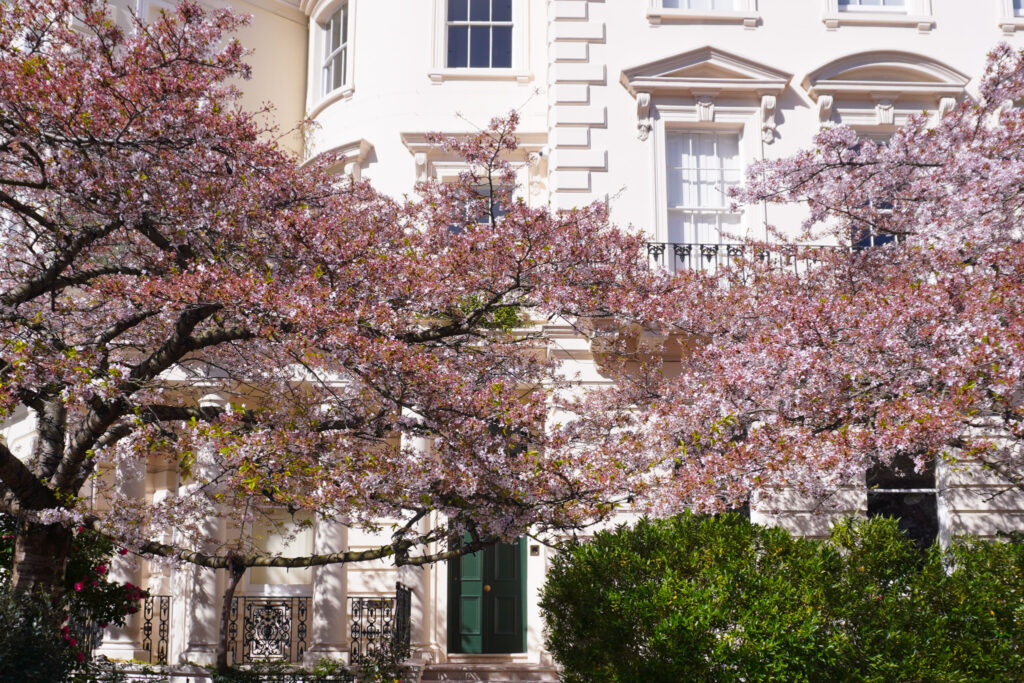
There’s something about Notting Hill that feels different from the rest of London. Maybe it’s the pastel-painted townhouses catching the afternoon light, or the way Portobello Road Market spills onto the pavement every Saturday. Whatever it is, this West London neighbourhood has held onto its village charm despite becoming one of the city’s most sought-after postcodes. I’ve been exploring Notting Hill for years now, and it never quite loses that initial magic. Yes, it’s become more polished since the film made it famous, but if you know where to look, you’ll still find the independent spirit that makes this area special. This isn’t a tourist’s hit-list of Instagram spots – it’s the Notting Hill I’ve come to know through countless Saturday mornings at the market, stolen weekday afternoons in quiet cafés, and those perfect summer evenings when the whole neighbourhood seems to spill onto the streets. Whether you’re planning your first visit or you’re a Londoner looking to rediscover this corner of West London, here’s what you actually need to know about Notting Hill. Getting to Notting Hill By Tube: Notting Hill Gate (Central, Circle, District lines) – the main station Ladbroke Grove (Circle, Hammersmith & City lines) – quieter, northern entrance Holland Park (Central line) – southern edge, near Kensington Best for: Portobello Market and main shopping street Quieter entrance: Come up at Ladbroke Grove for fewer crowds By Bus: Routes 7, 23, 52, 70, 94, and 390 all serve the area. The 52 is particularly useful if you’re coming from Victoria or King’s Cross. Walking from nearby areas: 15 minutes from Paddington Station 20 minutes from Hyde Park 25 minutes from Kensington High Street When to Visit Notting Hill Saturday mornings (8am-1pm): Peak Portobello Market time. Get there before 10am if you want to browse the antiques section without battling crowds. The market officially starts at 9am, but stallholders are setting up from 8am and it’s much quieter. Weekday mornings: The neighbourhood at its most authentic. Cafés filled with locals working on laptops, no queue for the Gail’s sourdough you’ve been eyeing, and Portobello Road as an actual street rather than a tourist attraction. Sunday afternoons: Most shops are closed, but the residential streets are beautiful for wandering. Locals are out walking dogs, the pubs have that perfect lazy Sunday atmosphere, and you get a real feel for what it’s like to actually live here. Avoid: Saturday afternoons after 1pm (market chaos), bank holiday weekends (overwhelmed), and August (peak tourist season). Best seasons: Spring for the wisteria-covered houses in full bloom, early autumn for golden afternoon light on those pastel facades. Portobello Road Market: What You Need to Know Let’s address the main reason most people come to Notting Hill. Portobello Market stretches for about a mile along Portobello Road, but it’s not one market – it’s several markets in one. The Antiques Section (Chepstow Villas to Elgin Crescent) Saturdays only, 9am-6pm This is the famous bit. Vintage jewellery, antique silverware, old cameras, vinyl records, and the kind of curiosities you didn’t know you needed. Quality varies wildly from genuine antiques to tat, but that’s part of the charm. My tip: Most dealers know their stuff, so proper bargains are rare. But if you’re looking for something specific and you visit regularly, you’ll start to recognise the dealers who specialise in your interest. They’re usually happy to chat and far more knowledgeable than a quick Google search. What to look for: Vintage jewellery (especially at the northern end), mid-century ceramics, old Penguin paperbacks, vintage prints and maps. The Food Market (Talbot Road to Lancaster Road) Monday-Saturday, 9am-6pm (Thursday until 1pm) Fresh produce, artisan bread, international food stalls, and some of the best street food in West London. This section runs all week, not just Saturdays. What to get: Gail’s sourdough if you haven’t already tried it, fresh pasta from the Italian deli, seasonal fruit from the greengrocer near Talbot Road, and coffee from any of the stalls—they’re all decent. Lunch here: The Moroccan food stall near Lancaster Road has been there for years. The falafel wraps are excellent and about £6. There’s also a Spanish tapas stall that does proper tortilla. The Fashion and Vintage Clothing (Westbourne Grove end) Fridays and Saturdays, 9am-5pm Less touristy than the antiques section. Vintage Levi’s, retro sportswear, second-hand designer pieces, and a lot of fast-fashion stalls mixed in. Worth it if: You enjoy digging for vintage finds and don’t mind that 80% of stalls are selling the same mass-produced festival clothing. General Market Survival Tips Start at the Notting Hill Gate end and walk north. You’ll hit the good antiques section first when you’re still fresh, and can decide if you want to continue up to the fashion bit. The real treasures are in the permanent shops, not on the street stalls. The antique shops along Portobello Road (especially in the arcade at 290) are open Tuesday-Saturday and often have better quality pieces. Watch your bag. Saturdays get packed, and pickpockets know this. Cafés Worth Your Time Farm Girl (59 Portobello Road) The Australian café that started the whole rose latte trend. Yes, it’s Instagram-famous. Yes, there’s often a queue. But the food is genuinely good—fresh, colourful, and the kind of breakfast you actually want on a Saturday morning. Order: The ricotta hotcakes or the green shakshuka. The coffee’s decent too. Best time: Weekday mornings (9-11am) to avoid the weekend crowd. Price: £12-18 for breakfast Granger & Co (175 Westbourne Grove) Bill Granger’s London outpost. More polished than Farm Girl, slightly less Instagrammable, arguably better food. The corn fritters and scrambled eggs are excellent. Why I like it: Large windows, lots of natural light, and they don’t rush you. Good spot for working if you’re okay with café noise. Best time: Any weekday morning Price: £14-20 for breakfast Gail’s Bakery (Multiple locations on Portobello Road) The London bakery chain that actually deserves the hype. Sourdough bread, excellent pastries, proper coffee. There are three Gail’s in Notting Hill, which tells
The Only Fudgy Dark Chocolate Brownie Recipe You’ll Ever Need
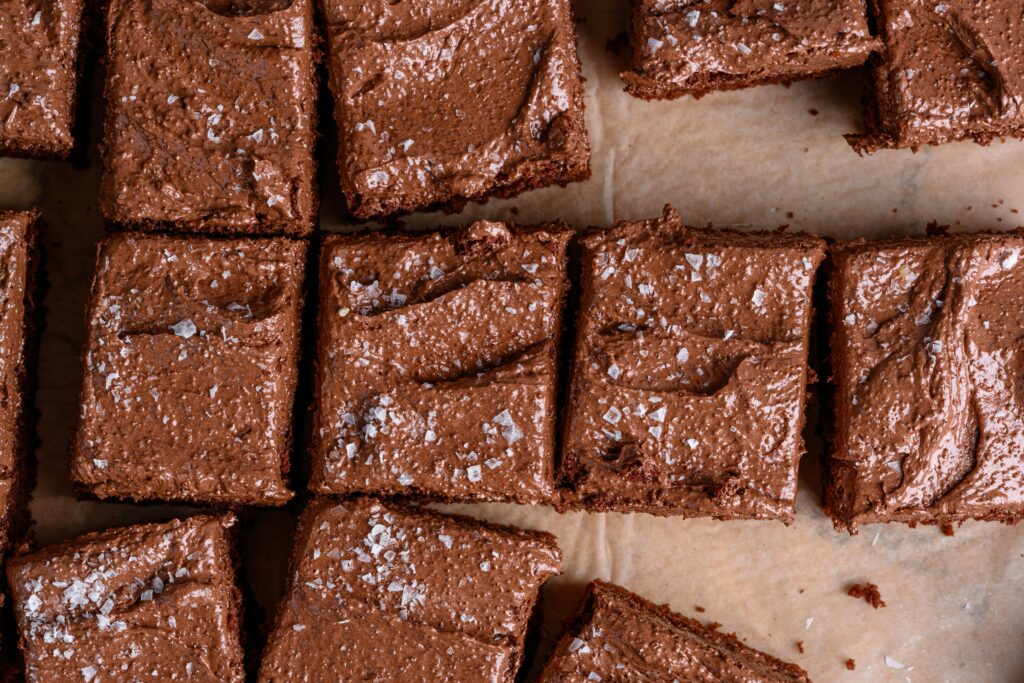
There is a specific kind of magic in a perfect brownie. I’m talking about that paper-thin, crackly top that shatters when you bite into it, giving way to a center so fudgy it’s almost like ganache. As someone with a background in cake decorating here in London, I have tried sooo many brownies. Many viral London “gems” look beautiful on Instagram but fall flat on texture and taste. This recipe is the “Little Black Dress” of my kitchen – classic, reliable, and perfectly styled. The Secret to the “Glossy” Top The secret isn’t just the chocolate – it’s the eggs and sugar. By whisking them until they reach a “ribbon stage” (thick, pale, and voluminous), you’re creating a meringue-like structure that rises to the top in the oven. Don’t skip the whisking time! Ingredients 180g Dark Chocolate: Use the good stuff (at least 70% cocoa). It balances the sugar. 180g Unsalted Butter: High-quality European butter for richness. 3 Large Eggs: Room temperature is best for volume. 250g Caster Sugar: For that perfect structure. 100g Plain Flour: Just enough to hold it together. 45g Cocoa Powder: Sifted, to avoid lumps. Optional (but divine): add a few dollops of your favourite jam or spread. I love using homemade berry compote. The Signature Finish: Choose Your Aesthetic A plain brownie is a snack; a topped brownie is an event. Depending on my mood, I finish these one of two ways. This is where the magic happens. Option 1: The “Cloud” (White Chocolate) For a high-contrast, minimalist look, I top the cooled brownies with white chocolate ganache. The Mix: 150g of white chocolate + 50ml double cream. The Tip: Use a high-quality white chocolate with cocoa butter (not vegetable fat) so it snaps when you bite into it. Option 2: The “Silk” (50% Cocoa Ganache) If I want something indulgent and glossy, I opt for a 1:1 dark chocolate ganache instead The Mix: 100g of 50% cocoa chocolate + 100ml double cream. The Method: Heat the cream until just simmering, pour over the chopped chocolate, let it sit for 2 minutes, then stir until it’s a mirror-like silk. The Look: Moody, rich, and incredibly satisfying. Method The Prep: Preheat your oven to 180°C (160°C Fan). Line a 9″ square baking tray with parchment paper. Melt & Cool: Melt the butter and dark chocolate together (bain-marie or microwave). Set aside to cool to room temperature. The “Mousse” Stage: Whisk the eggs and caster sugar together for 3–5 minutes until the mix doubles in volume and leaves a visible “trail” (the ribbon) for 2–3 seconds. The Gentle Fold: Pour your cooled chocolate mixture over the egg mousse. Use a spatula to fold gently—don’t knock out that air! Sift & Incorporate: Sift the cocoa powder and flour over the mix. Fold again until smooth. The Bake: Pour into the tin and bake for 25–30 minutes. It should have a slight wobble in the center. Leave to cool completely in the tin. The Final Touch: Once the brownie is stone cold, pour over your chosen white chocolate or 50% ganache. Let it set before slicing with a hot knife for those perfectly clean “Instagram” edges. Baking Ahead & Storage If you’re planning ahead, these actually taste better the next day once the flavours have had time to settle. You can keep them in an airtight container at room temperature for up to 4 days, or in the fridge if you prefer them extra chewy (especially with the ganache). They also freeze really well – just wrap the individual squares tightly in parchment and foil. Let me know if you make these.
The Vanilla Cake I’ve Been Making for Years
If you’ve followed me for a while, you’ll know I spent years working as a cake decorator. Celebration cakes, wedding cakes, last-minute orders, early starts, buttercream everywhere. And through all of that, there was one vanilla cake recipe I came back to again and again. I’ve shared bits and pieces of my baking over the years, but this is the first time I’m putting this one on the blog. All my customers commented on how amazing it tastes and the best thing is that it bakes up even layers so you don’t even need to trim the top. My go-to for these measurements is 3 6” layers as they bake up amazingly and give you layers that have the perfect thickness. What Makes this Vanilla Cake Special This isn’t a classic all-butter sponge, and it’s not an oil cake either. It sits somewhere in the middle – using both butter and oil for the best of both worlds. Butter gives flavour and structure Oil keeps the crumb soft and moist for days Sour cream adds richness and a gentle tang that keeps the cake from tasting flat The result is a bakery-style vanilla cake that’s velvety, even-crumbed, and sturdy enough for layering even tall cakes without ever feeling dry or heavy. Ingredients This recipe makes a generous, reliable vanilla cake base, perfect for layering. 300g caster sugar 80ml neutral oil (vegetable or sunflower) 200g unsalted butter, softened 5 large eggs, at room temperature 60g sour cream 300g self-raising flour Method 1. Prep the tins and ovenPreheat your oven to 190°C (170°C fan). Grease and line three 6” cake tins. This recipe works beautifully for layer cakes – just divide the batter evenly between tins. 2. Cream the fats and sugarAdd the sugar, oil and softened butter to a stand mixer fitted with the paddle attachment, or a large mixing bowl if you’re using a hand mixer. Beat on medium-high speed for a few minutes until the mixture looks noticeably lighter and fluffier.This step matters more than people think – you’re building air here, which gives the cake its soft structure. 3. Add the eggsAdd the eggs gradually, mixing well after each addition. The mixture may look slightly split or curdled at this stage – that’s completely normal and won’t affect the finished cake. 4. Fold in the flourSift the self-raising flour directly over the bowl. Mix on the lowest speed or fold in gently by hand until most of the flour is incorporated. Be careful not to overwork it – you want to keep as much air in the batter as possible. 5. Finish with sour creamAdd the sour cream and gently fold or mix until the batter is smooth and evenly combined. 6. BakeDivide the batter evenly between your prepared tins and level the tops. Bake for 22–25 minutes, or until a skewer inserted into the centre comes out clean.If you’re baking multiple layers at once, check them all – ovens can be uneven. 7. Cool properlyLet the cakes cool in their tins for around 15–20 minutes, then carefully turn out onto a wire rack to cool completely before filling or decorating. Decorating & Storing This vanilla cake is a dream to work with. It trims cleanly, stacks well, and holds fillings beautifully – buttercream, fruit, curd, ganache, you name it. Once baked, the sponges can be: Wrapped and stored at room temperature for a day Refrigerated for a couple of days Frozen (wrapped well) for longer storage It actually improves after a short rest, which is exactly why I relied on it so heavily when decorating cakes professionally. I usually bake the cake one day before decorating and store it in the fridge overnight.
Strawberry Shortcake Layer Cake, with a Nod to Paris
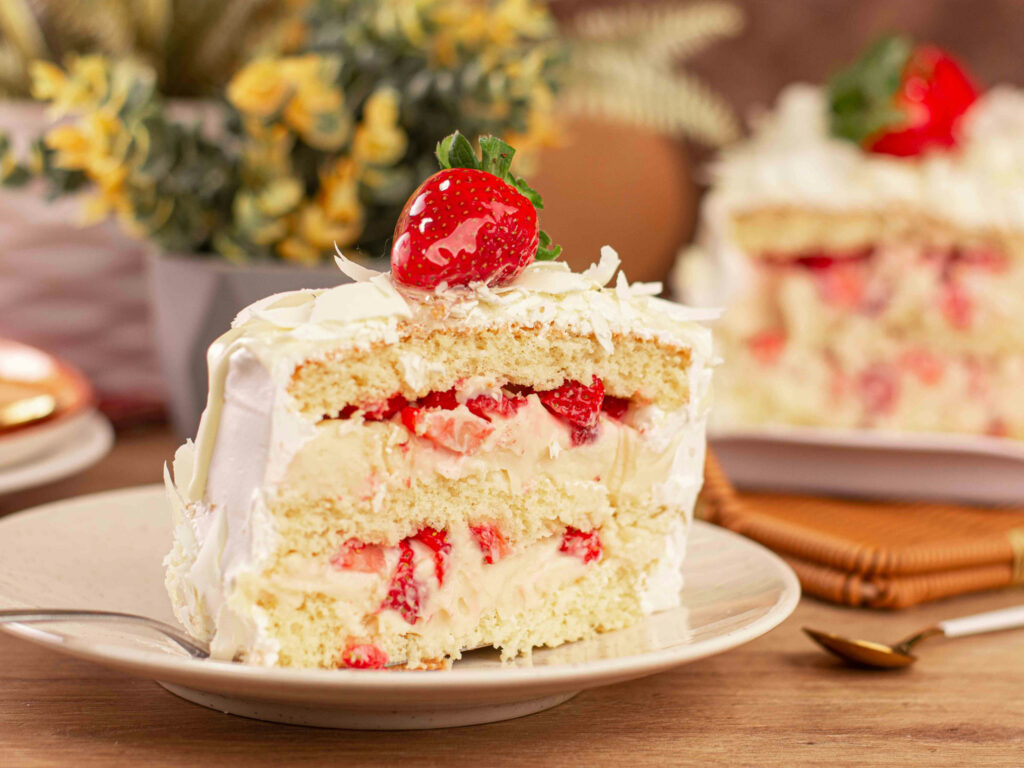
This strawberry shortcake is one of those recipes I’ll never stop making. No matter how many new ideas I bookmark or how many flavour combinations I flirt with, this is the cake I always come back to. It’s familiar in the best way – soft vanilla sponge, fresh strawberries, and whipped cream that’s just sweet enough to feel indulgent without tipping over. It’s also the cake that always makes me think of Paris. Not because it’s French by definition, but because of how strawberries and cream show up there. Walk past a pâtisserie in Paris around Valentine’s Day and you’ll spot le fraisier in the window – neat layers, glossy strawberries, pale cream, quietly beautiful. Romantic without being loud. Special without being heavy. That’s exactly the energy of this cake. I love it for Valentine’s Day because it doesn’t feel themed or performative. There’s no food colouring, no heart shapes, no drama. Just a cake that’s meant to be shared, sliced at the table, and eaten slowly enough to notice how good it actually is. Why I Always End Up Baking This One What makes this strawberry shortcake such a favourite is how easy it is to love. The sponge is light and tender, with real strawberry flavour coming from a reduction rather than anything artificial. The whipped cream keeps everything fresh, and the strawberries do most of the talking. It looks beautiful once it’s assembled, but it’s not precious. You don’t panic when you cut into it. You don’t need a special reason to make it. It’s the kind of cake that disappears quietly, one slice at a time, until suddenly there’s nothing left. Ingredients Strawberry Reduction 450g strawberries (fresh or frozen), hulled 50g caster sugar Vanilla Strawberry Sponge (3 x 6-inch layers) 170g unsalted butter, at room temperature 200g caster sugar 3 large eggs, at room temperature 1½ teaspoons vanilla extract 200g plain flour 1½ teaspoons baking powder ½ teaspoon salt 120ml whole milk 120ml cooled strawberry reduction Whipped Cream Frosting 600ml double cream, cold 90g icing sugar, sifted 1½ teaspoons vanilla extract Filling & Decoration 300–400g fresh strawberries, sliced Method Make the Strawberry Reduction Add the strawberries and sugar to a saucepan and cook over a medium heat until the fruit breaks down and the mixture thickens. This usually takes around 20–30 minutes. Blend until smooth and set aside to cool completely. Prepare the Tins Heat the oven to 170°C fan. Grease and line three 6-inch round cake tins. Make the Cake Batter Cream the butter and sugar until pale and fluffy. Add the eggs one at a time, mixing well after each addition, then stir in the vanilla. In a separate bowl, whisk together the flour, baking powder, and salt. Add this to the batter in two stages, alternating with the milk and strawberry reduction. Mix gently until just combined. Divide the batter evenly between the tins. Bake Bake for 30–35 minutes, until lightly golden and a skewer inserted into the centre comes out clean. Allow the cakes to cool completely before assembling. Whipped Cream Frosting Whip the double cream with the icing sugar and vanilla until soft, stable peaks form. Keep it light — the texture should feel smooth and airy. Assemble Place one sponge layer on a serving plate. Spread over a layer of whipped cream and scatter with sliced strawberries. Repeat with the second layer, then finish with the final sponge, a soft swirl of cream, and strawberries on top.
Pistachio & Vanilla Cake Inspired by a Persian Love Cake
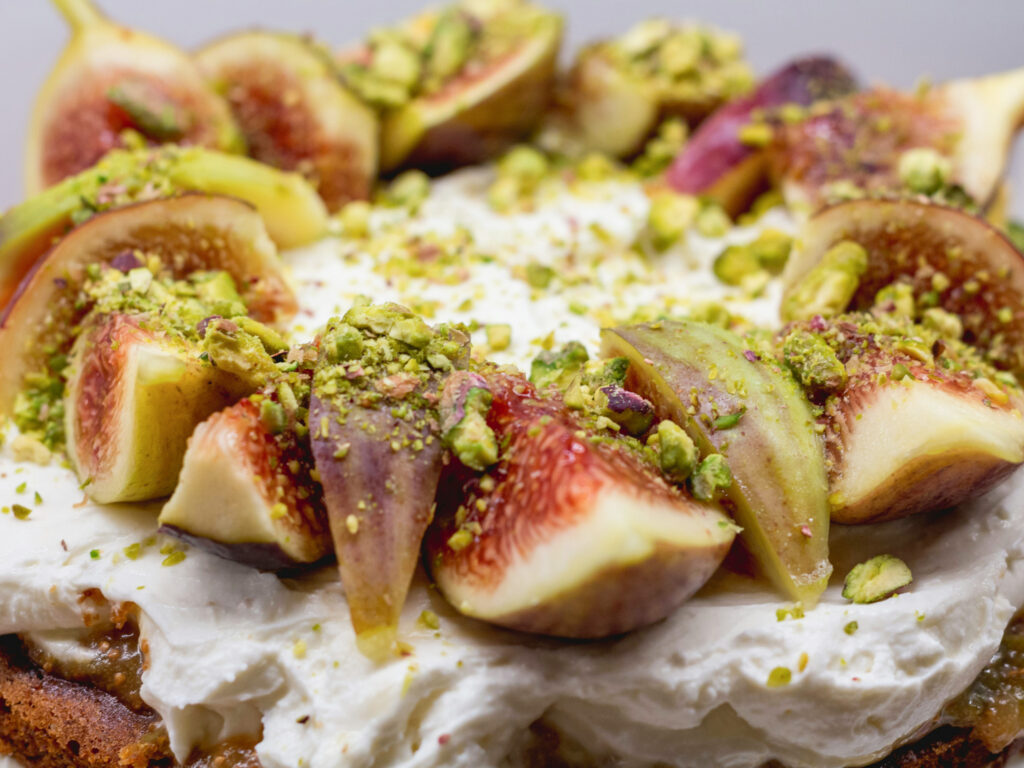
This pistachio and vanilla cake is inspired by a Persian love cake, making it a natural fit for Valentine’s Day baking. It takes cues from the original’s use of ground almonds, citrus zest, warming spices, and syrup-soaked crumb, but shifts the flavour profile away from floral notes. Instead, this version focuses on vanilla, orange zest, cardamom, and pistachios for a flavour that feels warm, balanced, and easy to enjoy. I’ve never really been a big fan of rose water in baking, so this recipe skips it entirely. The result is a cake that works well as a Valentine’s dessert, while still being versatile enough to make again for birthdays, dinners, or any occasion that calls for a layered cake without heavy icing. Designed as a three-layer 6-inch cake, this version uses plain flour instead of semolina, giving the layers a little more structure while keeping the crumb moist and tender thanks to ground almonds, yoghurt, and syrup. What Is a Persian Love Cake? Persian love cake is a Middle Eastern-inspired almond cake, typically made with ground almonds, citrus zest, and warming spices such as cardamom, then soaked in syrup after baking. It’s known for its dense yet moist texture and its aromatic flavour, which often includes floral notes like rose water. This recipe isn’t a traditional Persian love cake. Instead, it’s a layered cake inspired by those core flavours and techniques – the use of almonds, citrus, spice, and syrup – adapted into a format that stacks well and leans towards a more familiar vanilla-led profile rather than floral flavours. Why This Version Works Well as a Layer Cake Plain flour gives structure for stacking Ground almonds keep the crumb moist Pistachios add texture without weighing the cake down The syrup keeps the layers soft for days The flavour profile suits Valentine’s baking without being overly sweet If you make this, I’d love to know how you get on – especially if it becomes part of your Valentine’s plans. Pistachio & Vanilla Cake (Inspired by a Persian Love Cake – 3 × 6-inch Layers) Makes: 3 × 6-inch cake layersOven: 170°C fan / 190°C conventional Ingredients For the cake layers 180g ground almonds 110g plain flour 2 tsp baking powder ½ tsp bicarbonate of soda 1½ tsp ground cardamom Zest of 2 oranges 180g unsalted butter, softened 220g caster sugar 4 large eggs, at room temperature 2 tsp vanilla extract 180g Greek yoghurt 120g pistachios, finely chopped For the syrup 180ml water 150g caster sugar Juice of 1 orange 1 tsp vanilla extract To finish Chopped pistachios Icing sugar Method 1. Prepare the tins Grease and line the bases of three 6-inch round cake tins. Preheat the oven to 170°C fan. 2. Mix the dry ingredients In a large bowl, whisk together the ground almonds, plain flour, baking powder, bicarbonate of soda, cardamom, and orange zest. 3. Cream the butter and sugar Beat the butter and caster sugar until pale and fluffy. This step helps create even, tender layers. 4. Add the eggs and vanilla Add the eggs one at a time, beating well between each addition. Stir in the vanilla extract. 5. Combine Fold the dry ingredients into the butter mixture in two additions, alternating with the Greek yoghurt. Mix gently until just combined, then fold through the chopped pistachios. 6. Bake Divide the batter evenly between the prepared tins and level the tops. Bake for 22–25 minutes, until lightly golden and a skewer inserted into the centre comes out clean. 7. Make the syrup While the cakes bake, add the water, sugar, and orange juice to a small saucepan. Simmer gently for 6–8 minutes until slightly reduced. Remove from the heat and stir in the vanilla extract. 8. Syrup the layers As soon as the cakes come out of the oven, prick each layer all over with a skewer and spoon over the warm syrup. Leave the cakes to cool completely in their tins. Assembling the Cake Once fully cooled, stack the layers with: lightly sweetened whipped cream mascarpone or thick Greek yoghurt Finish with chopped pistachios and a dusting of icing sugar. Storage Store the assembled cake in the fridge for up to 3 days. Bring to room temperature before serving.Unfilled layers can be wrapped and stored at room temperature for 2 days.
Bridgerton’s England: Visit Every Location from the Netflix Series
The ballrooms are buzzing, the gossip sheets are flying, and somewhere Lady Whistledown is sharpening her quill. Since Bridgerton swept onto Netflix screens in 2020, over 82 million households have been captivated by the Regency-era romance, scandal, and sumptuous settings. With Season 4 arriving in early 2026, there’s never been a better time to step into the world of the Ton. Here’s the thing that makes Bridgerton different from most period dramas: you can actually visit nearly every location. From the wisteria-draped Bridgerton family home to the ballrooms where Daphne and Simon danced, from the Featheringtons’ colourful townhouse to Queen Charlotte’s regal palace – these aren’t sets locked away in studios. They’re real English estates, museums, and historic sites scattered across England, many open to the public year-round. We’ve compiled the complete guide to every major Bridgerton filming location, with practical visiting information, insider tips, and details on how to plan your own Regency-era tour of England. Bath: The Heart of Bridgerton’s “London” Bath stands in for much of Regency London in Bridgerton, and honestly, it’s perfect casting. The UNESCO World Heritage city’s honey-coloured Georgian architecture and elegant crescents look like they were designed specifically for period dramas. Those pale limestone buildings you see throughout the series? That’s Bath stone, and it’s remarkably easy to spot once you know what you’re looking for. The very first scenes of Series 1 are three shots of Bath in the sunshine, setting the atmosphere for the entire show. You see elegant members of the ton promenading with parasols along Alfred Street, exchanging greetings on the Royal Crescent, and strolling down Bath Street between two colonnades. The city becomes a character itself. No. 1 Royal Crescent: The Featherington Family Home The most iconic location in Bath has to be No. 1 Royal Crescent, which serves as the exterior of the Featherington family home throughout all three seasons. In the show, this is their London townhouse in the fictional Grosvenor Square, but the real building is the first house in Bath’s most famous street, built between 1767 and 1775. The production team had some fun with this one. They added stone lions flanking the entrance, decorative pediments, and rosettes to reflect the Featherington family’s taste for opulence and their social-climbing aspirations. Through CGI magic, they made it appear as if the Bridgerton home sits directly opposite across a London square, though in reality, that’s Ranger’s House in Greenwich, over 100 miles away. Filming here takes about two to three days per series, and the Royal Crescent gets closed to traffic each time, generating enormous local interest. You can imagine the crowds gathering to watch the cast in full Regency costume climbing in and out of horse-drawn carriages. The beautiful news for visitors is that No. 1 Royal Crescent is now a museum, meticulously decorated and furnished as it would have been in the late 1700s. You can explore both the upstairs rooms where a Georgian family would have lived and the downstairs servants’ quarters, getting a genuine feel for Regency-era life. The museum even offers private Bridgerton-themed tours from £17 per person where guides share behind-the-scenes stories and production details. Just email them to book. The entire Royal Crescent itself is worth walking along. That sweeping curve of 30 Grade I listed terraced houses overlooking Royal Victoria Park is one of the finest examples of Georgian architecture in Britain, and you can wander freely across the lawn in front, imagining yourself promenading with the rest of high society. Abbey Green: Where Fashion and Gossip Collide Tucked away near Bath Abbey lies Abbey Green, a picturesque cobbled square with an irregular shape and a tree at its centre. This location was used heavily in Series 1 as the backdrop for shopping trips and strolls through London, often with added market stalls for atmosphere. The real gem here is The Abbey Deli, which was transformed into the Modiste dress shop owned by the infamous Madame Delacroix. The production team filmed both inside and outside this Grade II listed building with its traditional double-fronted bay windows. In the show, the Modiste is where the characters have their gowns fitted and where some of the juiciest gossip gets exchanged. Today, you can visit The Abbey Deli for coffee and sandwiches, and they’ve embraced their Bridgerton fame by selling themed merchandise alongside their regular offerings. It’s open daily, and there’s something rather delightful about having tea in the exact spot where Penelope and her sisters were fitted for ball gowns. The Assembly Rooms: Where the Ton Gathers Georgian Bath’s social epicentre was the Assembly Rooms, and Bridgerton made full use of these spectacular spaces. The Tea Room and Ball Room served as backdrops for the lavish ball scenes where characters dance under the watchful eye of society whilst The Ton passes judgement on every glance and gesture. Built in the 1770s for public social functions, the rooms were bombed during the Second World War and later rebuilt. What makes them special are the original Whitefriars crystal chandeliers that were actually lowered from the ceiling to feature more dramatically in the ballroom scenes. Imagine the logistics of that. The Assembly Rooms are owned by the National Trust and at the time of writing are closed for redevelopment, with plans to reopen as a tourist attraction in early 2027. Before then, they may open for limited visiting, so it’s worth checking the National Trust website if you’re planning a trip. The Holburne Museum: Lady Danbury’s Grand Mansion The impressive facade of the Holburne Museum serves as Lady Danbury’s residence in the series. This Grade I listed building was originally designed as a hotel in the late 19th century and is actually Bath’s first art gallery. The elegant exterior and gardens you see on screen are the real deal. The museum features prominently in Season 1, Episode 4, when Simon Basset attends a gathering hosted by Lady Danbury – a pivotal moment in his relationship with Daphne. In Season 3, Lady Danbury
The Complete Guide to the Cotswolds: England’s Most Beautiful Countryside
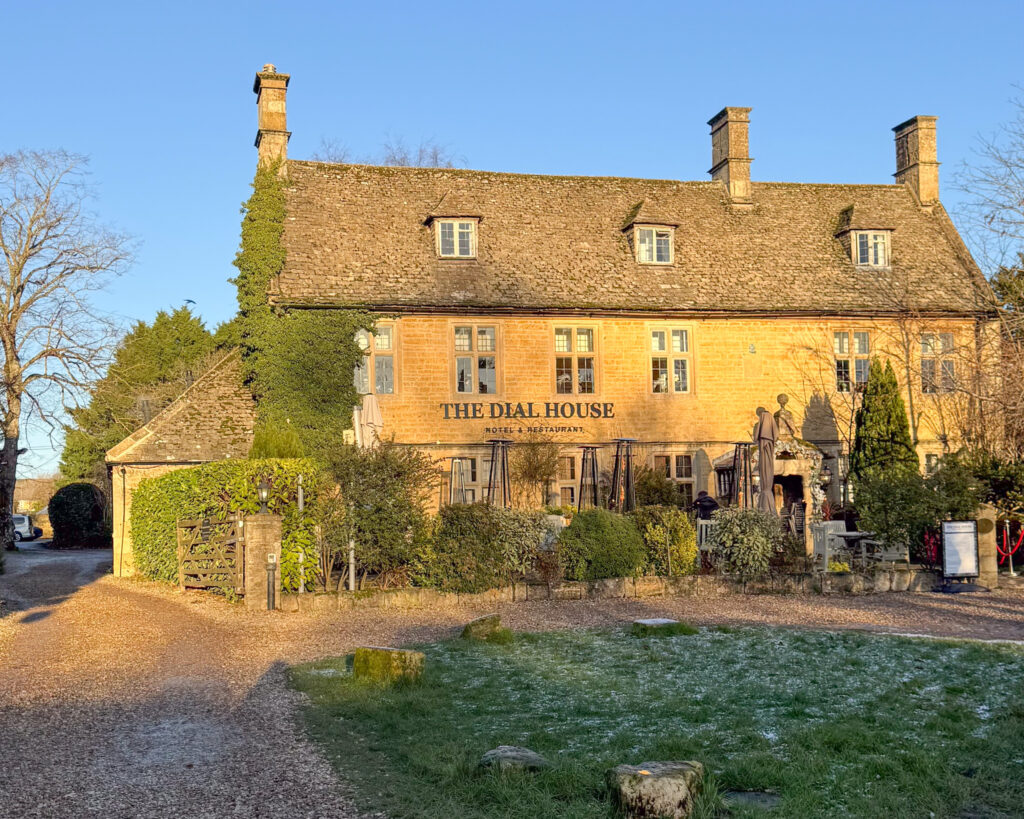
There’s a reason the Cotswolds attracts 38 million visitors every year. This isn’t just England’s largest Area of Outstanding Natural Beauty – it’s the England of your imagination made real. Honey-coloured stone villages that look lifted from storybooks. Rolling hills divided by miles of ancient dry-stone walls. Market towns where wool merchants built their fortunes in the Middle Ages. Thatched cottages with roses climbing the walls. Gentle valleys where time genuinely seems to move slower. We’ve spent years exploring the Cotswolds, returning in every season, discovering villages that don’t make the guidebooks alongside the famous names everyone visits. This is our complete guide – everything you need to know about visiting one of England’s most enchanting regions, from the practical details to the hidden corners that make the Cotswolds special. Where Are the Cotswolds? The Cotswolds covers nearly 800 square miles of south-western and west-central England, running roughly 90 miles long and 25 miles across. The region stretches from just south of Stratford-upon-Avon in the north down to Bath in the south, with Oxford marking its eastern edge. The area spans six English counties, though most of it sits in Gloucestershire and Oxfordshire. The boundaries also extend into parts of Warwickshire, Worcestershire, Wiltshire, and Somerset. This can make it slightly confusing to define exactly where “the Cotswolds” begins and ends – some people go by the official Area of Outstanding Natural Beauty boundary, others group together places sharing similar honey-stone architecture and rolling landscape. The highest point is Cleeve Hill at 330 metres, just east of Cheltenham. The region’s spine runs southwest to northeast, with its northern and western edges marked by steep escarpments down to the Severn Valley – a dramatic landscape feature known as the Cotswold Edge. What makes the Cotswolds distinctive is its geology. The bedrock is Jurassic limestone, created around 170 million years ago when this area lay under a warm, tropical sea. This limestone, when quarried and used as building material, creates that characteristic honey-gold colour you see throughout the region. The same geology creates rare limestone grassland and supports the ancient beech woodlands that cover roughly 10% of the area. The region was designated an Area of Outstanding Natural Beauty in 1966, making it England’s largest protected landscape of this type. In November 2023, all AONBs were rebranded as “National Landscapes,” though the legal designation remains AONB. Getting to the Cotswolds The Cotswolds’ location northwest of London makes it remarkably accessible. Most visitors can reach the region within a couple of hours by train or car from major cities. By car: The M4 and M5 motorways provide excellent access, connecting to a well-established local road network. Main roads through the area include the A46 (Bath-Stroud-Cheltenham), A419 (Swindon-Cirencester-Stroud), A429 (Cirencester-Stow-on-the-Wold-Moreton-in-Marsh), and A40 (Oxford-Burford-Cheltenham). Many of these follow ancient routes, some laid down by the Romans. By train: The region is bounded by two major rail routes – the Bristol-Bath-London high-speed line to the south, and the Bristol-Birmingham main line to the west. Moreton-in-Marsh is now accessible by train from London Paddington, making it an excellent starting point. Other towns with good rail connections include Cheltenham, Gloucester, and Stroud. From London: The Cotswolds makes an excellent day trip from London (though we’d recommend staying longer if possible). It’s roughly 90 miles and about two hours by car or train to the nearest parts of the region. The reality is that whilst it’s possible to explore the Cotswolds without a car using buses and trains, having your own transport gives you far more freedom to discover the smaller villages and stop wherever catches your eye. When to Visit the Cotswolds The Cotswolds is beautiful year-round, but each season offers something different. Spring (March-May): Gardens burst into bloom, lambs frolic in the fields, and the countryside turns vivid green. It’s one of the best times for visiting gardens and walking, though you might encounter occasional spring showers. The villages are less crowded than summer, and accommodation is easier to find. Summer (June-August): Peak season brings warm weather, long daylight hours, and the countryside at its most lush. This is when the Cotswolds gets genuinely busy, particularly in the famous villages. Expect crowds in places like Bourton-on-the-Water and Bibury, and book accommodation well ahead. The upside is that everything is open, gardens are at their best, and you have maximum daylight for exploring. Autumn (September-November): Many consider this the best time to visit. The leaves turn golden and amber, ivy creeps red across honey-stone buildings, and the crowds thin out after the school holidays end. The weather remains mild through September and October, and the autumn light is spectacular for photography. You’ll avoid peak tourist numbers whilst still enjoying pleasant weather. Winter (December-February): The Cotswolds at its quietest and, on crisp clear days, absolutely magical. Yes, it’s cold, and some attractions have reduced hours or close entirely. But a winter walk through a Cotswolds village dusted with snow, followed by lunch in a pub with a roaring fire, is genuinely special. The days are short, so plan carefully to make the most of limited daylight. Christmas markets and festive events add charm to December visits. The Most Beautiful Villages and Towns With hundreds of villages to choose from, where do you start? These are the Cotswolds’ most beloved destinations, plus some lesser-known gems. The Famous Four Bourton-on-the-Water: Often called the “Venice of the Cotswolds,” though that’s perhaps overselling it. The River Windrush flows through the centre of the village, crossed by low stone bridges, with willow trees overhanging and ducks paddling about. It’s undeniably pretty, but also the most touristy village in the Cotswolds. Visit early morning or late evening to avoid the worst crowds. The village hosts an annual river football match, which is as eccentric as it sounds. Bibury: William Morris called it “the most beautiful village in England,” and Arlington Row – a terrace of 17th-century weavers’ cottages – is one of the most photographed locations in the Cotswolds. The cottages sit beside the River
5 Days in Palermo: A Complete Guide to Sicily’s Vibrant Capital

Palermo isn’t just Sicily’s capital – it’s a living, breathing tapestry of cultures that have shaped this island for millennia. After spending five incredible days exploring its chaotic streets, bustling markets, and hidden gems, I can confidently say this city will capture your heart and challenge your senses in the best possible way. Getting There and Settled Flying into Palermo Falcone Borsellino Airport couldn’t be more straightforward. The airport sits about 35 kilometres from the city centre, and getting into town is refreshingly simple. The Prestia e Comandè bus runs regularly throughout the day, taking roughly 50 minutes to reach the central station area. Tickets cost around €6 and can be purchased directly from the driver or at the airport desk. Alternatively, taxis are readily available, though expect to pay around €35-45 depending on traffic and your exact destination. Where to Stay: Stepping Back in Time We were incredibly fortunate to stay in the historic centre in a building that quite literally breathed history – over 1,000 years of it. Walking through those ancient wooden doors, originally designed for horses to enter the central courtyard, felt like stepping directly into medieval Palermo. The thick stone walls and traditional Sicilian architecture provided the perfect backdrop for our adventure, whilst keeping us right in the heart of the action. The location proved absolutely perfect. Within a five-minute walk, we were surrounded by some of Palermo’s most atmospheric bars and restaurants, yet the building’s historic walls provided a peaceful retreat from the city’s vibrant street life. Our host deserves special mention – they transformed our stay from good to extraordinary. Armed with insider knowledge and genuine enthusiasm for their city, they provided us with a local’s perspective that no guidebook could match. From recommending hole-in-the-wall trattorias to sharing the best times to visit markets, their advice proved invaluable throughout our stay. The Heart of Palermo: Its Incredible Markets Mercato del Capo Starting with perhaps the most authentic of Palermo’s markets, Mercato del Capo winds through narrow streets in the historic centre like a living organism. This isn’t a market designed for tourists – it’s where locals do their daily shopping, and that authenticity shows in every interaction. The vegetable stalls burst with seasonal produce: blood oranges so sweet they taste like dessert, fennel bulbs the size of your head, and tomatoes that put anything you’ve tasted elsewhere to shame. The vendors here are characters in their own right – expect theatrical displays of their wares, passionate discussions about the best cooking methods, and the occasional free sample if you show genuine interest. Don’t miss the meat section, where whole animals hang alongside more familiar cuts, and skilled butchers work with precision that borders on artistry. The fish stalls offer the day’s catch from the Tyrrhenian Sea, with vendors happy to explain the best preparation methods for unfamiliar species. Mercato della Vucciria Once Palermo’s most famous market, Vucciria has evolved into something quite different from its historical heyday. During the day, it maintains its traditional market atmosphere with fruit and vegetable stalls, but come evening, it transforms into a buzzing nightlife district. The daytime market focuses heavily on street food – this is where you’ll find some of the city’s best arancini, those glorious stuffed rice balls that come in countless varieties. Try the classic ragù version, but don’t leave without sampling the spinach and mozzarella or the surprising but delicious pistachio variations. The evening transformation is worth experiencing. As the traditional vendors pack up, bars and street food stalls take over, creating an atmospheric open-air dining experience that feels uniquely Palermitan. Mercato di Ballarò Arguably the most vibrant of Palermo’s markets, Ballarò stretches through several streets and feels more like a festival than a shopping experience. The energy here is infectious – vendors call out their wares in a mixture of Italian, Sicilian dialect, and theatrical gestures that transcend language barriers. This is the place for serious food exploration. The prepared food stalls offer incredible variety: sfincione (Sicilian pizza) topped with tomatoes, onions, and anchovies; panelle (chickpea fritters) served in crusty bread; and cazzilli (potato croquettes) that make perfect street snacks. The spice stalls here are particularly impressive, offering everything from local Sicilian oregano to North African ras el hanout, reflecting the island’s complex cultural history. Many vendors are happy to explain the origins and uses of unfamiliar spices, making it an educational experience as well as a sensory one. Mercato delle Pulci (Flea Market) For a completely different market experience, the weekend flea market near Palazzo Reale offers treasure hunting of a different sort. Antique dealers spread their wares across cobblestones, offering everything from vintage postcards of Sicily to genuine antique ceramics. This market requires patience and a good eye – genuine treasures hide amongst tourist tat, but that’s part of the fun. Even if you don’t buy anything, it’s fascinating to see the eclectic mix of items that reflect Palermo’s layered history. Day Trip to Cefalù: Coastal Beauty Within Reach One of our most rewarding experiences was a day trip to Cefalù, the stunning coastal town that sits about an hour away by train. The journey itself proves half the fun – regional trains depart regularly from Palermo Centrale, and the route hugs the spectacular Sicilian coast for much of the journey. Tickets cost around €5 each way and can be purchased at the station. The trains are comfortable and reliable, though they maintain a relaxed Sicilian pace that’s part of the charm rather than a frustration. Book your seats in advance during peak season, but outside summer months, you can usually just turn up and travel. The coastal views during the journey are spectacular, offering glimpses of small fishing villages, dramatic cliffs, and endless Mediterranean blue. Keep your camera ready – the stretch between Palermo and Cefalù provides some of the most photogenic coastline in Sicily. Cefalù itself deserves its own detailed exploration (which we’ll cover in our next post), but as a day trip destination, it offers the